To email bills or documents to your clients, you need to check your setup in Outlook and configure a valid email address for:
-
clients
-
company (if sending on behalf of a company email address)
-
employees.
You can access the email setup either via the Bills Ready to Print window or from the Mail Merge Wizard.
You must use MYOB certified versions of Microsoft Office. See our system requirements page.
To set up your Send via email window via Bills Ready to Print
-
Open Outlook.
-
In the toolbar, click the Billing drop-down and choose Bills Ready to Print.
-
Click Search.
-
Click the checkbox for a client who has an email address displayed in either the Email or Is Invoice Email column.
-
On the Tasks bar, click Send via Email.
-
Ensure you have created your
Creating a new email templatefor emailing invoices, debtor statements or other documents.
In the Email account to be sent from section:-
The Email account column is blank the first time you come into this screen.
-
(AE) - You can scroll through the Company column to see the list of companies assigned to the contacts you have selected if you have more than 1 configured.
-
To select the email account, click the Email account drop-down. A separate email can be assigned for each company in the list.
-
Emails in this list are retrieved from your Microsoft Outlook profile.
-
We’ll remember the most recent email you selected.
-
You can use the Configure a shared or Delegate mailbox to configure your mailbox settings.

-
-
Either:
-
-
To send your bills, click Finish.
-
If you're not ready to proceed with the email process, click Cancel.
-
The email address you use for sending emails is taken from your Outlook profile. Once the email details are filled out, we'll remember them for next time.
For Document Manager (DM) sites, the approval workflow requires the personal email account to be set up under Employees > Personal tab.
To set up your Send via email window via the Mail Merge Wizard
-
Open Outlook.
-
In the toolbar, click Contacts.
-
Click the checkbox for a client which has an email address displayed.
-
On the Tasks bar, click Mail Merge Wizard.
-
Click the checkbox for a client who has an email address displayed in either the Email or Is Invoice Email column.
-
Select Email as the mail merge method.
-
Click Next.
-
Either:
-
select an email template, or
-
to create an email template, click Creating a new email template.
-
-
Click Next.
-
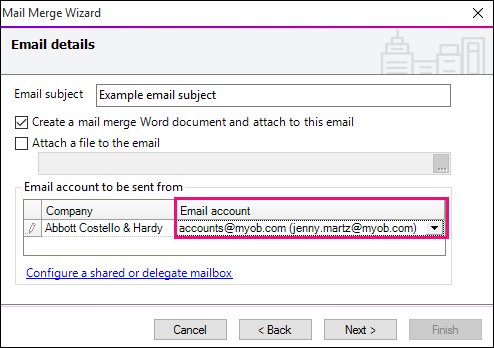
In the Email account to be sent from section:
-
The Email account column is blank the first time you come into this screen.
-
(AE) - You can scroll through the Company column to see the list of companies assigned to the contacts you have selected if you have more than 1 configured.
-
To select the email account, click the Email account drop-down. A separate email can be assigned for each company in the list.
-
Emails in this list are retrieved from your Microsoft Outlook profile.
-
We’ll remember the most recent email you selected.
-
You can use the Configure a shared or Delegate mailbox to configure your mailbox settings.
-
-
Either:
-
To continue with the mail merge, click Next, make your selections and click Finish.
-
If you're not ready to proceed with the email process, click Cancel.
-
The email address you use for sending emails is taken from your Outlook profile. Once the email details are filled out, we'll remember them for next time.
For Document Manager (DM) sites, the approval workflow requires the personal email account to be set up under Employees > Personal tab.
To configure a shared or delegate mailbox (if required)
The selected email address is validated against your email profile. For example, if you have selected to send bills or documents from the Company email address, but your email profile has not been given access to that email address, then you will not be able to email bills or documents using that email address.
-
In Shared mailbox/On behalf of, enter the name of a shared mailbox or delegate email address.
-
Click the Send using drop-down and select the authorised email address.

-
Click OK. The entry is saved.
-
Click the Email account drop-down and select the shared mailbox.
To check if your email account is authorised, press [F1] in Outlook.