Disable your anti-virus / malware program before running the install.
Ensure your regional settings for format and location are set to Australia or New Zealand (depending on your location).
Make sure that you have internet access.
Allow sufficient time for installation. It may take more than an hour to complete.
To ensure that your database is upgraded correctly, you MUST reboot the computer which has your existing MYOB AO database.
Make sure that your Windows login has administrator rights when performing the installation.
Document Manager preparations
Required servers
You will need to identify the servers in your practice. The servers may be on one machine or located separately.
Servers:
The Practice ManagerApplicationServer is where Practice Manager is installed. Document Manager installs new software components in the DEPLOY directory on that server.
The File StoreServer is where Document Manager stores documents such as Microsoft Word and Excel, email and PDF documents. This secure directory may only be accessed by the Administrator and must have ample storage. If your File StoreServer is on the same machine as the application server the configuration process commences automatically. If not, after this installation you will need to log onto the File Store server, browse to the shared directory on the application server and run the DM_Config.exe file on your file store server.
The SQL Server is the location of your Practice Manager database
We recommend that the SQL Server is on the same machine as the File Store server.
Location of Document Manager
By default, Document Manager is installed in the Accountants Office deploy directory C:\MYOBAO\AOSQL\Central\Deploy.
Details of your document file store
Identify which Accountants Office database will be associated with the file store.
By default, the Document Manager File Store Service is installed in C:\Program Files\MYOB\Knowledge Management\DMFSService\.
The file store location is a local folder, not a network folder, for example, C:\MYOB\Data\DMFS_AODB1.
The default port number used for the DMFS service is 4001.
Details of your indexing service
By default, the Document Manager indexing service is installed in C:\Program Files\MYOB\Knowledge Management\DMIndexingService\.
The default port number used for the indexing service is 4002.
Other things to consider
If you're performing a network installation, make sure that the selected location is accessible from each workstation on your network.
The Document Manager installation will set default values for the interrelated components it uses. We recommend that you use the defaults as far as possible but recognise the need for these values to be customised. If you have a system administrator they can advise you on any changes that need to be made.
The following table is provided to assist you in recording changes to default values because these values will be required during future software upgrades.
If you already have MYOB AO installed, use the instructions for Upgrading your existing MYOB AO.
The MYOB AO installation wizard will guide you through the installation process.
Main installation
You must run the installation on the computer that will store your MYOB AO database. If you have a network this is usually your server. See What is my system setup? for more information on your system setup.
Download the MYOB AO 2020.1 (5.4.36.144) - Full Install file from my.MYOB.
Exit all programs and reboot the computer you are going to install MYOB AO on to ensure a clean environment.
Log on to the computer as the administrator.
If the installation applies to both Australia and New Zealand, you will see the Regional Selection screen. Select the region that applies to you so the correct software for your region is installed and click Next. The Welcome - Licence Agreement window opens.
At the bottom of the installer window there is a link to the release notes.
Read the Licence Agreement carefully, select I have read and accept the licence agreement then click Next.
Click Install Now to start the installation.
The installation may take more than an hour to complete. Make sure that you have allocated enough time for the installation.
If you are running the MYOB AO Full Install, you may see this window:
If you click Yes, Microsoft SQL Server 2014 Service Pack will be installed, if you click No the install will end.
If the SQL installation fails, you’ll need to manually install the SQL server service, see Installing SQL Server 2014 Service Pack 2 manually below:
A dialog appears indicating that you may receive an Open File - Security Warning message when opening MYOB AO. Click OK.
When the MYOB AO installation is complete, click Finish.
If you’re using a proxy server you don’t need to change the ClientFrameWork.exe.config file in the server Deploy folder see Proxy Server Information.
If you are prompted to restart your computer, make sure the Restart now box is ticked before clicking Finish.
If you disabled your anti-virus / malware programs before you installed MYOB AO, re-enable it before continuing.
If you have a network setup and you are running MYOB AO on more than one computer, perform a Workstation installation to update the local deploy folder.
Instructions on how to log into MYOB AO are launched in a browser window or see Logging in to MYOB AO.
Installing SQL Server 2014 Service Pack 2 manually
If you received an error that the SQL installation failed:
Locate and run \Software\SQL2014\SQL_2014_SP2_EXPRWT_x86_ENU.exe.
Select Upgrade from SQL Server 2005, SQL Server 2008, SQL Server 2008 R2 or SQL Server 2012: Click to enlarge
In Instance to upgrade, select MYOBACCT, then click Next: Click to enlarge
The install is complete, click Close to exit.
Run the MYOB AO install.
How do I know if the SQL Server Service Pack has successfully upgraded?
Open SQL Server Management Studio.
Locate the installation folders (for example, IR2012\MYOBDATA)
Click New Query in the top left hand corner Type “Select @@Version”
Click Execute. You should see ‘SQL Server 2014 (SP2)’ in the Results tab at the bottom of the screen.
Workstation installation
An upgrade can either be done by Auto update when you open MYOB AO or you can run a Manual update.
There are changes to workstation installations as part of this release, refer to workstation install changes for further information.
If you see this screen, automatic workstation updates have been disabled for your practice, so you should run a Manual update on your workstation.
Auto update
If you see this screen when you open MYOB AO, automatic workstation updates are enabled at your practice:
Click Yes to update your workstation automatically.
Click No and you will need to run a Manual update (see below).
Manual update
The workstation updates for all MYOB AO products are combined into one file for this installer. The file is located at \MYOBAO\AOSQL\WorkstationInstall\setup.exe.
After the server installation, a manual workstation update should be performed on all workstations that you want to have access to the latest MYOB AO products, in the following instances:
if you’re installing MYOB AO on a new workstation for the first time.
if the workstation link is not operational.
if the automatic update can’t proceed and you’re prompted to run a manual install.
Instructions
Ensure that you have read the information in General preparations.
Log into the workstation as administrator.
Navigate to \MYOBAO\AOSQL\WorkstationInstall\setup.exe on your server or computer where the server installation was performed.
Double-click setup.exe. The Licence Agreement window opens.
Read and accept the Licence Agreement by selecting the I have read and accept the licence agreement checkbox.
Click Next. The Ready to Install window opens.
Click Install Now. The Installation Progress window opens.
If you receive the message, If you receive an “Open file security” warning message when opening MYOB Accountants Office Workstation, it is recommended that you restart your computer, click OK.
On completion, the Installation Complete window opens.
Click Finish. The workstation installation is complete.
To run a workstation install
Open Windows Explorer and navigate to the following path: \\servername\MYOBAO\AOSQL\WorkstationInstall where servername is the name of the server or computer on which you performed the main installation. This is the computer where the MYOB AO application is stored.
The file path specified above may be different if you chose a Custom Installation and selected a non-standard location for the server installation in Step 13 of the Main installation. Browse to the location where you installed MYOB AO on the server to find the AOSQL folder.
Document Manager installation
You’ll be prompted for the following information once the main installation of MYOB AO is complete:
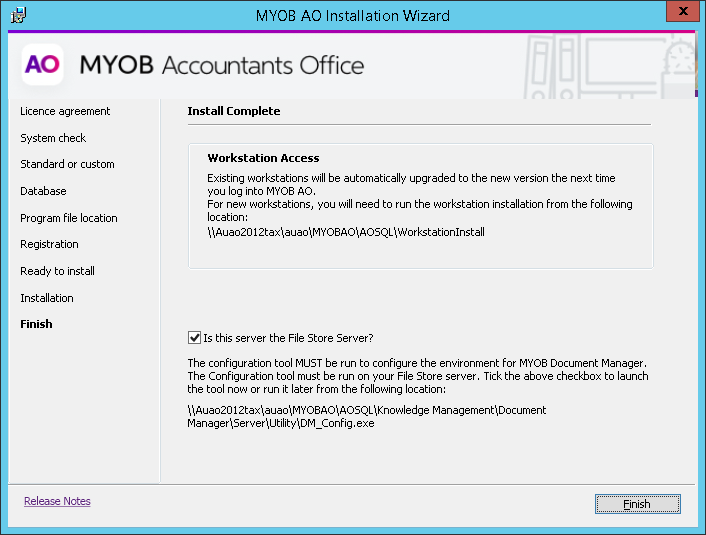
If the server you are installing on is your document file store server
Select the Is this server the File Store Server? checkbox, then click Finish
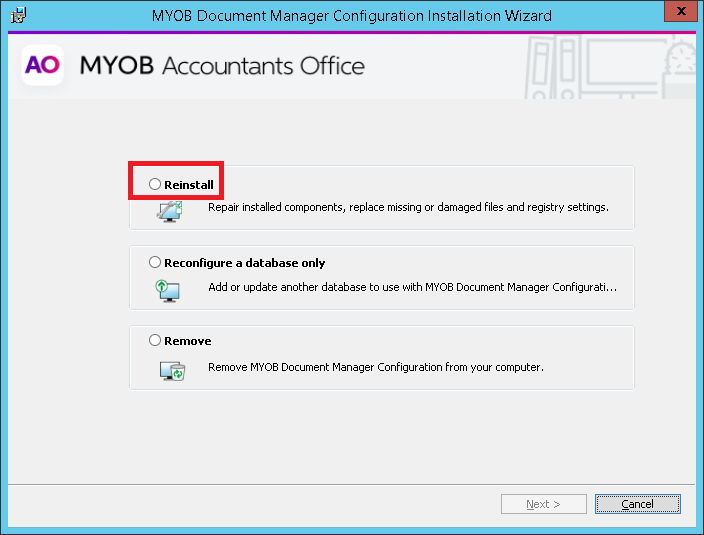
If you have already have Document Manager on your server, you will see this screen. Select Reinstall and click Next. The repair is complete.
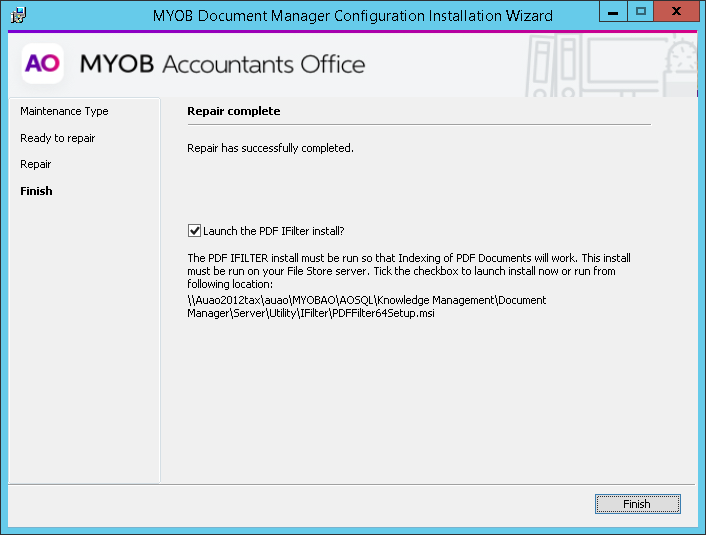
If you don’t already have it, you will be prompted to install Adobe iFilter version 9.0 x64. Tick the checkbox and click Finish.
The PDF iFilter ensures that PDF documents will be indexed and therefore searchable in Document Manager.
If the server you are installing on is not your document file store server
Install the document file store on a different server:
Deselect the Is this server the File Store Server? checkbox, and click Finish to complete the installation.
Run the Configuration tool on your chosen server from C:\MYOB\Knowledge Management\Document Manager\Server\Utility\DM_Config.exe or C:\MYOBAE\AESQL\Knowledge Management\Document Manager\Server\Utility\DM_Config.exe.
Read and accept the Licence Agreement.
Select the SQL Server instance that contains your MYOB Accountants Enterprise database.
Enter the location and details of the port number for your Document Manager document file store and indexing service.
Follow the onscreen instructions to complete the installation.
If you don’t already have it, you will be prompted to install Adobe iFilter version 9.0 x64. Click Next through the installer screens until it completes.
The PDF iFilter ensures that PDF documents will be indexed and therefore searchable in Document Manager.
Run a workstation install on each workstation that uses Document Manager. The file is located at C:\MYOBAE\AESQL\WorkstationInstall\setup.exe. You’ll only need to do this the very first time. On successive upgrades, the workstation update will occur automatically when you access MYOB AE.
The Adobe PDF iFilter installer will open, click Next through the next few screens until the install is complete.
Adding a new product
You can purchase a new product to add to your existing MYOB Practice Solution to make your business life even easier.
If you are using Corporate Compliance in non-integrated mode, please do not add Corporate Compliance as a new product at this stage as you will then have issues with your database and Corporate Compliance will change to integrated mode.
Complete the upgrade of your existing MYOB AO product(s).
Run the installation again. You will be directed to a maintenance screen of the installation where a number of options are available.
Select the Add another MYOB product option.
Add and register your new MYOB product. Contact MYOB Client Services to obtain your new registration code. You will need to provide Client Services with the:
Serial Number shown in the Register MYOB Products screen, and
products that are displayed in the Register MYOB Products screen.
Click Finish.
If you are adding Document Manager for the first time
Complete the upgrade of your existing MYOB AO product(s).
Run the installation again. You will be directed to a maintenance screen of the installation where a number of options are available.
Select to add another MYOB product.
After you add, register and install Document Manager, you will need to:
Identify whether the server you are installing on will be your Document File Store Server. On the Install complete screen, there is a Is this server the File Store Server? checkbox. If the server you are using is your file store server, ensure that the Is this server the File Store Server? checkbox is selected. Then click the Finish button to continue with the Configuration tool. If the server you are using is not your file store server, ensure that the Is this server the File Store Server? checkbox is deselected. Then click the Finish button to complete the installation. Then just run the Configuration tool from C:\MYOBAO\AOSQL\Knowledge Management\Document Manager\Server\Utility\DM_Config.exe on your file store server.
When you upgrade Document Manager, you will not be prompted for the file store server again unless you are using a different server.
Enter the details of the port number for your Document Manager document file store and indexing service. See Document Manager preparations for details.
Click Finish.
Run a workstation install on each workstation that will be using Document Manager. The file is located at C:\MYOBAO\AOSQL\WorkstationInstall\setup.exe
Upgrading your existing AO
These instructions for MYOB Accountants Office (AO) explain how to upgrade an existing MYOB AO installation to the latest version.
The MYOB AO Installation Wizard will guide you through the installation process.
Install MYOB AO on the computer which has your existing MYOB AO database. If you have a network this is usually your server.
If you run MYOB AO on more than one PC, install MYOB AO on all other computers which run MYOB AO.
Main installation
You must run the installation on the computer that will store your MYOB AO database. If you have a network this is usually your server. See What is my system setup? for more information on your system setup.
Download the MYOB AO 2020.1 (5.4.36.144) - Lite Install file from my.MYOB.
Exit all programs and reboot the computer you are going to install MYOB AO on to ensure a clean environment.
Log on to the computer as the administrator.
Select the region that applies to you so the correct software for your region is installed and click Next. The Welcome - Licence Agreement window opens.
At the bottom of the installer window, you'll find links to the Release Notes.
Read the Licence Agreement carefully, select I have read and accept the licence agreement then click Next.
Click Install Now to start the installation.
The installation may take more than an hour to complete. Ensure that you have allocated enough time for the installation.
If you are running the MYOB AO Lite Install, and you see this message: Locate and download MYOB AO Full Install instead. The full installer will install SQL Server 2014.
If you are running the MYOB AO Full Install, you may see this window: If you click Yes, Microsoft SQL Server 2014 Service Pack will be installed, if you click No the install will end.
If the SQL installation fails, you’ll need to manually install the SQL server service, see Installing SQL Server 2014 Service Pack 2 manually below:
A dialog appears indicating that you may receive an Open File - Security Warning message when opening MYOB AO. Click OK.
When the MYOB AO installation is complete, click Finish.
If you’re using a proxy server you don’t need to change the ClientFrameWork.exe.config file in the server Deploy folder see Proxy Server Information.
If you are prompted to restart your computer, make sure the Restart now box is ticked before clicking Finish.
If you disabled your anti-virus / malware programs before you installed MYOB AO, re-enable it before continuing.
If you have a network setup and you are running MYOB AO on more than one computer, perform a Workstation installation to update the local deploy folder.
Instructions on how to log into MYOB AO are launched in a browser window or see Logging in to MYOB AO.
Installing SQL Server 2014 Service Pack 2 manually
If you received an error that the SQL installation failed:
Locate and run \Software\SQL2014\SQL_2014_SP2_EXPRWT_x86_ENU.exe.
Select Upgrade from SQL Server 2005, SQL Server 2008, SQL Server 2008 R2 or SQL Server 2012:
In Instance to upgrade, select MYOBACCT, then click Next:
The install is complete, click Close to exit.
Run the MYOB AO install.
How do I know if the SQL Server Service Pack has successfully upgraded?
Open SQL Server Management Studio.
Locate the installation folders (for example, IR2012\MYOBDATA)
Click New Query in the top left hand corner Type “Select @@Version”
Click Execute. You should see ‘SQL Server 2014 (SP2)’ in the Results tab at the bottom of the screen.
Workstation installation
An upgrade can either be done by Auto update when you open MYOB AO or you can run a Manual update.
There are changes to workstation installations as part of this release, refer to workstation install changes for further information.
If you see this screen, automatic workstation updates have been disabled for your practice, so you should run a Manual update on your workstation.
Auto update
If you see this screen when you open MYOB AO, automatic workstation updates are enabled at your practice:
Click Yes to update your workstation automatically.
Click No and you will need to run a Manual update (see below).
Manual update
The workstation updates for all MYOB AO products are combined into one file for this installer. The file is located at \MYOBAO\AOSQL\WorkstationInstall\setup.exe.
After the server installation, a manual workstation update should be performed on all workstations that you want to have access to the latest MYOB AO products, in the following instances:
if you’re installing MYOB AO on a new workstation for the first time.
if the workstation link is not operational.
if the automatic update can’t proceed and you’re prompted to run a manual install.
Instructions
Ensure that you have read the information in General preparations.
Log into the workstation as administrator.
Navigate to \MYOBAO\AOSQL\WorkstationInstall\setup.exe on your server or computer where the server installation was performed.
Double-click setup.exe. The Licence Agreement window opens.
Read and accept the Licence Agreement by selecting the I have read and accept the licence agreement checkbox.
Click Next. The Ready to Install window opens.
Click Install Now. The Installation Progress window opens.
If you receive the message, If you receive an “Open file security” warning message when opening MYOB Accountants Office Workstation, it is recommended that you restart your computer, click OK.
On completion, the Installation Complete window opens.
Click Finish. The workstation installation is complete.
Document Manager installation
You’ll be prompted for the following information once the main installation of MYOB AO is complete:
If the server you are installing on is your document file store server
Select the Is this server the File Store Server? checkbox, then click Finish
If you have already have Document Manager on your server, you will see this screen. Select Reinstall and click Next. The repair is complete.
If you don’t already have it, you will be prompted to install Adobe iFilter version 9.0 x64. Tick the checkbox and click Finish.
The PDF iFilter ensures that PDF documents will be indexed and therefore searchable in Document Manager.
If the server you are installing on is not your document file store server
Install the document file store on a different server:
Deselect the Is this server the File Store Server? checkbox, and click Finish to complete the installation.
Run the Configuration tool on your chosen server from C:\MYOB\Knowledge Management\Document Manager\Server\Utility\DM_Config.exe or C:\MYOBAO\AOSQL\Knowledge Management\Document Manager\Server\Utility\DM_Config.exe.
Read and accept the Licence Agreement.
Select the SQL Server instance that contains your MYOB Accountants Enterprise database.
Enter the location and details of the port number for your Document Manager document file store and indexing service.
Follow the onscreen instructions to complete the installation.
If you don’t already have it, you will be prompted to install Adobe iFilter version 9.0 x64. Click Next through the installer screens until it completes.
The PDF iFilter ensures that PDF documents will be indexed and therefore searchable in Document Manager.
Run a workstation install on each workstation that uses Document Manager. The file is located at C:\MYOBAO\AESQL\WorkstationInstall\setup.exe. You’ll only need to do this the very first time. On successive upgrades, the workstation update will occur automatically when you access MYOB AO.
The Adobe PDF iFilter installer will open, click Next through the next few screens until the install is complete.
Post-installation
You need to confirm that the release version is correct on both the server and your workstations after the installation.
See Common tasks for more information on frequent tasks that you may need to perform after the installation of MYOB AO.
Click Help to access the help centre which contains links to online resources, knowledge base articles, getting started and other useful information.
If you've experienced any issues listed in the release notes for Tax, after installing this release, go to the worksheet or schedule listed in the release notes and press F6 to refresh it.
Check your version numbers
Product
Version number
MYOB AO
Open MYOB AO.
Click Help and select About.
Confirm that the:
Install version: is 2020.1.
Version is 5.4.36.144.
Click Plugins.
Confirm the version for the following products:
Statutory Reporter: 5.4.36.144
Client Accounting: 5.4.36.144
Document manager: 5.4.36.144
Practice Manager: 5.4.36.144
Tax Homepages: 7.0.14.150
AO Tax
Open a tax return.
Click Help and select About.
Confirm that the version is:
2020.1 (for a 2020 tax return)
2019.3 (for a 2019 tax return)
If you have Client Accounting...
If you have updated XML mappings for customised CSV imports, you may need to verify and migrate your XML mappings after the upgrade.
Once the upgrade is complete, a number of files are created in your MYOB installation:
File name
Description
Location
MyobCsvMaps-System.xml
This system file contains the MYOB default settings for CSV import. Do not modify this file.
Located in <MYOB directo-ry>\CENTRAL\Deploy.
MyobCsvMaps-User.xml
This file is a new map-ping XML file that contains user-defined XML mappings.
Any values in this file will override the system defaults.
You can modify this file if you wish to add any new mappings or value map sections.
If you made changes to MyobCsvMaps.xml before the upgrade, MYOB will back up this file to the folder <MYOB directory>\CENTRAL\Deploy\Client Accounting Templates.
You can open this file and manually copy over any custom mappings to a new Map in the MyobCsvMaps-User.xml file, which is located in the folder indicated in the table above.
After you have copied your changes, you may delete MyobCsvMaps.xml if you wish. Any future updates should be made in MyobCsvMaps-User.xml.