This support note applies to:
-
AE Statutory Reporter (NZ)
-
AO Statutory Reporter (NZ)
-
Workpapers (NZ)
-
AO Workpapers (AU)
-
AE Workpapers (AU)
-
AO Statutory Reporter (AU)
-
AE Statutory Reporter (AU)
In MYOB Accountants Enterprise (AE) and Accountants Office (AO) Client Accounting, you have the flexibility to produce Departmental Profit and Loss statements using Statutory Reporter where you have configured an AE/AO Ledger.
To produce Departmental reports in Client Accounting, you'll need to set up your chart of accounts for each department and edit the department settings in Client Accounting.
We'll take you through this process using the following configuration:
Source Ledger: AE/AO Ledger
Chart Type: AO Classic General Ledger
3. Edit Department Settings
-
From within the Client Accounting module, click Edit configuration details. The Edit Configuration Details window appears.
-
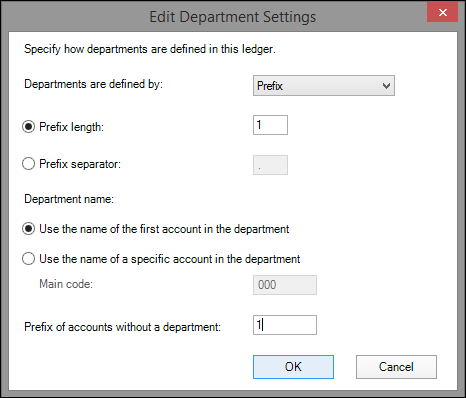
Select This ledger uses departments then click on Edit department settings. A tick appears in the checkbox and the Department Settings window appears.
-
Select Prefix from the Departments are defined by drop-down menu. Additional fields display.
-
Type the number of digits displayed in the prefix (i.e. the number of digits displayed before the account code) in the Prefix length field. For an AO GL-style chart of accounts, this number will be 1 (or 2 where there are more than 9 departments).
-
Select Use the name of the first account in the department. In the above example, the name of the first account will be account code 2000 "Name of Department 1" or 3000 "Name of Department 2".
-
Enter the prefix number in the Prefix of accounts without a department field if there are income or expense accounts that do not belong to a department. In this example, the prefix will be 1 - No department.
-
Click OK. You are returned to the Client Configuration window.
-
Click OK. The Client Configuration window closes.
You are now ready to prepare your journals and workpapers. For information on preparing and completing workpapers refer to the Online Help topic: Preparing workpapers
4. Allocate the Account Ranges to Account Groups
-
Open Statutory Reporter by navigating to the client's Client Accounting > Reports tab. The Reports tab is selected and a list of available reports appear.
-
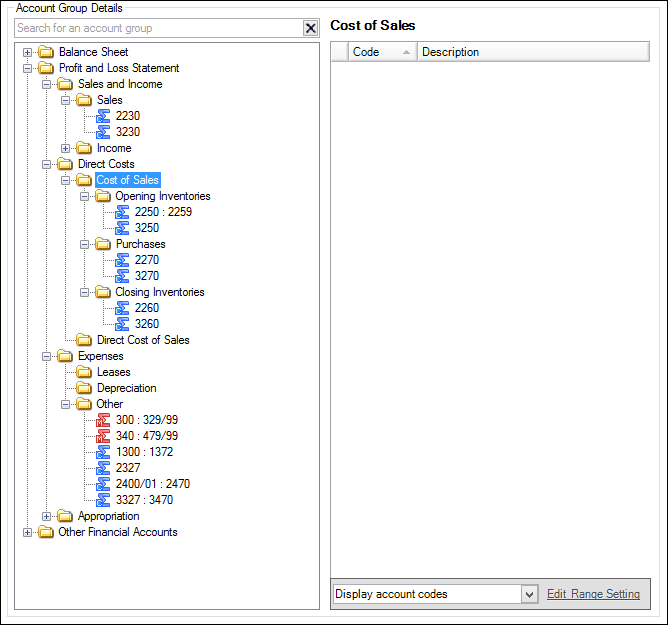
Click Account Groups on the Tasks bar. The Statutory Reporter - Account Groups window opens.
-
Allocate the relevant account code or range to the appropriate Account Group. Repeat this step until all account codes have been allocated.
-
Click OK to save and close the Statutory Reporter - Account Groups window.
For information on allocating accounts to a group refer to the Online Help topic: Allocating account ranges to account groups.
You do not need to create custom account groups to product departmental reports. The Departmental Income Statement will allocate each account code with a prefix of 2 to Department 1's Income Statement and account codes with a prefix of 3 to to Department 2's Income Statement. This means you will receive a separate income statement per department.