Only follow the steps in this KB if support asks you to. It requires technical expertise. Make sure you read all the instructions before proceeding. If you're unsure, speak to your IT for help.
This KB is relevant only for AE and Series 6/8 clients who have done a bulk rollover of all the tax returns.
In these steps, we'll be forcing a rollover of the tax returns that have already been rolled over.
-
Make sure you have access to the server where your SQL database is located. You'll need this to take backups.
-
You'll need to be an administrator to login to AE and system release. You'll need the admin rights to export and import tax returns.
-
Make sure all users are logged out of AE.
Step 2: Exporting tax returns with status other than not started
Export any returns that don't have a Not Started status. You can import them back later. You can use Audit update option to export returns in bulk and within a date range.
-
Open MYOB AE/AO and click the Tax button. The Tax Homepage: Tax - Client Search tab appears.
-
Highlight the required return then click Export in the Tasks panel. The Export Returns window opens.
-
Ensure that all options on the left-hand side are selected except for the Include client details option. The export options are selected.
-
Select Batch on the right-hand side. Batch is selected.
-
The Current path shows the location to which the export files are exported. MYOB recommends not changing this location, as it is the default required for importing tax returns. Deselect Send as email attachment.

-
Click OK. The Export batch window opens.
-
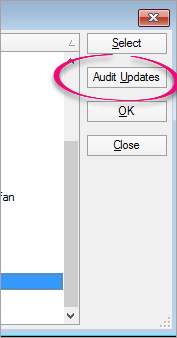
Select Audit Updates. Select this option to export all or some of the returns you had worked on during a certain period.
-
Select Edit and enter a date range.
We recommend the date range to be when you first installed tax 2020 (for example, 31/07/2019) till the date you're performing these steps.
-
Click OK.
For example, you've made changes to 100 returns, 15 of which were done in the last 2 days. If you set the date range to this 2 day period then the 15 returns will be exported. -
Click OK. The Export Returns window opens.
-
If you have previously exported returns, the message "Do you wish to Overwrite or Append?" appears. We suggest you select Overwrite for the first time, but if you need to export any more returns after that select Append.
In exporting all the selected tax returns, this creates a file called EXPORT in the chosen export directory.
Step 3: Unlocking the exported returns
When you export a tax return, the returns will be locked. You can unlock the returns in bulk.
-
Login to system release as an administrator.
-
Double click to open the tax 2020 ledger.
-
From the Utilities menu, select Unlock/lock return.
-
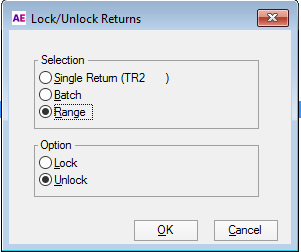
In the Lock/Unlock returns window, under selection select Range and under Option select Unlock.
-
Double click the locked returns and select OK. The returns are unlocked.
Step 4: Performing the Force RSD
-
Login to System Release as an administrator.
-
Double click to open the tax 2020 ledger.

-
From the Utilities menu, select Practice default options > Retain schedule data.
-
If the Enter Master Password window appears, enter the master password. The default password is ASSERT. If this doesn't work, contact your practice administrator.
-
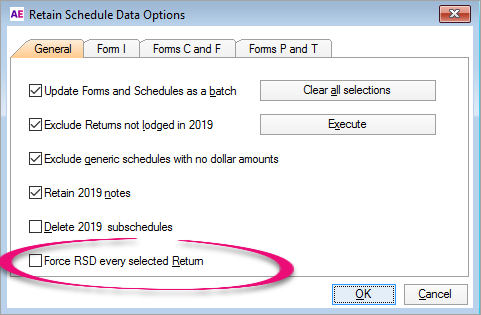
In the Retain Schedule Data Options window, select Force RSD for every selected Return.
-
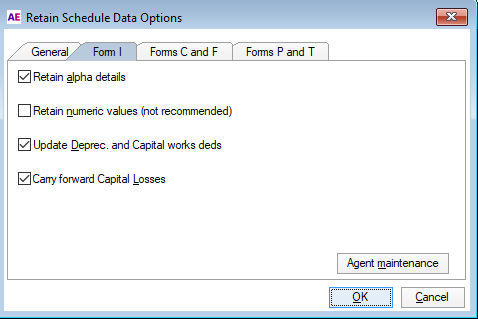
Go to Form
I tab and make sure the following options are selected:
-
Retain alpha details
-
Update Deprec and Capital works deds
-
Carry forward Capital Losses.
-
-
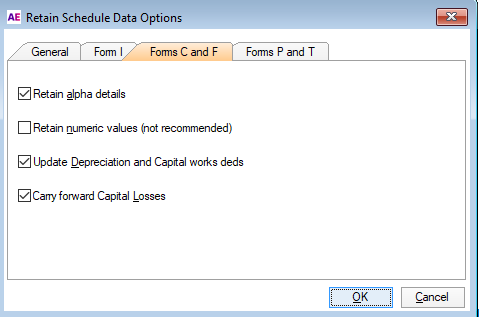
Go to Form C and F tab and make sure the following options are selected:
-
Retain alpha details
-
Update Depreciation and Capital works deds
-
Carry forward Capital Losses.
-
-
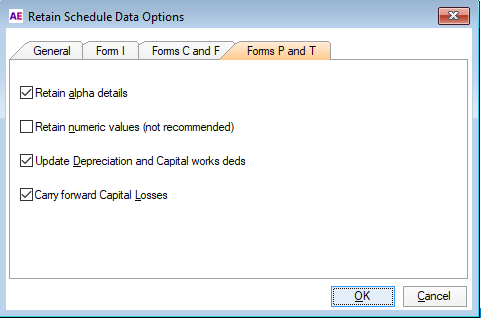
Go to Form P and T tab and make sure the following options are selected:
-
Retain alpha details.
-
Update Depreciation and Capital works deds
-
Carry forward Capital Losses.
-
-
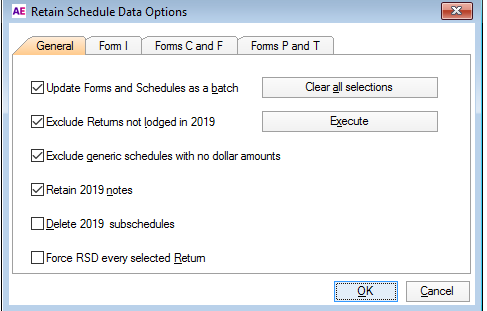
Go to the General tab and click Execute.
-
Select Proceed in the Retain Schedule Data Options window.

-
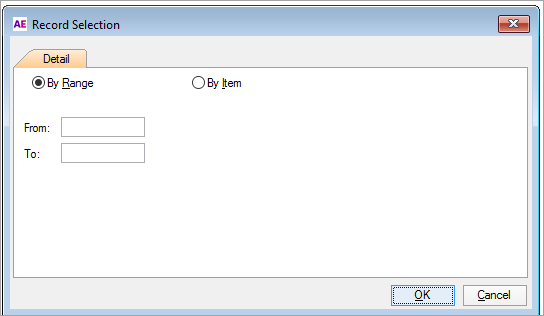
In the Record Selection window, select By Range.
-
Leave the From and To fields blank and click OK.
The returns are now reset to Not started.