Document Manager install guide—5.4.29 (Australia & New Zealand)
This guide explains how to install and upgrade MYOB Document Manager 5.4.29.
This installation of MYOB Document Manager also includes the automatic installation of MYOB Intranet 5.4.29.
To see what's changed, check out the release notes
Before you install
Identify the servers on your site which may be on one computer, or located separately. This guide refers to these servers as the:
Practice Manager ApplicationServer – where Practice Manager is installed. Document Manager installs new software components in the DEPLOY directory on that server.
File StoreServer – where Document Manager stores documents such as Microsoft Word and Excel, email and PDF. This secure directory may only be accessed by the Administrator and must have ample storage.
SQL Server – where the Practice Manager database is located. We recommend that the SQL Server is on the same machine as the File Store server.
The following prerequisites will help you plan for the tasks involved in installing and upgrading MYOB Document Manager.
Check our System Requirements page for Australia or New Zealandto ensure that your environment is supported. The website covers requirements for:
PC hardware
Printers
Operating system, database and Microsoft Office.
If your system setup is not listed on our website you may experience installation and configuration problems or functionality may be limited - unexpected results may occur.
Make sure that you know the login name and password for your server and each workstation.
You must login as a System Administrator to install on the application server, file store server and all workstations.
Do not use the default Administrator login created by Windows.
- Be aware of the type of server/workstation environment you have:
- Client Server or
- Terminal Server.
- Exit all MYOB software and Windows programs.
- Exit all Microsoft Office applications including Microsoft Outlook.
- If you are upgrading an existing version of Document Manager, close any Document Manager and PDF Manager icons in the System Tray.
- Back up all databases that will be upgraded. We recommend that you keep backups indefinitely.
Server installation
Accept default share names, directory names and locations where indicated. This makes it easier for MYOB to support your system, and for you to install upgrades. Changes to defaults must be recorded and used exactly in any future upgrades.
Download the latest version from my.myob and save it to a known location on your local server or computer. The Welcome window will open automatically after downloading and extracting the installation files.
MYOB Document Manager must be installed on the Application server where MYOB AE/AO is installed.
Exit all programs before starting the MYOB Document Manager installation.
To perform the install you must log on as an Administrator with full access rights. Do not use the default administrator login created by Windows.
You should start at the relevant place for your server type:
If you use a server with client workstations
From the server console:
- Click Server Install > Document Manager on the Welcome window.
- Alternatively, double-click the DocMgrSetup.exe file within the DM_5.4.29 installation folder.
The installation will start.
- Continue at the Licence screen Step 7 on page 5.
- this:
- Select the I have read and accept the licence agreement checkbox.
Click Next.
The Server Directory window opens.
Check the Folder Location - Server Program Components.
We recommend that you accept the default location and option.Do not select stand alone unless no other client workstation will access the data and no shares or UNC paths are required.
- Click Next.
The Deploy Directory window opens.
Check the Folder Location - Server Program Components.
We recommend that you accept the default location.Click Next.
If you are repeating the Server installation because you have more than one Accountants Framework database integrated with Document Manager, the Multi Database Option window opens.
Select the Reconfigure a database only checkbox.Click Next.
The Accountants Enterprise database window opens.

Select the database from the list and select the appropriate authentication method.Click Next.
When you are installing for the first time the Intranet Location window opens.
When you are upgrading your existing version, you won't need to install MYOB Intranet again, and this window will not open. Go to Step 19.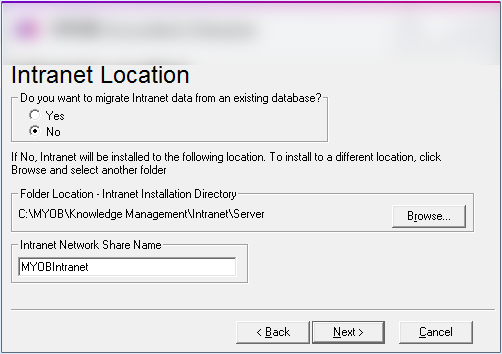
If you are migrating Intranet data from an existing database, select the Yes option or
If you are not migrating Intranet data from an existing database, select the No option. MYOB Intranet will then be installed in the default Folder Location - Intranet Installation Directory that is displayed.
Click the Browse button to select a different location.
Check the default Network Share Name.
Click Next.
The Intranet Data Directory window opens.
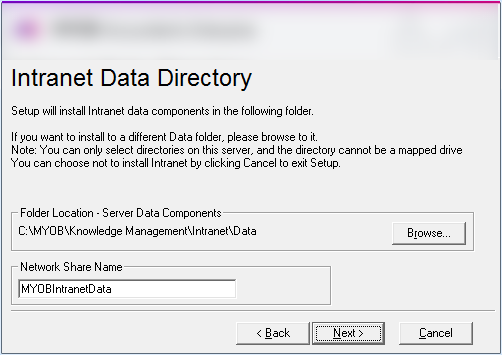
Check the Folder Location - Server Data Components.
Intranet data components will be installed the default location displayed.
Click the Browse button to select a different data folder.
You can only select directories on this server. The directory cannot be a mapped drive
Check the default Network Share Name.
Click Next.
The Document Manager Defaults window opens.
By selecting Australian or New Zealand defaults, the new Document Manager database is preset according to that region with Filing Cabinets and Extra Fields
Defaults can be modified by the practice after installation.
- Click Next.
The Database Backup window opens
Click Yes to backup the database to the default location
If you select No, you will need to confirm that you have back up copies already Click Next.
The Ready to Install window opens.
Note: The installation includes Intranet Server.
Click Next and wait.
The Register MYOB Products window opens.
You are prompted to register your product, if you are installing Document Manager for the very first time.
To register Document Manager:
- Document Manager is added to your products list and requires registration.
- Click Register.
- Contact MYOB Support during business hours to obtain your registration code.
You will need to provide MYOB Support with your serial number which is displayed on the right-hand side. - Enter the Registration code supplied by MYOB Support.
- Click Next.
Another dialog is displayed listing the products that you have successfully registered. - Click Close.
- To obtain a temporary 7-day trial registration to Document Manager:
Click Temporary.
You will be provided with a temporary registration.
When you are ready to fully register Document Manager, see Registering Document Manager
- Click Next
The Server Install Complete window opens when the installation is complete.
The File Store server is where Document Manager documents are stored. The File Store server must be configured when setting up Document Manager.
There are two options:- If the current server is the File Store server, select the Is this server the File Store Server checkbox.
- If your File Store Server is on a different server, deselect the Is this server the File Store Server checkbox and run the DM_Config.exe on the appropriate server.
- Click Finish.
If the checkbox is selected processing continues at Step 1 on page 12 .
otherwise:Log on to the File Store server.
Browse to the Application server using the path just copied.
For example: \\AppServer\MYOBDM\Utility (where AppServer is replaced with the machine name of the application server).- Double-click DM_Config.exe and continue at Step 1 on page 12 .
The following instructions are for a single terminal server that contains your Document Manager data and programs. Programs are accessed after starting a session on the terminal server or via a Citrix system.
From the terminal server console:
- Close the Welcome screen, if it's open.
- Open Control Panel > Classic View.
- Click Install Application on Terminal Server.
- Click Add New Programs.
The Run Installation Program wizard opens.
If necessary, browse to ...\DM_5.4.29\DocMgrSetup.exe in the installation folder. - Click Finish.
The installation starts. - The Licence Agreement window opens.
- Select the I have read and accept the licence agreement checkbox.
Click Next.
The Server Directory window opens.Check the Folder Location - Server Program Components.
We recommend that you accept the default location and option.Do not select stand alone unless no other client workstation will access the data and no shares or UNC paths are required.
- Click Next.
The Deploy Directory window opens. Check the Folder Location - Server Program Components.
We recommend that you accept the default location.Click Next.
If you are repeating the Server installation because you have more than one Accountants Framework database integrated with Document Manager, the Multi Database Option window opens.
Select the Reconfigure a database only checkbox.Click Next.
The Accountants Enterprise database window opens.
Select the database from the list and select the appropriate authentication method.Click Next.
When you are installing for the first time the Intranet Location window opens.
When you are upgrading your existing version, you won't need to install MYOB Intranet again, and this window will not open. Go to Step 19.If you are migrating Intranet data from an existing database, select the Yes option or
If you are not migrating Intranet data from an existing database, select the No option. MYOB Intranet will then be installed in the default Folder Location - Intranet Installation Directory that is displayed.
Click the Browse button to select a different location.
Check the default Network Share Name.
Click Next.
The Intranet Data Directory window opens.
Check the Folder Location - Server Data Components.
Intranet data components will be installed the default location displayed.
Click the Browse button to select a different data folder.
You can only select directories on this server. The directory cannot be a mapped drive
Check the default Network Share Name.
Click Next.
The Document Manager Defaults window opens.
By selecting Australian or New Zealand defaults, the new Document Manager database is preset according to that region with Filing Cabinets and Extra Fields
Defaults can be modified by the practice after installation.
- Click Next.
The Database Backup window opens
Click Yes to backup the database to the default location
If you select No, you will need to confirm that you have back up copies already Click Next.
The Ready to Install window opens.The installation includes Intranet Server.
Click Next and wait.
The Register MYOB Products window opens.
You are prompted to register your product, if you are installing Document Manager for the very first time.
To register Document Manager:
- Document Manager is added to your products list and requires registration.
- Click Register.
- Contact MYOB Support during business hours to obtain your registration code.
You will need to provide MYOB Support with your serial number which is displayed on the right-hand side. - Enter the Registration code supplied by MYOB Support.
- Click Next.
Another dialog is displayed listing the products that you have successfully registered. - Click Close.
- To obtain a temporary 7-day trial registration to Document Manager:
Click Temporary.
You will be provided with a temporary registration.
When you are ready to fully register Document Manager, see Registering Document Manager
- Click Next
The Server Install Complete window opens when the installation is complete.
The File Store server is where Document Manager documents are stored. The File Store server must be configured when setting up Document Manager.
There are two options:- If the current server is the File Store server, select the Is this server the File Store Server checkbox.
- If your File Store Server is on a different server, deselect the Is this server the File Store Server checkbox and run the DM_Config.exe on the appropriate server.
- Click Finish.
If the checkbox is selected processing continues at Step 1 on page 12 .
otherwise:Log on to the File Store server.
Browse to the Application server using the path just copied.
For example: \\AppServer\MYOBDM\Utility (where AppServer is replaced with the machine name of the application server).- Double-click DM_Config.exe and continue at Step 1 on page 12 .
The Document Manager Configuration install sets up the Document Manager File Store location, the File Store service and the Indexing service. It must be run for all available MYOB AE databases.
This Information window has opened automatically or you have opened it by navigating to DM_Config.exe from the File Store Server.
The Document Manager Configuration install:
runs automatically after the Application Server install if the Is this server the File Store server? checkbox is selected. Continue at Step 2. below, or
may be run separately from the Application Server Installation, that is, if the File Store server is a separate machine.
- The Information window lists the tasks that this process performs.

- Click Next.
If all prerequisites are found the Deploy Directory window opens.
Otherwise, the Prerequisite Check window opens.
For example, if you do not have Adobe Acrobat Reader 8.0 or above installed, download and install the latest version from: http://www.adobe.com/products/acrobat/readstep2.html.
The installation detects the location of the Practice Manager install.
If you are on a different server you must browse to the Application server. This path is likely to be: \\AppServer\Central\Deploy. - Click Next.
If this is a repeat install for an additional database, the Multi Database Option window opens. - Select the Reconfigure a database only checkbox.
- Click Next.
The MYOBAccountants Enterprise database window opens.
- Select the database from those available for integration and your authentication method.
Click Next.
The File Store window opens.
The File Store Folder Location must be a local drive, not a mapped drive.
Accept the default location for the File Store folder or click Browse to select another folder.- Click Next.
The DMFS Service Directory window opens.
By default, the DMFS Service is installed to the ProgramFiles folder with Port Number 4001. We recommend that you don't change these defaults. - Click Next.
The Index Service Details window opens.
Deselecting the Optimise checkbox will slow down indexing for large documents. - Click Next.
The Confirmation! window opens listing the configuration details.
Click Next and wait.
The Configuration Complete! window opens.
For compatible systems, the PDF iFilter option is only displayed if PDF iFilter 9.0 x64 or 11.0 x64 have not been installed. The checkbox will be selected by default and the PDF iFilter installation wizard will start automatically after you click Finish. The PDF iFilter ensures that PDF documents will be indexed and therefore searchable in Document Manager.
- Click Finish.
If the PDF iFilter checkbox is selected, the PDF iFilter 9.0 x64 installation wizard will start automatically.
Once the PDF iFilter is installed the server installation and configuration is complete.
Proceed to the next section to perform a workstation install of Document Manager.
Workstation (client) installation
A workstation (client) install must be performed on each workstation where MYOB Document Manager is used.
For each workstation requiring access to MYOB Document Manager you must run the Workstation installation as a user with administrator rights to the Application server.
Different setup procedures are necessary for workstations depending on the server type you use. You should start at the relevant place for your server type:
If you use a server with client workstations
From the client workstation:
- Log on to the workstation.
- Browse to ....\\servername\MYOBDM\setup\DocMgrWkstn.exe where the servername is the name of your server.
- The installation will start.
Continue at the MYOB Document Manager Workstation Wizard screen see
If your server is a terminal server
From the terminal server console:
Open Control Panel > Classic View.
Click Install Application on Terminal Server.
Click Add New Programs.
The Run Installation Program wizard opens.Browse to ...\\<servername>\MYOBDM\setup\DocMgrWkstn.exe where <servername> is the name of your server.
Click Finish.
- The MYOB Document Manager Workstation Wizard opens.

- Click Next.
- The Licence Agreement window opens.

- ClickYes to accept the agreement.
The Workstation Location window opens.
- At this point, you must nominate the location where Document Manager client files will be installed.
- You can accept the default location as displayed in the Folder Location - Workstation Components field.
- Or click Browse to select a different location.
- Click Next.
- The Ready to Install window opens listing the installation details.

- Click Next to start the installation.
- If the defaults have been used the process will complete and th
- Installation Complete window opens.

- Click Finish.
Your new Document Manager installation must be registered on the administrator’s machine only.
Registering Document Manager
This is only relevant if you are installing Document Manager for the very first time.
At the completion of the install on the administrator’s machine (where MYOB AE/AO is installed), the MYOB licensing process automatically opens at the Select Component window.
You may need to register Document Manager if you selected a temporary licence which has now expired.
You must run this procedure during business hours as you will need to call MYOB Support to obtain your Document Manager registration number. MYOB Support will request information from you, so we recommend you to be at the server or workstation with the Register MYOB Products window open.
If necessary, run this procedure by selecting:
Start > MYOB Accountants Enterprise/Office > System Release Tools > Registration or
Start > MYOB > Registration.
- In the Register MYOB Products window, click Add or remove products.
The Add or remove products window opens. - Select the components Intranet and Document Manager.
- Click Register.
The Register MYOB Products window displays your serial number. - Type the RegistrationCode supplied by MYOB Support.
- Click Register.
You'll see a message listing the products that have been registered. - Click Close.
MYOB Document Manager and MYOB Intranet have been registered, and are now available to run.
The Installation Complete window opens. - Click Finish.
Post-installation
With Document Manager installed on your application server and workstations, you are ready to start using the software.
After installing Document Manager, you need to perform some checks and operations with the new software and with other integrated software.