Skip table of contents

MYOB AE/AO release notes—2019.0 (New Zealand)

Release date—2 April 2019

Check your version numbers

Product

Version number

MYOB AE/AO

2019.0

Client Accounting5.4.31.132
Document Manager5.4.31.132
Practice Manager5.4.31.132
Tax Manager5.4.31.132
Statutory Reporter Formats16
To check your Statutory Reporter Formats version number
  1. Open MYOB AE/AO.

  2. On the main menu, go to Maintenance > Maintenance Menu > Client Accounting > Practice Report Settings.

  3. On the Tasks bar, click About.

To check your other version numbers
  1. Open MYOB AE/AO.

  2. Click Help and select About.

  3. Click Plugins to access the version number of individual products.

Client Accounting
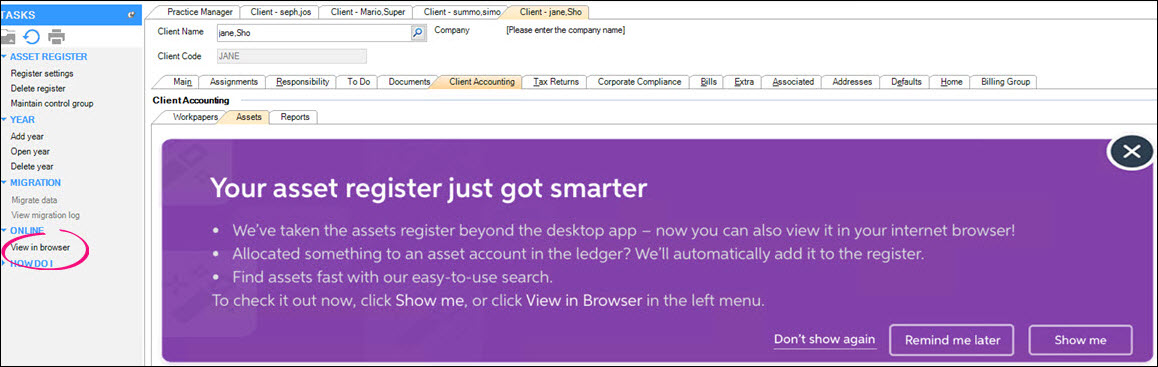
View Assets in browser

What is it?

Your asset register just got smarter!

We've introduced:

  • Easy to use and efficient workflows in a new browser-based interface
  • Tight integration with your MYOB integrated AE/AO or MYOB Ledger so that adding new assets is more automated than ever before
  • A new global search feature to find assets faster, and viewing or editing details is a simple click away.

Can I use it?

  • You must have one of the following:
    • An AE/AO ledger.
    • An Essentials ledger.
    • An AccountRight Live ledger.
  • If you are a Super User or an Administrator you will automatically see the banner below.

How do I start using it?

  • If you have access to this feature, a banner is displayed in the Assets tab. The options are:
    • Cross—closes the banner for the current session. The banner will re-appear if the same client is re-opened
    • Don’t show againthe banner will close and never be displayed again for this client.
    • Remind me latercloses the banner for the current session. The banner will re-appear if the same client is re-opened
    • Show mecloses the banner and launches your asset register in your default browser.
  • Alternatively, on the Tasks bar, click the new View in browser link to launch Assets online in your default browser.

Learn more

See Accessing an asset register.

Workpapers
Create PDF option updates
  • We've fixed a conversion issue in the Create PDF process in Workpapers, which would happen when converting Excel files to PDF.
  • The Create PDF process will notify you if there are any issues with converting a document to PDF.
  • If any documents aren't converted when using the Create PDF process, you can see a list of unconverted documents in the Documents not converted to PDF report.
  • You can select unsupported file types in the Create PDF process, to include a complete list of documents in your reports.
  • In addition to supporting the file formats .pdf, .doc, .docx, .xls, .xlsx and .msg, the Create PDF process supports .xlsb, .xltx, .xltm, .xlsm and .csv. Excel files printed to PDF include Excel files with macros.
  • The Create PDF option will include any documents that you linked to workpaper templates without using the Document link table in MYOB's standard templates. The linked documents are included in the PDF generated, or in the list of exclusions.
Links in workpapers

For Document Manager and non-Document Manager users.

Also available if you've linked documents to workpaper templates without using the Document link table in MYOB's standard templates.

In a workpaper, you can add a link to a web page.

In the Document links table at the bottom of the workpaper, you'll find a link 

icon. Click the link 
icon to open the Insert hyperlink window and complete the details.

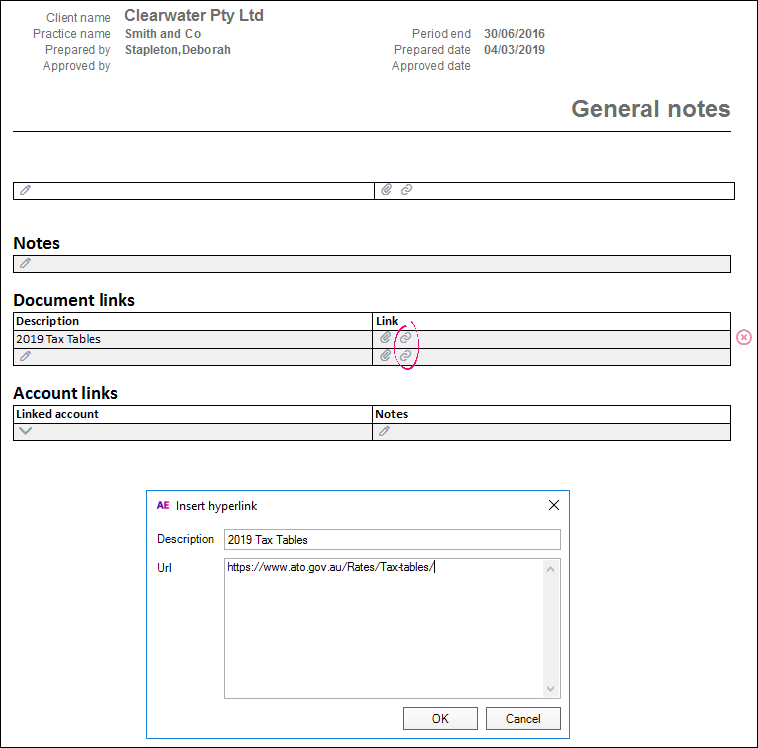
In the Insert hyperlink window:

  • The Description needs to be in English text only.
  • In Url, use the full address. For example, if you're using HTTPS, you'd begin with https:// , not www.

When converting the workpaper to PDF using the Create PDF process, you may notice the URLs are included in the Documents not converted to PDF page. That's because the resources referred to by these URLs don't get converted.

Delete and move document links

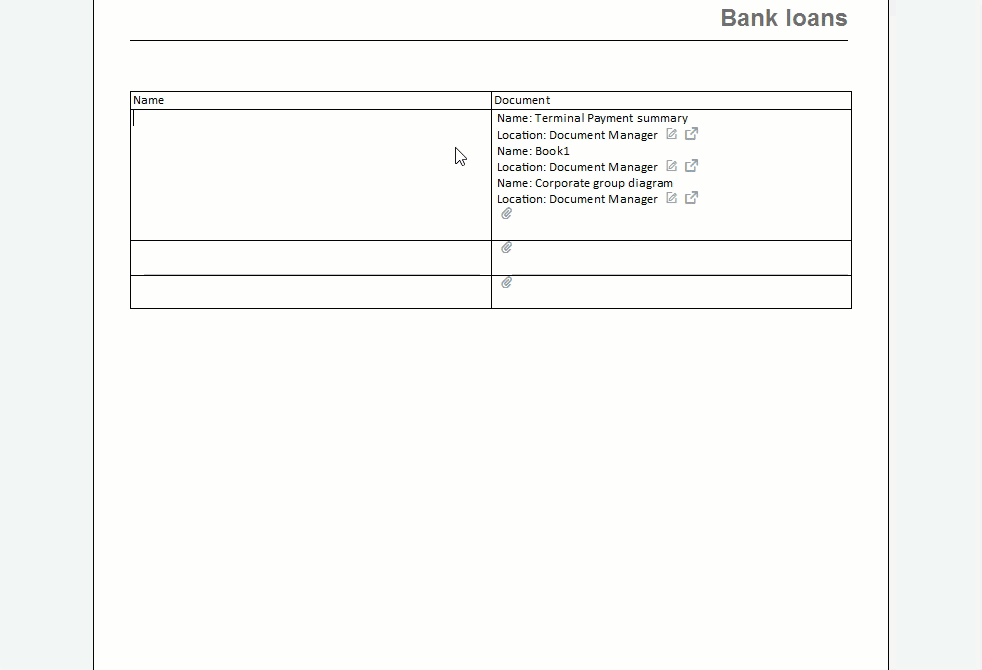
We've added some features you may find handy if you've linked documents in workpaper templates. When you attach document links to data entry tables, you can now move and delete the links!

This applies to linked documents in data entry tables in workpapers templates, not in the Document link table in MYOB's standard templates.

When you select a linked document in a table, you'll see:

  • a delete
    button, for deleting a linked document from the data entry table
  • an insert
    button, for inserting and attaching a new linked document
  • a move up
    and a move down
    button, for reordering your linked documents.

Watch this animation to see a demo of how the buttons work.

Using the delete, attach and move buttons

Click the animation to make it bigger.

Manage in-progress documents

AE and Document Manager only

We've added more options for managing in-progress documents when completing a workpaper period. You can set configuration keys to control what happens if a user tries to complete a workpaper period and in-progress documents are attached from Document Manager:

  • Don't allow the period to be completed.
  • Show a warning. On the warning:
    • Select Yes and you'll continue with completing the period.
    • Select No and a window displays with a list of the in-progress document attached from Document Manager.

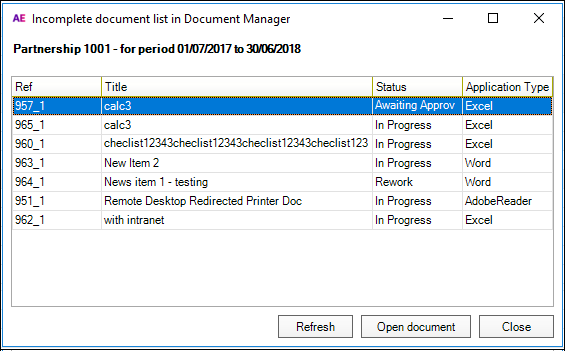
    If a user sees this window, they can:

    • Refresh the list
    • select a document from the list and Open document to view the document, or
    • Close the window.
    If a user completes the document, they can continue completing the workpaper period.

New configuration keys

Set the configuration keys that control period completion in Maintenance > User Defined > Configuration.

  • To prevent completing the period if in-progress documents are attached from Document Manager, turn on WorkpapersBlockCompleteThePeriod.
  • To show a warning if in-progress documents are attached from Document Manager, turn on WorkpaperWarningInProgressDocuments.

Both keys are turned off (set to 0) by default. To turn the keys on, change the Key Value to 1.

Bypass the configuration key settings

If you don't want the configuration key settings to apply to some users, you can use a new group task permission in Maintenance > Security > Task Permissions:

#Client #Client Accounting #Workpapers #Allow completing a period with in progress documentation attached

The permission is off by default for all user groups except Superuser.

Statutory Reporter
Account group changes

Renamed:

  • Trading to Trading inventories, in Balance sheet > Assets and liabilities > Assets > Current assets > Inventories > Trading.
  • Other to Other inventories, in Balance sheet > Assets and liabilities > Assets > Current assets > Inventories > Other.
  • Other to Other movements or Other movements in Trust Funds, in Balance sheet > Equity > Trust funds > Other.
  • Profit to Current year earnings, in Balance sheet > Equity > Proprietor's funds > Profit.
  • Other to Other tax, in Balance sheet > Assets and liabilities > Assets > Current assets > Taxation > Other.
  • Other to Other tax, in Balance sheet > Assets and liabilities > Liabilities > Current liabilities > Taxation > Other.
  • Provisions to Accruals, in Balance sheet > Assets and liabilities > Liabilities > Current liabilities > Provisions > Provisions.
  • Other to Other movements, in Equity > Trust funds > Other.
  • Other to Suspense, in Other financial accounts > Other.

Removed:

  • Other financial accounts > Trust equity note.
Display depreciation after Net profit before depreciation

We've added an option to display depreciation after Net profit before depreciation in the profit or loss statement and the 5-year trend report.

To enable displaying depreciation after Net profit before depreciation
  1. Go to the Client Accounting > Reports tab.
  2. On the Tasks bar, select Non-Transaction Data. The Statutory Reporter - Non-Transaction Data window appears.
  3. Select Profit or loss statement.
  4. Select Print depreciation after 'net profit before depreciation' and select OK.
Account in debtors receipts
AE only

If you have multiple companies with multiple bank accounts, the Account field in the the Debtors Ledger will no longer be greyed out.

Tax Manager

From the end of April 2019, Inland Revenue (IR) will start using the Transaction data service (TDS) instead of Tax agents web services (TAWS) to provide downloadable data.

You'll get income tax, tax credits, and working for families data from TDS.

IR authorisation

Tax Manager uses IR gateway services for the Transaction data service (TDS) and related interactions with IR. Each agency needs to link a my.MYOB user to a myIR account once. If you have a my.MYOB login and you do a task that uses gateway services, and you aren't linked to a myIR account, your internet browser displays the myIR login page to link the my.myob account to the myIR accounts.  

To link your my.MYOB account to a myIR account

Each user is limited to only performing the gateway service connection functions that they could do directly in myIR. However, once the data is in MYOB AE or AO, you must still control access to the data using task permissions and you must control access to specific clients by adding Team security. Review permissions in Maintenance > Maintenance Map > Security > Task permissions.

  1. Enter your myIR login credentials.
  2. If an IR Consent Management message appears, read the message and click Authorise. A confirmation message displays when IR has verified the login.
  3. Close the browser window and return to Tax Manager.
No login or password needs to be stored in MYOB AE/AO for gateway services. The existing online services login and password for tax agents do need to be held so that you can still receive student loan data via TAWS.
Data downloads based on tax agent client list

You'll receive the daily download data via a connection to a secure MYOB server, rather than directly from IR. We've made the link with MYOB based on the tax agent client list. You need to let IR know that you want to receive the IR data downloads through MYOB software.

To let IR know that you want to receive data through MYOB software
  1. Go to Maintenance > Maintenance Map > Tax > Maintain Agents.
  2. For each tax agent you want to receive TDS data for:
    1. Select the required tax agent.
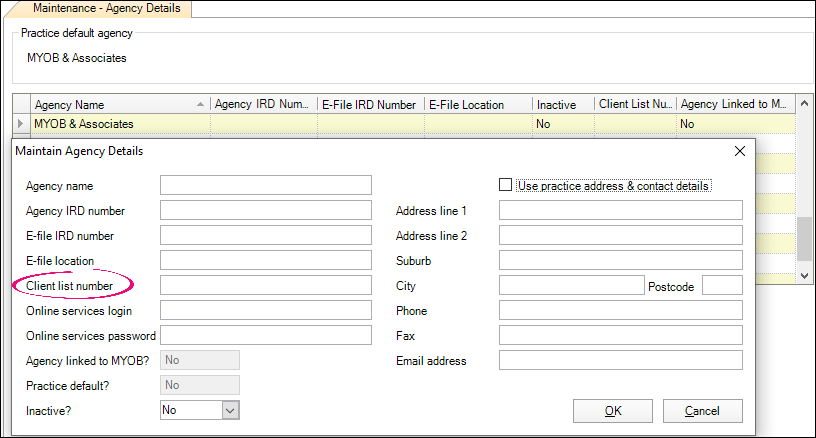
    2. On the Tasks bar, select Edit agency details.
    3. Add the Client list number to the new field with this name.

      The client list number is the number you use when you talk to IR or when you use myIR. You can find your client list number in MyIR under Manage my agency. The number might not be the same as your Agency and E-file IRD number.

      To avoid getting an error if your agency is an Individual, before you link your agency, wait until after IR’s new system's up and running on 26 April. Non-Individuals are not affected and can link at any time. 

      To tell if you're an Individual or Non-Individual, go to myIR and, under Manage my agency, check the wording above your name.


    4. Click OK.

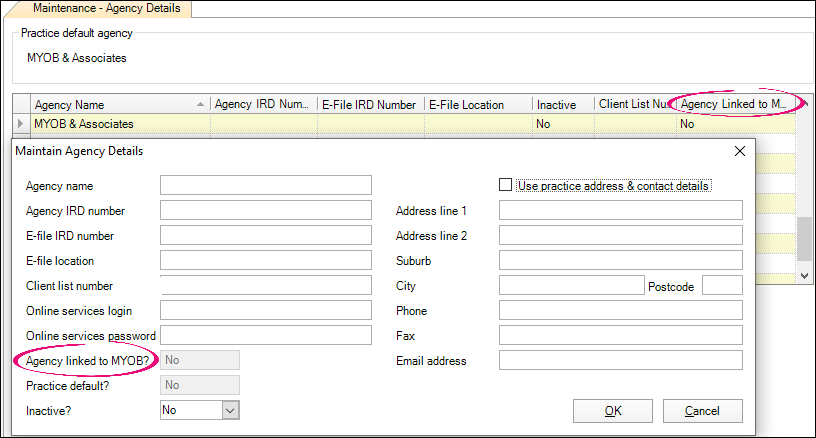
    5. If you see the myIR login, enter your details.
    6. On the Tasks bar, select Link agency to MYOB at IRD. When successful, the Agency Linked to MYOB column and field display Yes.
To no longer receive IRD data through MYOB software for a particular client list
  1. Go to Maintenance > Maintenance Map > Tax > Maintain Agents.
  2. For each tax agent you don't want to receive TDS data for:
    1. Select the required tax agent.
    2. On the Tasks bar, select the tax agency with the client list, then select Delink agency from MYOB at IRD.
    3. Click OK. When successful, the column Agency Linked to MYOB changes to No.
IR download schedule

To stagger the download requests, we've updated the download schedule to randomise the minutes of the scheduled time. The update affects existing scheduled tasks and newly-scheduled downloads. There are no changes to the hour of the download schedule.

To verify the scheduled time, go to Maintenance > Maintenance Map > Tax > IRD download schedule.

More to come!

In April, we'll provide a Tax Manager update with additional functionality. You'll need to install this update before you can receive TDS data.

Other changes
  • From 1 October 2019, the 2021 tax year will be available, which will give you access to the 2022 provisional tax calculator. We've added rates for the 2022 tax year so you can calculate the correct rates and uplifts.
  • We've updated the Tax Manager service to make sure it uses TLS 1.2 security protocol to communicate with online services.

You can also check out the tax compliance release notes for AE or AO.

JavaScript errors detected

Please note, these errors can depend on your browser setup.

If this problem persists, please contact our support.