Skip table of contents

MYOB AE Tax install guide—2019.0 (New Zealand)

Release date—2 April 2019

Tax Tracking, Tax Returns and E-File systems are all included in this installer.

You must install AE Tax 2019.0 on the same server as SR Dal.
Prerequisites
Minimum MYOB versions

To upgrade to AE Tax 2019.0, you need to have the following versions or later

ApplicationMinimum version
MYOB AE5.4.31
Tax Returns System 20182018.0
Tax Tracking System2018.0
E-File System2018.0
System Release8.1a
Central Database6.3aNZ
Pre-installation checks
  • Make sure everyone's logged out of all MYOB programs
  • Check that your computer meets the system requirements.
  • Disable your virus checker.
  • If installing on a network, log on to the network as a system administrator.
  • If installing on a standalone PC, log on as a local administrator.
  • If installing on a standalone PC logged onto a network, disconnect it from the network (you shouldn’t be able to access any network drives).
  • If you're upgrading from a previous version, install the latest version into the same folder. The new version overwrites existing program files.
Back up your data

If you've used AE Tax before, take a full back up of your data and program files before you install.

Standard MYOB database (CFS) installations

Back up the \SOL64 and \SOL63 directories and their subdirectories. You can use MYOB’s data back up facility to do this.

Microsoft SQL installations

Use SQL Server Management Studio or something similar to back up the SQL database. If you need to access pre-2006 tax return system ledgers, back up the \SOL64 and the \SOL63 directories.

Tax notice templates

This install will overwrite your customised templates, so it's best to take a copy before you install.

You only need to perform this step if you've customised your tax notice templates.

To take a copy of your customised tax notice templates:

Copy from...Template location
Workstation\\<servername>Tax Manager Templates
ServerC:\Program Files(x86)\MYOB\Central\Tax Manager Templates.
To install AE Tax
  1. Log in to my.MYOB and go to My Products > Download
  2. Select MYOB AE Tax from the drop-down.
  3. Click on MYOB AE Tax 2019.0 - Update to download the install file.
  4. Double-click the downloaded file to start the install.
  5. Click Release Notes to find out what's changed in this release.

  6. Accept the licence agreement and click Next.

  7. Specify where to install MYOB system files (usually \SOL64). 
    The default location is E:\sol64. To change the location, click Browse to navigate to your MYOB system files, then click Next
  8. At the Install SQL Tax? window, select:
    Yes if you're installing for the first time or if you use Microsoft SQL, then click Next
    No if neither of those things apply, then click Next, and go to step 10.
  9. Confirm the Central deploy folder location, then click Next.
  10. Confirm SQL server name where you store your tax data, then click Next.
  11. Select the AE Tax database where you store your tax data, then click Next
  12. If you use an MYOB CFS database, the AE Tax folder window opens. Specify the location of System Release (usually \SOL63). 
    The default location is I:\sol63. To change the default, click Browse to navigate to your MYOB system files, then click Next
  13. On the Tax client code window, type the tax client code. The default is TAXFILE, then click Next.
  14. If you've already installed AE Tax on the computer, you'll see a warning message.
  15. If you haven’t already backed up your data, quit the installation now. See expand-Beforeyouinstallfor more information.
  16. Click Next to open the Ready to Install? window. 
    Review the details to see if you need to make any changes. 
  17. Click Install to start.
  18. When the install is complete, a confirmation window opens. Click Finish.
Post-installation
Check your version numbers
  1. Open Tax Returns System 2019.
  2. Select Help > About.
  3. Check the version number of each application:
ApplicationVersion
Tax Returns System 20192019.0
Tax Returns System 20182018.1
Tax Tracking System2019.0
E-File System2019.0
System Release8.1a
Central Database6.3aNZ
Check practice letters in TRS

There's a setting in TRS > Control Record > Preferences > Copy Practice letters from previous year on ledger creation  This setting determines if we copy practice letters from the previous year when we're creating the ledger for the new year.

If you tick the option to copy practice letters, make sure you only have letters that you've modified at practice level in Tax Returns System 2018.


This is because a practice letter takes precedence over a master letter. It can cause printing issues if you have an old version at practice level.

If you copy letters that aren't needed any more, you can delete them from Tax Returns System 2018.

If you don't tick the option to copy practice letters, you can still manually copy a practice letter over from Tax Returns System 2018. Do this after you've created a Tax Returns System 2019 ledger.
To check the letters you currently have at practice level:
  1. Open Tax Returns System 2018.

  2. Select Maintenance > Letter Writing > Tax Practice Letters.

  3. Review the list of practice letters.

  4. Highlight a letter and select File > Delete to delete a letter at practice level.

Create 2019 tax returns ledger

Perform these instructions from within System Release.

  1. Log in to System Release using:
    Username: supervis
    password: s6.
  2. Click Folders under Administration on the left side bar.
  3. Double click on your tax folder. For example, SQLTAX.
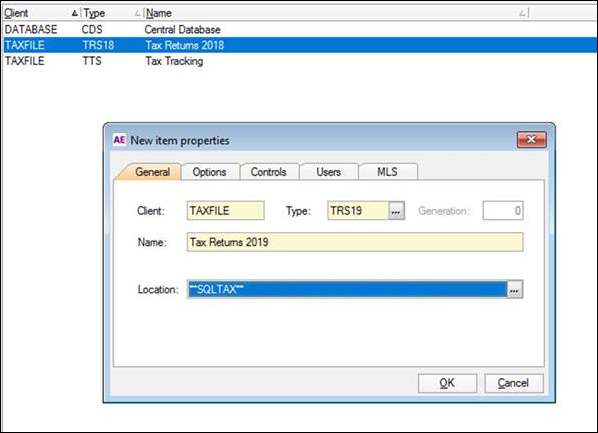
  4. From the File menu, select New > Item.
  5. Enter the details in each field (you can tab through the fields):
    Client: must be the same as the name in the Client column
    Type: TRS19
    Name: Tax Returns 2019
  6. Click Yes if you see the message ‘Do you wish to create a shortcut in the Ledgers folder?’.
  7. For the message ‘This is a new TRS19 ledger. Do you want to copy ledger setup from TRS18?’:
    • Click No if you don't want to copy last year's ledger setup.
    • Click Yes if you do, setup information includes control record information, practice defaults, agents, users and client picklists.
  8. Click Yes or OK for any warning messages similar to ‘There is a problem accessing Tax Tracking’.
    The import of the new master picklists starts.

    Do not interrupt this procedure.
  9. The About window opens. Check that it refers to Tax Returns System 2019 then click OK.
Update menu level security

If you're using Menu Level Security (MLS), copy last year's MLS codes to the new year's template:

  1. In System Services, select Manage > Templates.
  2. Select Tax Returns System 2018 and click Properties.
  3. Copy the contents of the MLS tab, then click OK.
  4. Select Tax Returns System 2019 and click Properties.
  5. Paste the copied codes into the MLS tab, then click OK.
  6. Tax Returns System – to add the new MLS codes to the existing table, copy them from the text file at \SOL64\MLSTRS.txt, or add them manually:
    TMBlkUpd=6 Other Utilities/Tax Manager update - All returns
    TMSinUpd=6 Other Utilities/Tax Manager update - Single return
    UtilUndo8=6 Other Utilities/Undo IR833 Return status
  7. Tax Tracking System – to add the new MLS codes to the existing table, copy them from the text file at \SOL64\MLSTTS.txt or add them manually:
    UTRebld=6 Utilities > Special routines > Rebuild Tax Tracking Ledger
    SPTMInt=6 Utilities > Special routines > Tax Manager integration
Refresh links between applications
To refresh integration links if you don't use Tax Manager
  1. Open Tax Returns System 2019.
  2. Select Utilities > Control Record > Integration.
  3. Click Clear.
  4. Click Tax Tracking System.
  5. Double‐click the Ledgers folder.
  6. Double‐click the Tax Tracking System ledger to open the Edit Integration window.
  7. Click Central Database System.
  8. Double‐click the Ledgers folder.
  9. Double‐click the Central Database ledger to open the Edit Integration window.
  10. Click E‐File System.
  11. Double‐click the Ledgers folder.
  12. Double‐click the E‐File System item to open the Edit Integration window.
  13. Click OK.
To set up the integration between E-File and Tax Tracking
  1. Open E‐File System.
  2. Select Utilities > Control Record > Integration.
  3. Click Clear.
  4. Click Tax Tracking System.
  5. Double‐click the Ledgers folder.
  6. Double‐click the Tax Tracking System ledger to open the Edit Integration window.
  7. Click OK.
To import master picklists
  1. Open Tax Returns System 2019.0.
  2. Select Utilities > Other Utilities > Import Master Picklists.
Reinstall AE reports for tax
This section only applies to AE users who have MYOB AE Tax installed with a Microsoft SQL database.

After installing a new tax release, you may get this message when running a Tax Tracking report in AE 'Report contains no data. Try altering the filter conditions and re-run the report.'.

Reinstall AE Reports after installing a tax update so that things run smoothly.

Download the current version of AE Reports from the AE Tax download page on my.MYOB.


JavaScript errors detected

Please note, these errors can depend on your browser setup.

If this problem persists, please contact our support.