Skip table of contents

AE Install guide after migrating to PM Plus

Follow the steps to install AE 2023.1 or a later version after successfully migrating to PM Plus.

Prerequisites
  1. Exit all MYOB software and all Windows programs on your server

  2. Make sure all staff members have exited all MYOB applications on their workstations, including closing any icons in their system tray.

  3. Ensure your regional settings and format language are set to Australia.

  4. Ensure that you have internet access.

  5. To make sure that your database is upgraded correctly you MUST reboot the server machine that you intend to use to perform the MYOB AE installation on before you start the actual installation.

  6. Allow sufficient time for installation. It may take more than an hour to complete.

  7. Disable any anti-virus/malware software and user account control on your server. Make sure to enable them again once you’ve finished installing MYOB AE.

  8. Check your disk space and back up your data:

    1. The combined installer requires a minimum 4GB of free disk space on the local disk of your server.

Installing 2023.1 version

You need to run the installation on the server. Make sure you have admin rights to run an installation on the server.

  1. Download the latest AE version from my.myob.

  2. Click Unzip and Read the Licence Agreement and then accept it by selecting the I have read and
    accept the Licence Agreement checkbox.

  3. Click Next.

  4. When using the combined installer for the first time, a number of system checks
    are performed and any required third-party software is installed.

You may be prompted to change the SQL sa password. See Changing the default password for 'sa' username in SQL.

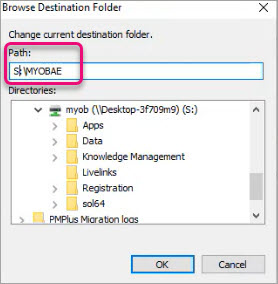
  1. In the configuration file location window, the default location will show as C:\MYOBAE but it is important to change this location to the current mapped drive where your SOL64 folder is located.

  2. Click Browse. Select the mapped drive where your SOL64 folder is located and type MYOBAE in the Path field. This will create a MYOBAE folder in the mapped location and all the files will be installed there.

The combined installer will not remove or change any previous installation files and/or directories

  1. Click OK.

  2. In the Select SQL Server instance window, select your Accountants Enterprise database. Click Next.

If you have multiple databases, make sure you select your curent AE database. To update another database, you can re-run the install and select the second database.

  1. Click Upgrade Now.

  2. Click Finish when the upgrade is complete. The server installation of MYOB AE is complete.

Go to workstation install

Workstation install

In the combined installer, the workstation updates for all MYOB AE products have been combined and are located \MYOBAE\AESQL\WorkstationInstall\setup.exe in your mapped drive.

After server installation, a manual workstation update should be performed on all workstations that you want to have access to the latest MYOB AE products,

  1. Log into the workstation as administrator.

  2. Go to \MYOBAE\AESQL\WorkstationInstall\setup.exe on your server or computer where the server installation was performed.

  3. Double‐click setup.exe The Licence Agreement window opens.

  4. Read and accept the Licence Agreement by selecting the I have read and accept the licence agreement checkbox.

  5. Click Next. The Ready to Install window opens.

  6. Click Install Now.

  7. Click Finish. The workstation installation is complete

If you receive the following message, If you receive an “Open file security” warning message when opening MYOB Accountants Enterprise Workstation, it is recommended that you restart your computer, click OK

If you have Document Manager

You will be prompted for the following information once the main installation of MYOB AE is complete:

  • Identify whether the server you are installing on will be your Document File Store Server.

  • If the server you are installing on is your Document File Store Server,select the Is this server the File Store Server? checkbox.

  • If the server you are installing on is not your Document File Store Server, deselect the Is this server the File Store Server? checkbox, then click the Finish button to complete the installation.
    Then just run the Configuration tool from \\<ServerName>\MYOBDM\Utility, where <ServerName> is the name of the server where Document Manager is installed.

  • Select the SQL Server instance that contains your Accountants Enterprise database.

  • Enter the location and details of the port number for your Document Manager document file store and indexing service.  Follow the onscreen instructions to complete the installation.

JavaScript errors detected

Please note, these errors can depend on your browser setup.

If this problem persists, please contact our support.