MYOB BankLink has been shut down
To continue receiving bank feeds, move to an MYOB Business solution. Find out how to move.
If you’ve given a client access to their file so they can download historical data, they need to install MYOB BankLink Books (available from the MYOB product downloads page).
This support note applies to:
-
MYOB BankLink
-
MYOB Business Connected Ledger
This is a step-by-step guide to moving your client’s MYOB BankLink data to MYOB Connected Ledger.
Estimated time to complete: 15 minutes per client file.
If you have multiple BankLink accounts to move, why not save time and use our trusted 3rd party conversion partner, MMC Convert, to convert your BankLink client files to MYOB Business Connected Ledger?
To complete these steps, you’ll need:
-
A new MYOB Business Connected Ledger file with no transactions entered and that has not had a financial year rolled over. We recommend that you get your Sales Specialist to set it up, to take advantage of special pricing.
-
An MYOB Practice login (if you choose to create an MYOB Business Connected Ledger file yourself).
-
Access to your client’s data in MYOB BankLink.
-
A spreadsheet application like Microsoft Excel or Google Sheets.
1. Create an MYOB Business Connected Ledger file
We recommend that you book a time with your Sales Specialist to get them to set up the file, so you can take advantage of special pricing for moving your BankLink clients moving to MYOB Business Connected Ledger. This special pricing which is only available via your Sales Specialist.
Once your MYOB Business Connected Ledger files have been created, they'll be visible under your Client Files (Online Files) section in MYOB Practice as blank ledgers.
If you want to create your own files, these steps are described here. You'll only be able to take advantage of the best available offers to all practices from here.
Create an MYOB Business Connected Ledger file
You’ll need an MYOB Practice login to complete the following steps. If you don’t have one, contact your MYOB Practice Administrator to get your MYOB Practice login set up. If you don’t have anyone in your Practice with access to MYOB Practice, contact your Sales Specialist or MYOB Support AU 1300 555 117 or NZ 0800 696 227 (Monday to Friday 9am-5pm).
If you don’t want to have MYOB Practice set up, you can ask your Sales Specialist to provision a ledger for you. But you’re missing out. Become an MYOB Partner Program Member to ensure you don’t miss out on MYOB Practice and other benefits.
-
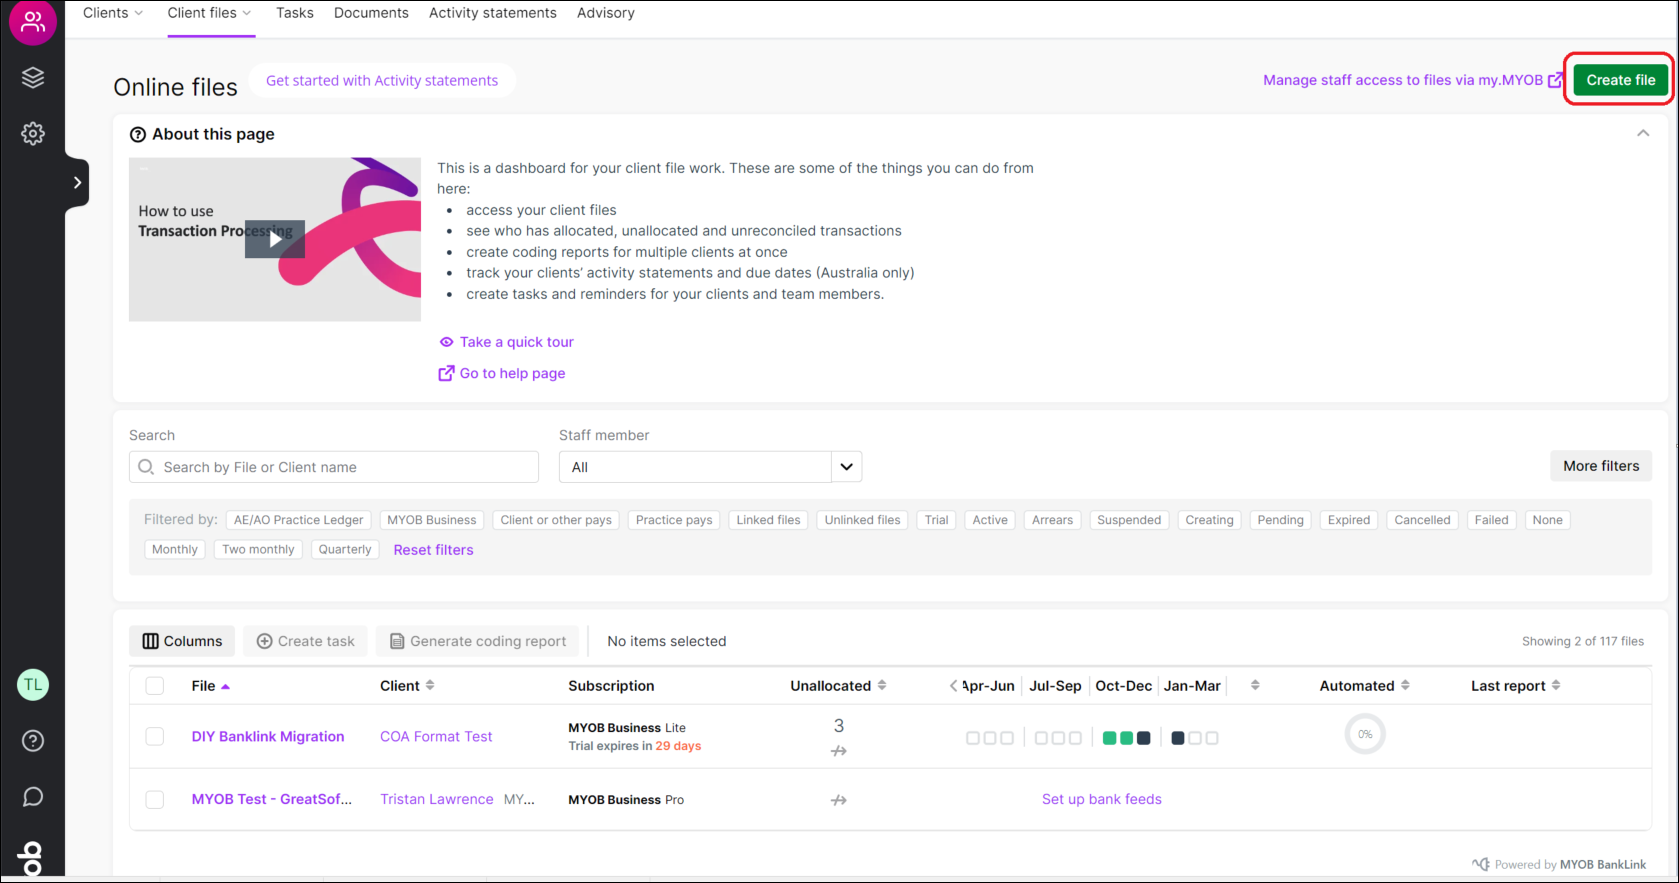
Open MYOB Practice and go to the Client files page (also known as Transaction processing page) where all your online files are displayed alongside their coding indicators (similar to BankLink).
-
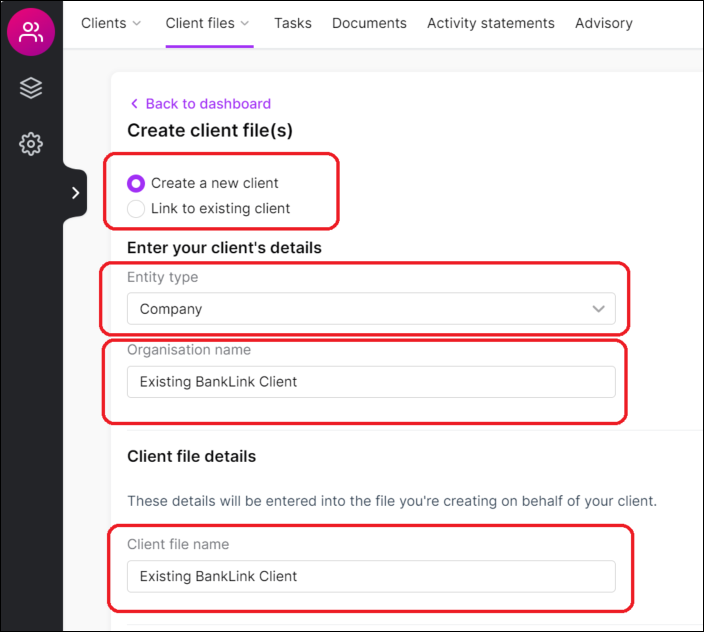
Complete the necessary details on the Create client file(s) page and link to an existing client as required. Ensure that you have selected the appropriate entity type and that the file name is named appropriately as by default it will display as the client name.
-
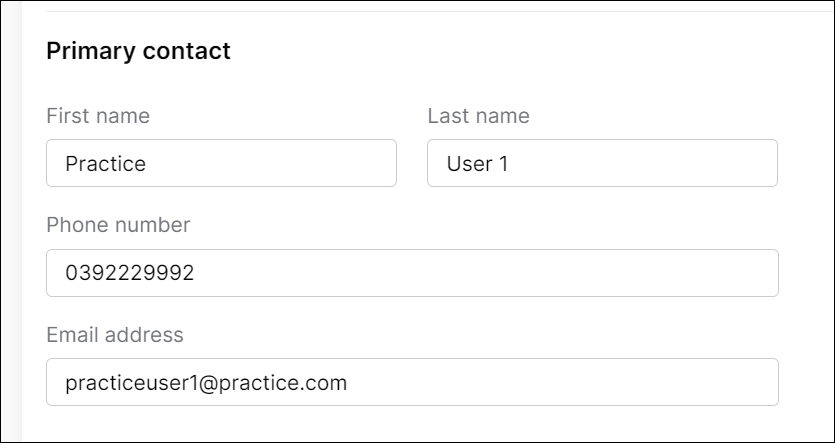
When completing the Primary contact details, we recommend you use an MYOB Practice contact as using the client’s details will add the client to the file. You can always add them later if you wish them to work with you or access reports from within the ledger.
-
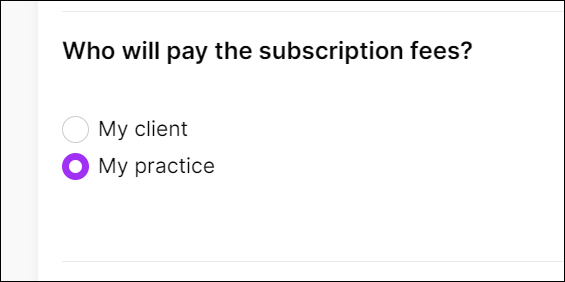
When selecting “Who will pay the subscription fees?” it is important to note that most BankLink clients paid the practice for an all-inclusive service in which the practice billed the client for their accounting services including any software. If you have not yet discussed with your client changes to their engagement, it’s likely you’ll want to ensure there are no surprises. As such we recommend that you select My Practice - note that this requires you to have a payment profile setup in my.myob and means that your firm will be billed for the MYOB subscription and you can then bill your client.
-
Lastly, when selecting your product under the Select the product you’d like to purchase section, we would recommend you look under Payroll and ledgers and select MYOB Business Connected Ledger which is the product designed with the type of clients BankLink has supported over the years. Note, the price to your practice will depend on your MYOB Practice Partner Program Tier.
Not yet a MYOB Partner Program Member? Sign up today and get exclusive benefits and discounts of at least 15% up to 30% on all ledgers, plus 1 free MYOB Business AccountRight Plus and access to MYOB Academy.
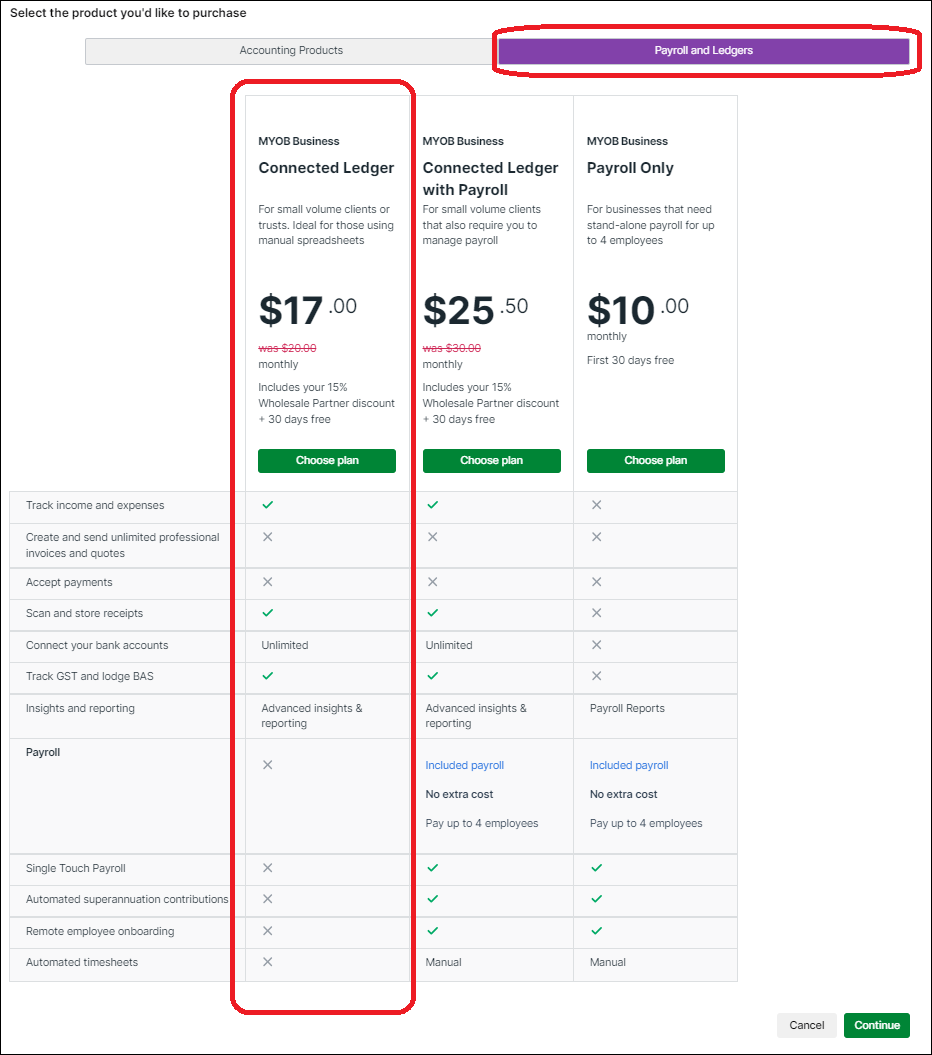
If you have more complex, needs, however, you can continue select other options though note that any BankLink discounts will only apply to MYOB Business Connected Ledger and you may need to re-key or import more data than is the subject of this document. See Importing and exporting data (myob.com) for more details.
-
Once you’ve made your selections and entered your data, click Continue. A summary of your selections will be presented to you. Ensure these are correct, you can go back to the previous step to make any necessary adjustments. Once you’re sure of the information you’ve provided, click Create file.
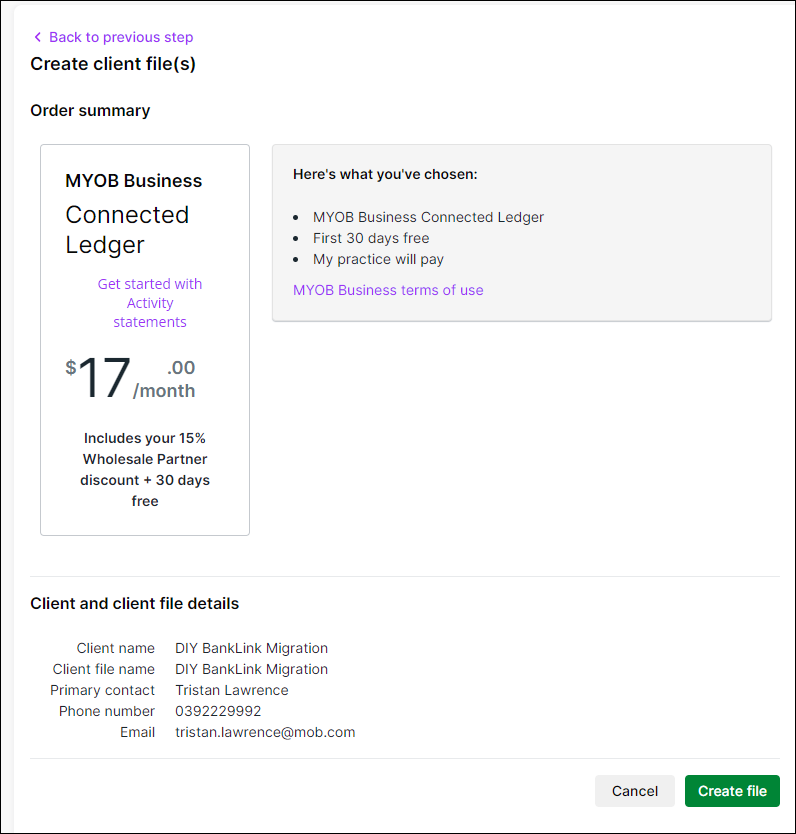
Your new file will be created and in less than a minute should be available for you to select in your MYOB Practice Online files area.
2. Export the chart of accounts from MYOB BankLink
Before exporting your chart of accounts from MYOB BankLink, we recommend that you clean up your chart of accounts so that you have a fresh start in your new MYOB Business Connected Ledger file. The following steps are in your BankLink Practice software.
Export your chart of accounts from MYOB BankLink
-
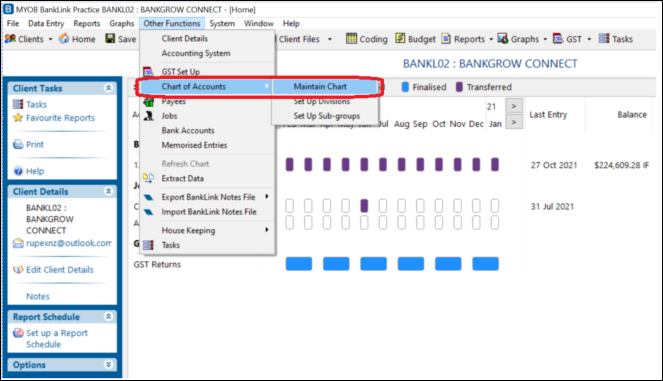
Open your BankLink software and find the client you wish to move to MYOB Business Connected Ledger.

-
Once you have selected the client, go to Other Functions > Chart of Accounts > Maintain Chart of Accounts
-
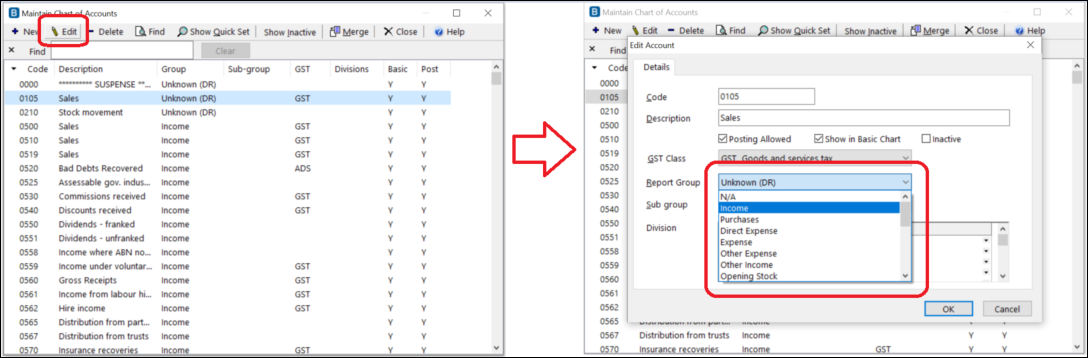
You can see all of the chart of account information for this client and be able to edit the chart. We strongly recommend you:
-
Make Inactive any accounts with 0 balances or any accounts that serve as the debtors control, creditors control, superannuation payable, GST payable, wages and salaries, current year earnings, historical balancing and retained earnings, as these accounts (or categories, as they’re called in MYOB Business) already exist by default and cannot be deleted in your MYOB Business Connected Ledger file).
-
Correctly classify the account Report Group for each account as these will be required when importing the chart into MYOB Business (i.e. do not set to N/A, Unknown (DR), Unknown (CR)).
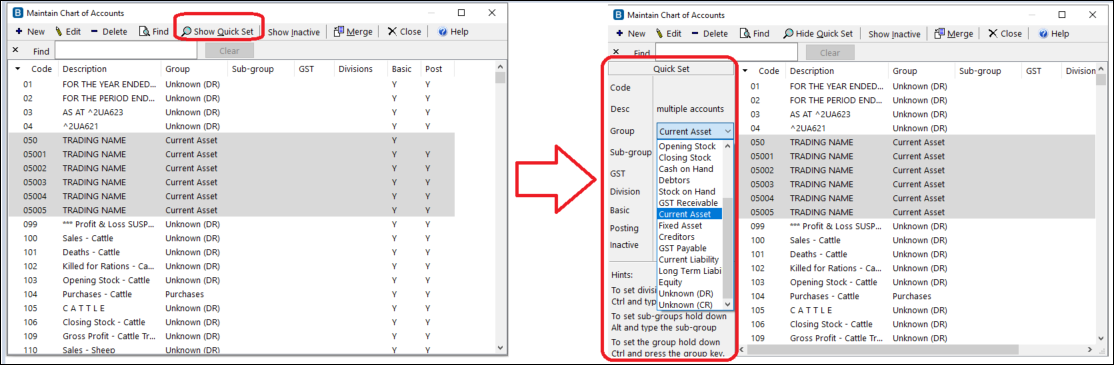
Use the Show Quick Set to set the GST class and Report groups up in bulk by highlighting several accounts together using the Shift button on your keyboard and then making the changes en masse against the Group.
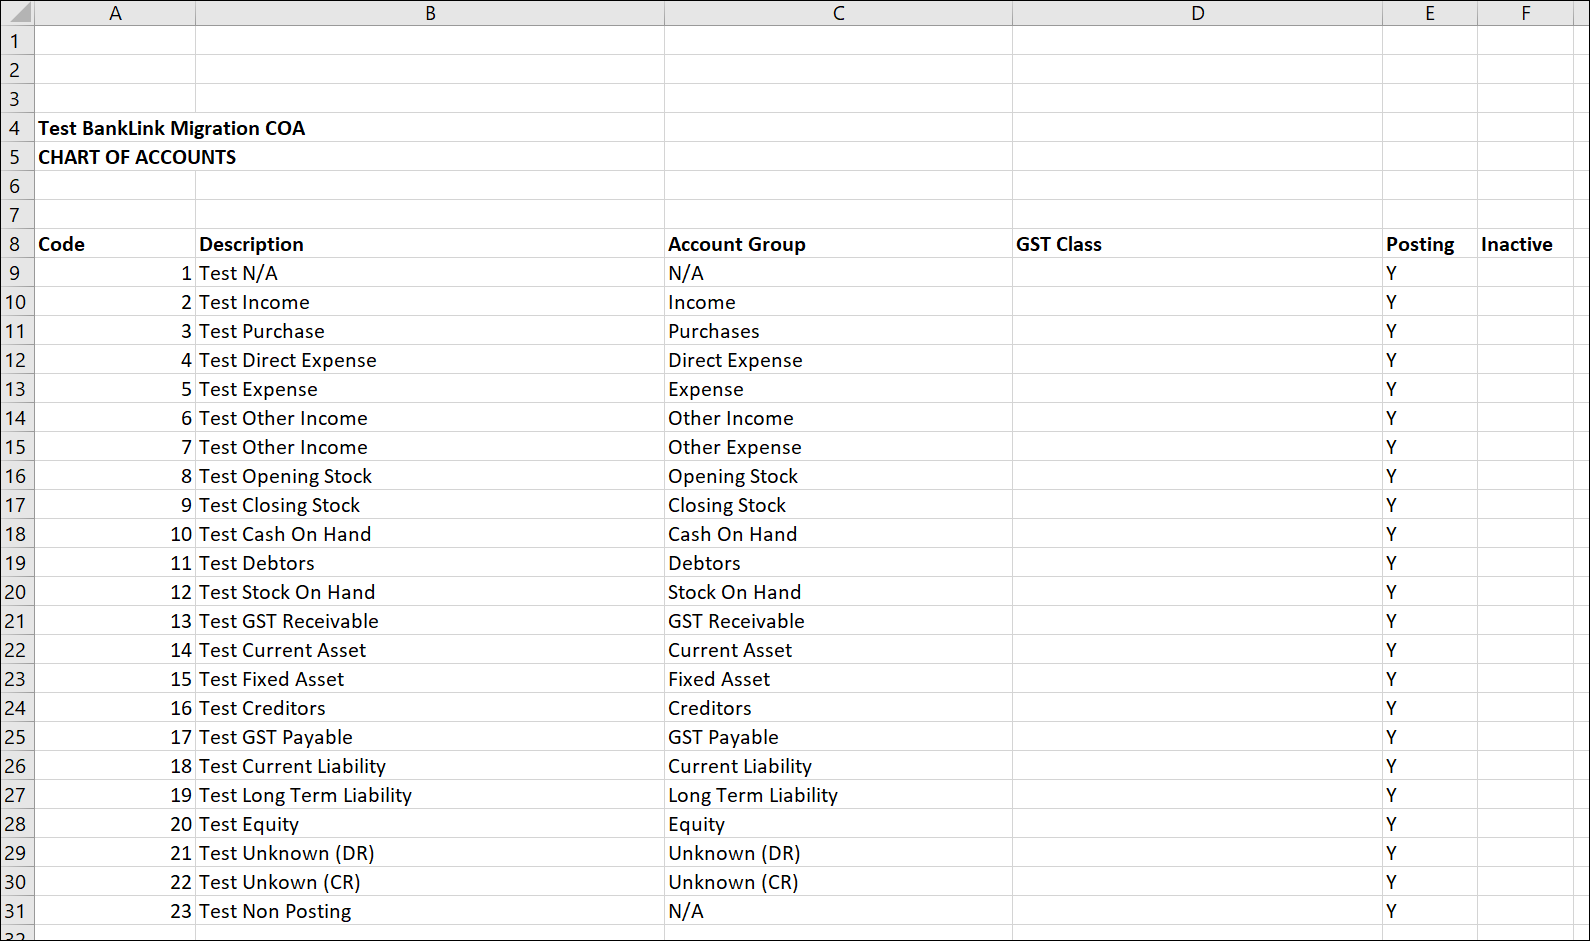
For reference, this is how your Report Group Selections will be mapped via our BankLink COA conversion import tool assistant (in step 3. Convert your BankLink chart of accounts into the format required for MYOB Business below) to your category type in the MYOB Business ledger, including the default assignments to the GST codes required for each category:
In MYOB Business, accounts are now called categories. Find out about the other language changes in MYOB Business.
|
BankLink Report Group |
MYOB Business Category type |
MYOB Business Tax Code (AU) |
MYOB Business Tax Code (NZ) |
|
|---|---|---|---|---|
|
1 |
N/A |
Invalid Category Type - will fail import |
Invalid Category Type - will fail import |
Invalid Category Type - will fail import |
|
2 |
Income |
Income |
GST |
S15 |
|
3 |
Purchases |
Cost of sales |
GST |
S15 |
|
4 |
Direct Expense |
Expense |
GST |
S15 |
|
5 |
Expense |
Expense |
GST |
S15 |
|
6 |
Other Expense |
Other expense |
GST |
S15 |
|
7 |
Other Income |
Other income |
GST |
S15 |
|
8 |
Opening Stock |
Other asset (1) |
N-T |
N-T |
|
9 |
Closing Stock |
Other asset (1) |
N-T |
N-T |
|
10 |
Cash On Hand |
Bank |
N-T |
N-T |
|
11 |
Debtors |
Account receivable (2) |
N-T |
N-T |
|
12 |
Stock On Hand |
Other asset (1) |
N-T |
N-T |
|
13 |
GST Receivable |
Other current liability |
N-T |
N-T |
|
14 |
Current Asset |
Other current asset |
N-T |
N-T |
|
15 |
Fixed Asset |
Fixed asset (3) |
CAP |
N-T |
|
16 |
Creditors |
Accounts payable (2) |
N-T |
N-T |
|
17 |
GST Payable |
Other current liability |
N-T |
N-T |
|
18 |
Current Liability |
Other current liability |
N-T |
N-T |
|
19 |
Long Term Liability |
Long term liability |
N-T |
N-T |
|
20 |
Equity |
Equity |
N-T |
N-T |
|
21 |
Unkown (DR) |
Invalid Category Type - will fail import |
Invalid Category Type - will fail import |
Invalid Category Type - will fail import |
|
22 |
Unknown (CR) |
Invalid Category Type - will fail import |
Invalid Category Type - will fail import |
Invalid Category Type - will fail import |
We strongly urge you to resolve any accounts in BankLink with a BankLink Report Group of:
-
N/A
-
Unkown (DR)
-
Unknown (CR)
and change them to any of the other available options. Alternatively you can make them Inactive as these category types are not available in MYOB Business (i.e. there can be no unknown category types).
Note that the table above is for guidance only. If you have bank fees and wages accounts (for example), these may have GST tax codes allocated to them by default, depending on the categories they’ve been mapped to, but you can change these tax codes if you want.
For the MYOB Business category types:
In MYOB Business, accounts are now called categories. Find out about the other language changes in MYOB Business.
|
Unlike MYOB Business (which operates on a perpetual inventory basis, using average cost), MYOB Business Connected Ledger doesn’t have an inventory feature. While it’s possible to maintain a periodic inventory using generally accepted accounting principles and methods such as FIFO as an example, these need to be maintained as journal entries. |
|
A debtors control category and a creditors control category already exist by default in the standard charts provisioned on your MYOB Business file. You may change the category name or number of these after you are done importing, but you won't be able to delete any categories that are marked as Linked categories. Find out more about linked categories. |
|
We would recommend that post import you check your fixed asset balances and ensure they have the appropriate carrying value as well as the correct linked accumulated depreciation categories and journals. |
If there are category codes that are modified later that don’t conform to the BankLink Report Group code these will show up as FALSE
-
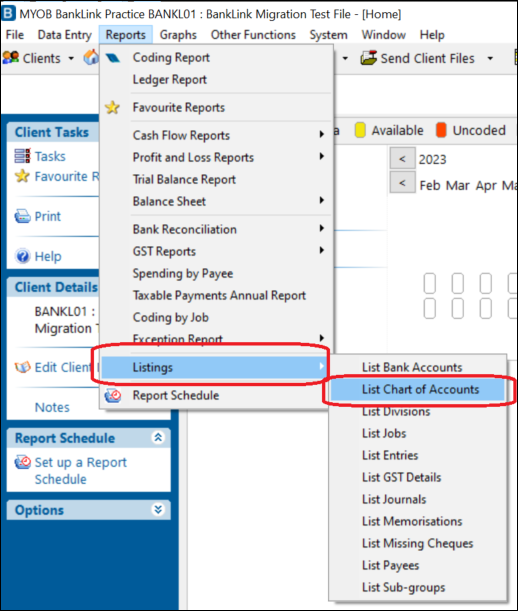
Once you have made the necessary adjustments to your client’s chart of accounts, you can now export these by going to Reports > Listing > List Chart of Accounts.
-
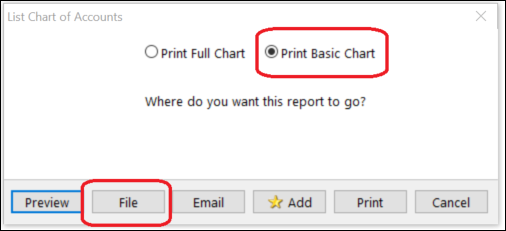
When the List Chart of Accounts pop up window appears, select Print Basic Chart and select File
-
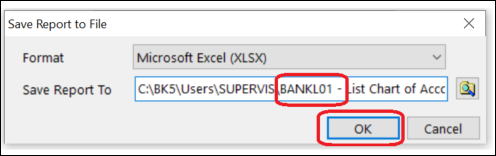
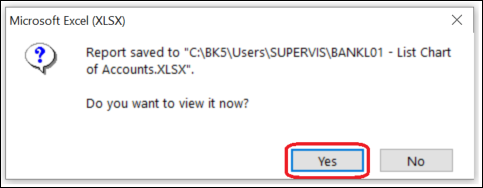
When the destination pop up window comes up, ensure that you select an appropriate location. We also highly recommend that you add appropriate identifiers such as the BankLink Client Code so that you know which client chart this refers to. Click Ok. The file will be saved in your nominated location with the file name you have input.
-
Once the file is saved, you will be asked whether or not you wish to view the file. Click Yes as you will need this for the next phase when importing as you will need to copy this into the template we provide to assist in converting the chart to the MYOB Business format.
-
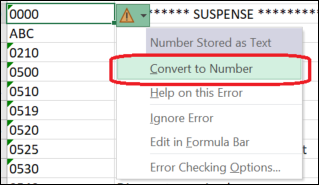
An Excel screen will pop up if you have Microsoft Excel installed displaying the CHART OF ACCOUNTS information.
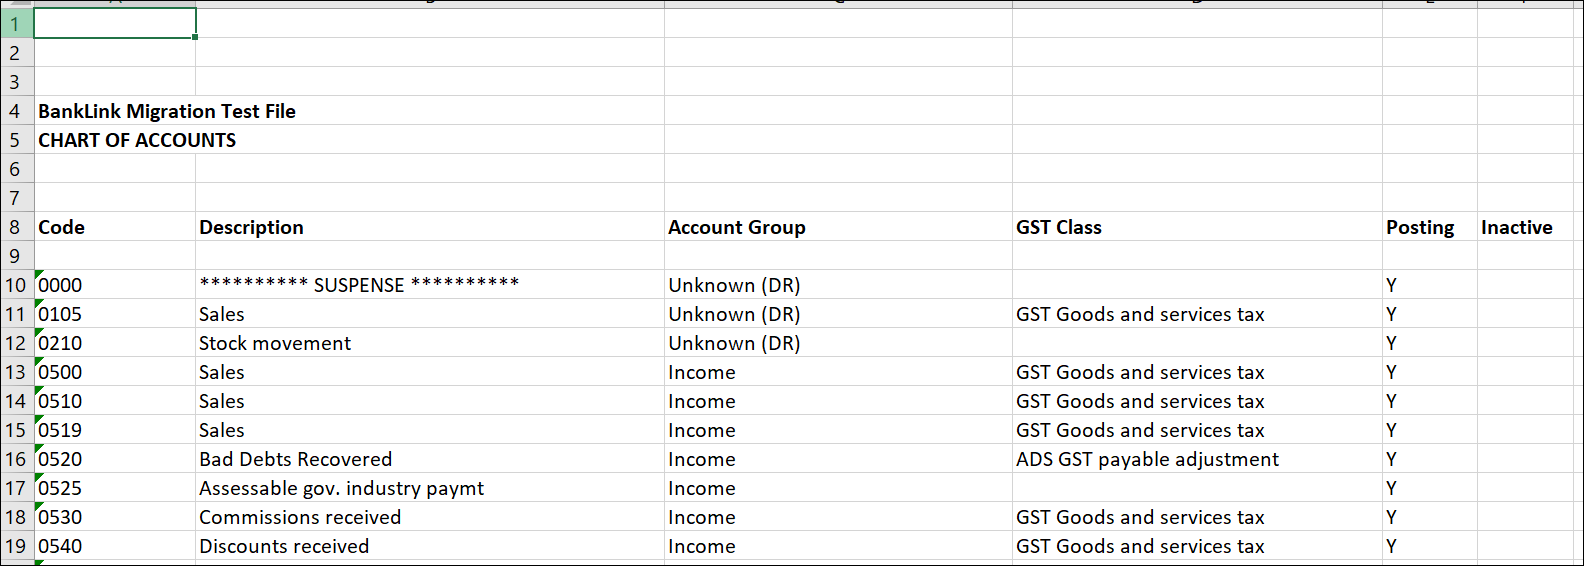
-
Ensure the formatting is correct. We would recommend that numbers are converted to number. Save the report.
-
Do one last check to ensure that your Account Groups and GST class is correct, if not make the necessary modifications in the BankLink client and re-export and re-save the report. Note that you’re able to modify the CopyImportCOAHere page to take into account specific instances where income and expenses are not defaulted to GST like bank fees and wages.
Do not delete any rows or columns from this spreadsheet.
3. Convert your BankLink chart of accounts into the format required for MYOB Business
Now that you have exported your BankLink client’s chart of accounts, you can now ensure that the formatting is suitable for import into MYOB Business. We have provided you a spreadsheet template that you can use to assist in the conversion.
Convert your BankLink chart of accounts into the format required for MYOB Business
-
Download and open the BankLink MYOB Business Chart Conversion Assistant:
Australia: BankLink_MYOB_Business_Chart_Conversion_Assistant_AU.xlsx
New Zealand: BankLink_MYOB_Business_Chart_Conversion_Assistant_NZ.xlsx -
Familiarize yourself with the excel file. In this file you will find 3 tabs:
-
BankLinkCOAthis is a blank sheet where you can copy your COA from Step 2.6 -
MYOBBCOAthis locked sheet that contains formulas (but will allow you to filter) to ensure that your BankLink chart is converted to the appropriate format required by MYOB Business. You will need to filter this sheet to copy to (c) so that only the accounts (or categories as they are called in MYOB Business) that can be imported into MYOB Business are attempted for the import to prevent unnecessary errors. It will also highlight certain accounts that you may need to look at post the import, to ensure:-
They have the appropriate headers; or
-
That you might want to use to replace the default linked categories in your MYOB Business file
-
-
CopyImportCOAHerethis sheet is where you should copy the filtered list in (b). Copy the entire sheet and when pasting it into the ImportCOSHere tab be sure to chose Paste values.
-
-
Copy your Banklink Chart of Accounts from Step 2.6 to the
BankLink_COAtab
You’re not able to modify the BankLink chart (for example, delete columns or rows) when it contains active formulas. The formulas on the MYOBBCOA tab are configured to specific rows in the BankLinkCOA tab.
Row 4 typically contains the client’s name.
Row 5 specifies it is a CHART OF ACCOUNTS.
Row 8 contains headers to identify the data.
-
Examine the output on the
MYOBBCOAtab. Notice that column B and column C on row 2 contain aNotethat advises what to filter. As pointed out in Step 2.2 not all account groups can be mapped and imported. -
Using the filter on Column C, filter out
BlanksandInvalid Account Type - will fail import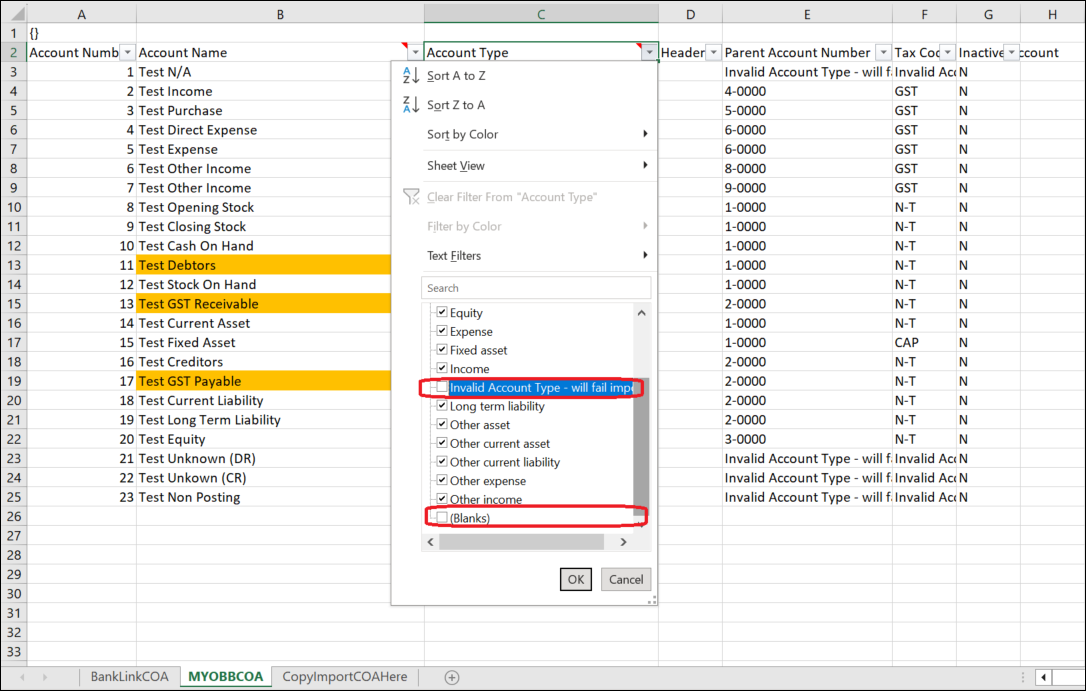
You will get a filtered list that is ready to copy to the CopyImportCOAHere
-
Copy this filtered list to
CopyImportCOAHere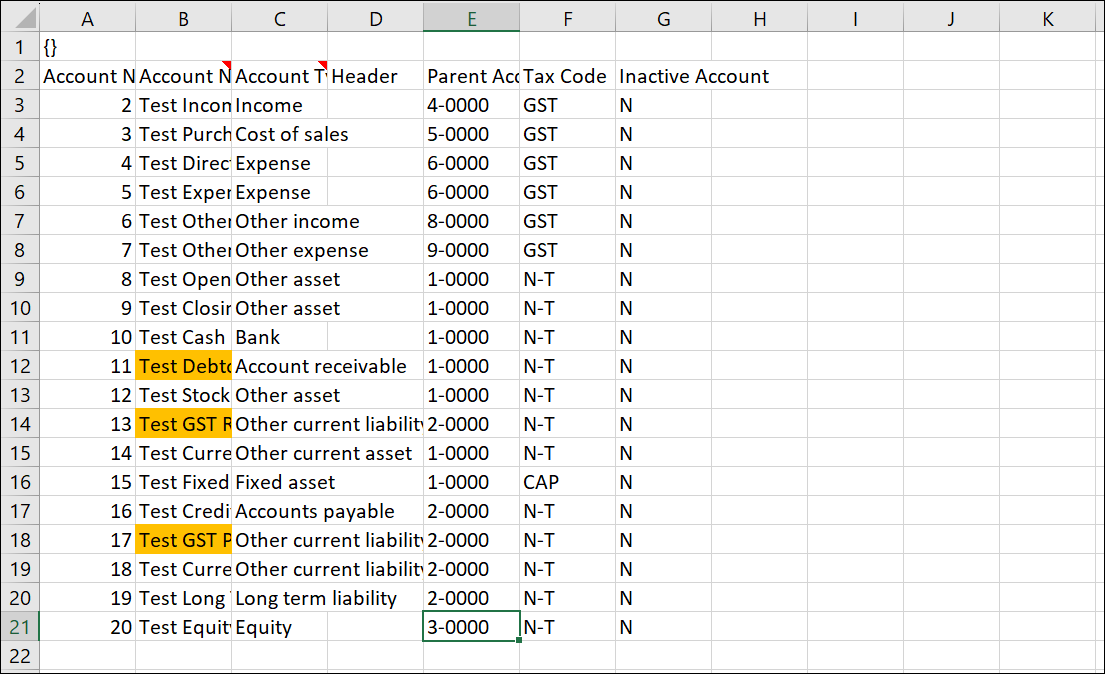
-
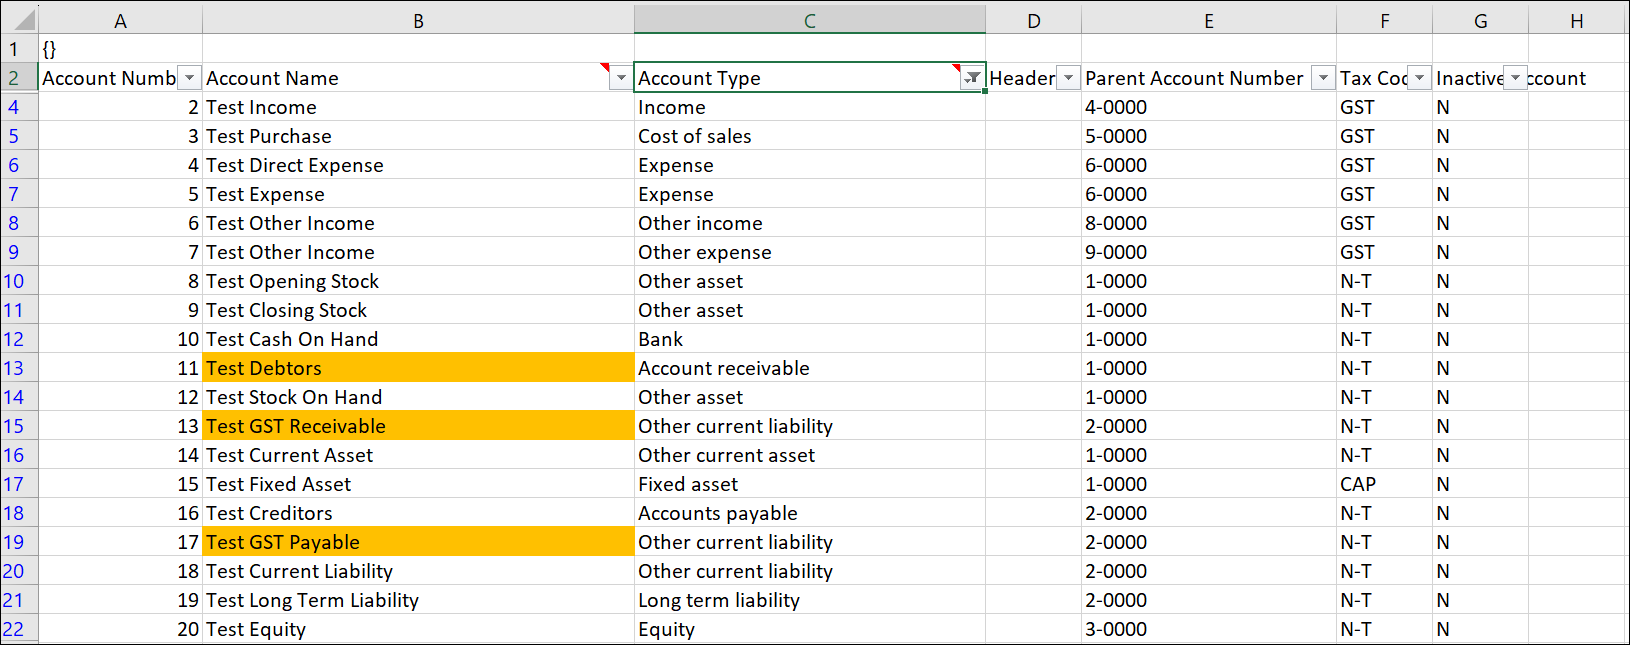
Check the list for any lines highlighted in orange. These accounts have been highlighted as you might want to check these accounts as they may serve the same purpose as linked categories in your MYOB Business Connected Ledger as highlighted in Step 2.2 which can’t be deleted. You’ll either need to repeat the steps from Step 2 or delete these post the import when in Step 6.
-
Save the spreadsheet with an appropriate name to identify the client worksheet and to an appropriate location, i.e. perhaps the one in Step 2.6
-
Open a new spreadsheet and copy the results you pasted in
CopyImportCOAHereand ensure you keep the original formatting. Save this as a comma separated values (*.csv file) named appropriately - e.g. using your BankLink client code with an identifier to alert you that it is a chart of accounts to import. For example, if your client code in BankLink was BNKL, then name your import file asBNKL_COA_Import.csv
4. Import your categories (chart of accounts) into MYOB Business
Using the file you’ve created in Step 1 you are now able to import your categories (chart of accounts).
In MYOB Business, accounts are now called categories. Find out about the other language changes in MYOB Business.
Import your categories (chart of accounts) into MYOB Business
-
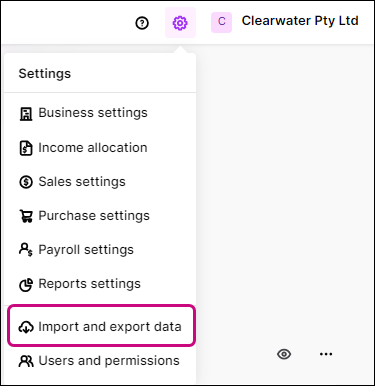
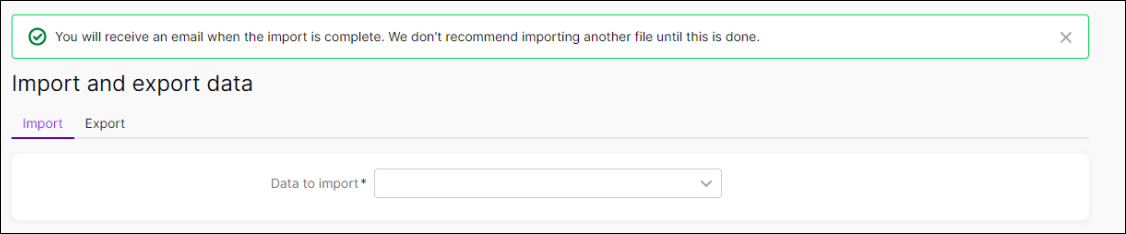
Open the company file, go to the settings menu (⚙️) and choose Import and export data.
-
On the Import tab, for the Data to import choose Categories (Chart of accounts).
-
Select Delete unused categories.
It is important you select the Delete unused categories option as not doing so will leave all default categories in the file. You'll need to manually delete these one by one or import the file again, (ensure if you need to that you also keep the “Update existing data” selection in place).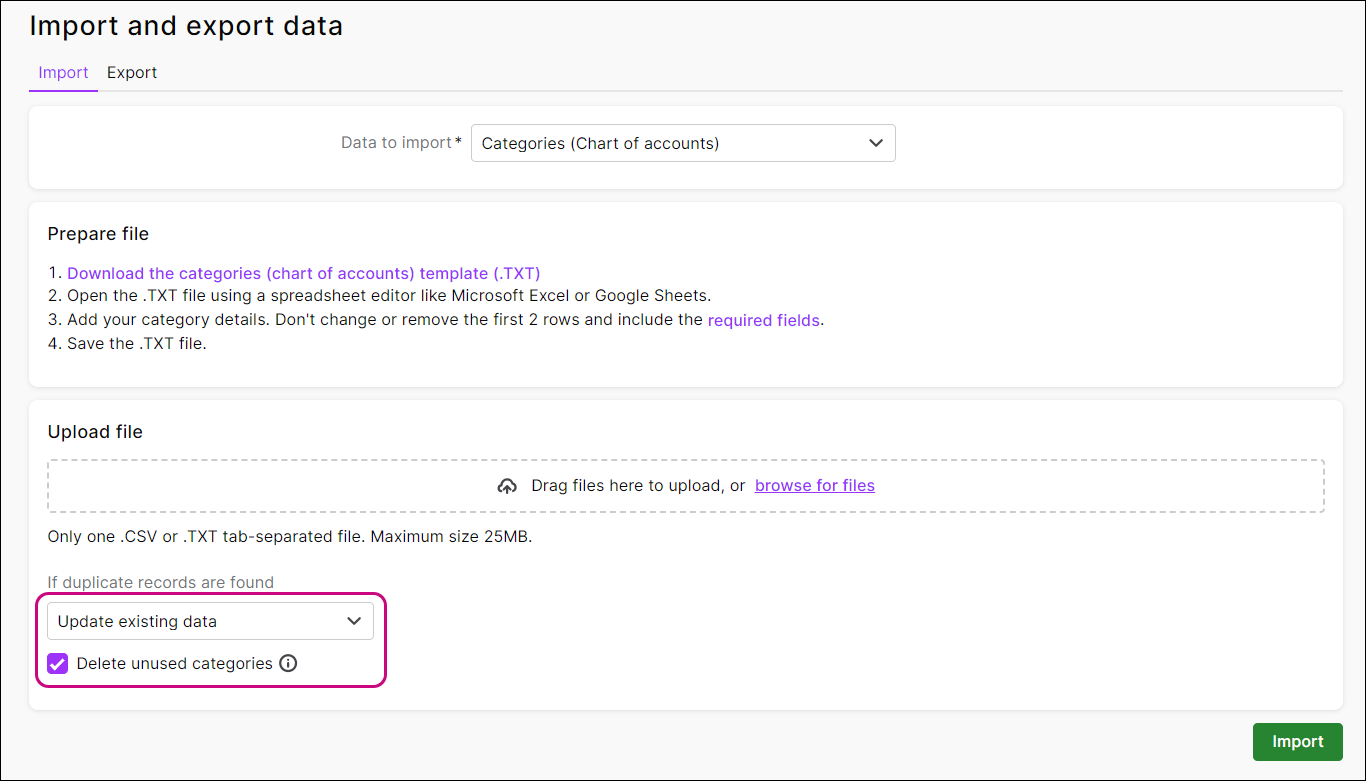
-
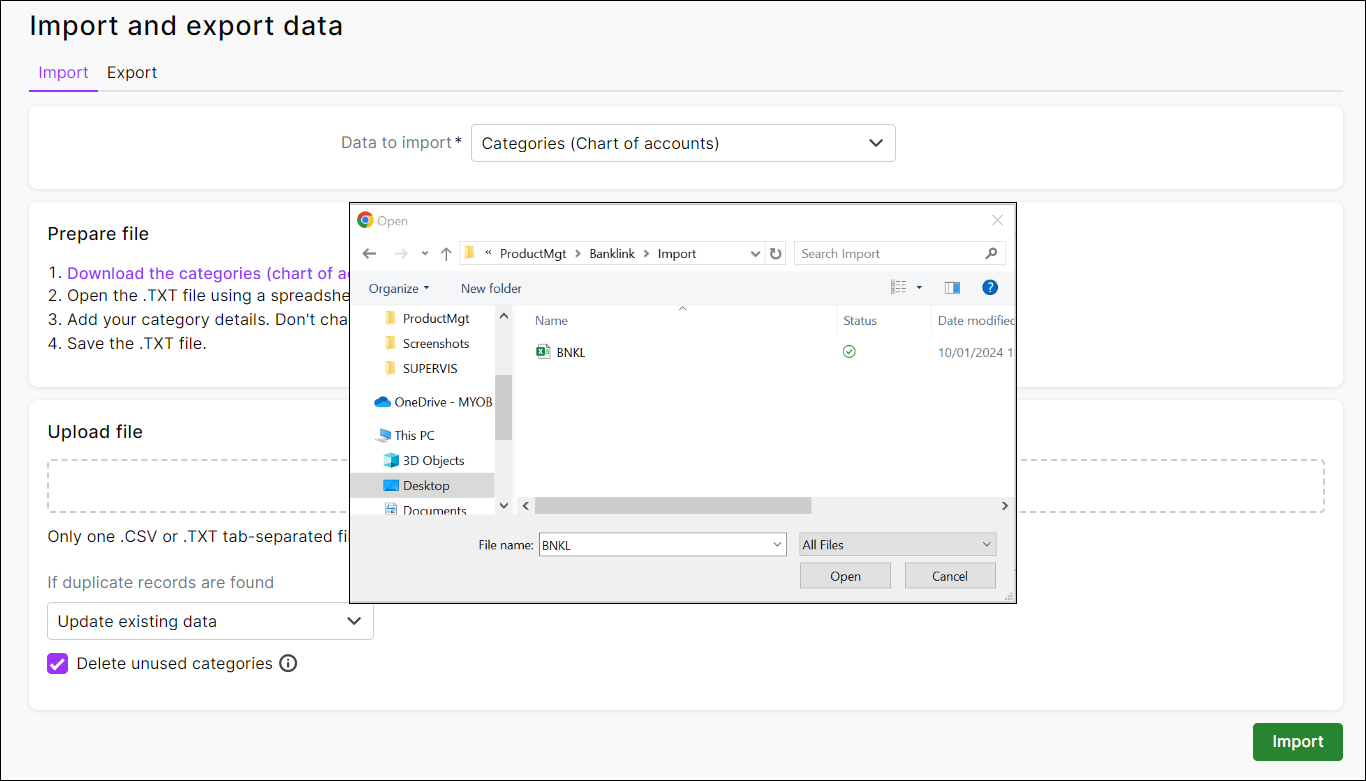
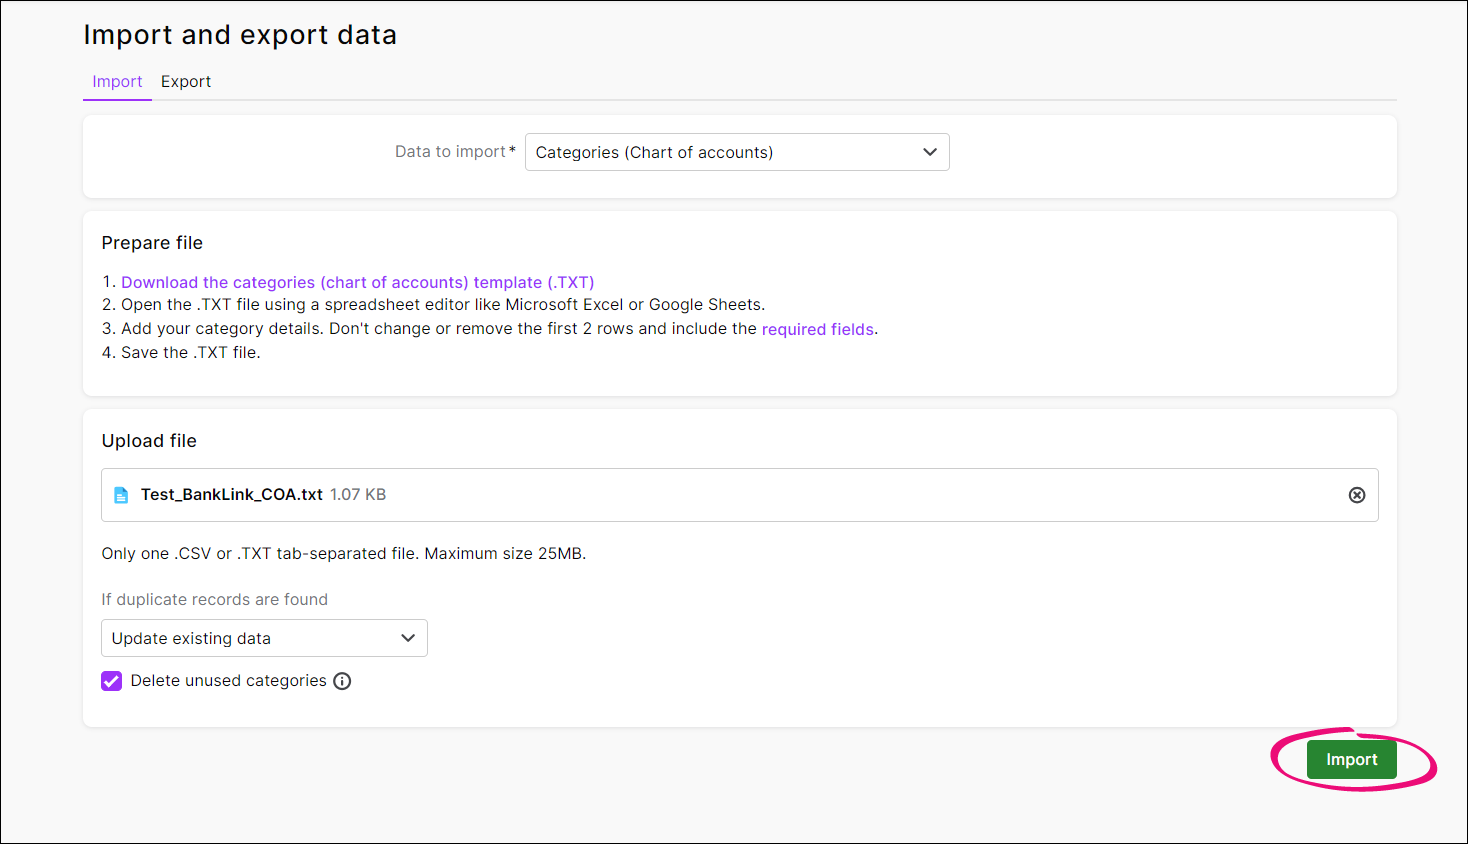
Browse for your file from or drop the file in the Upload file section
-
Once your file has been dropped in or selected click the Import button
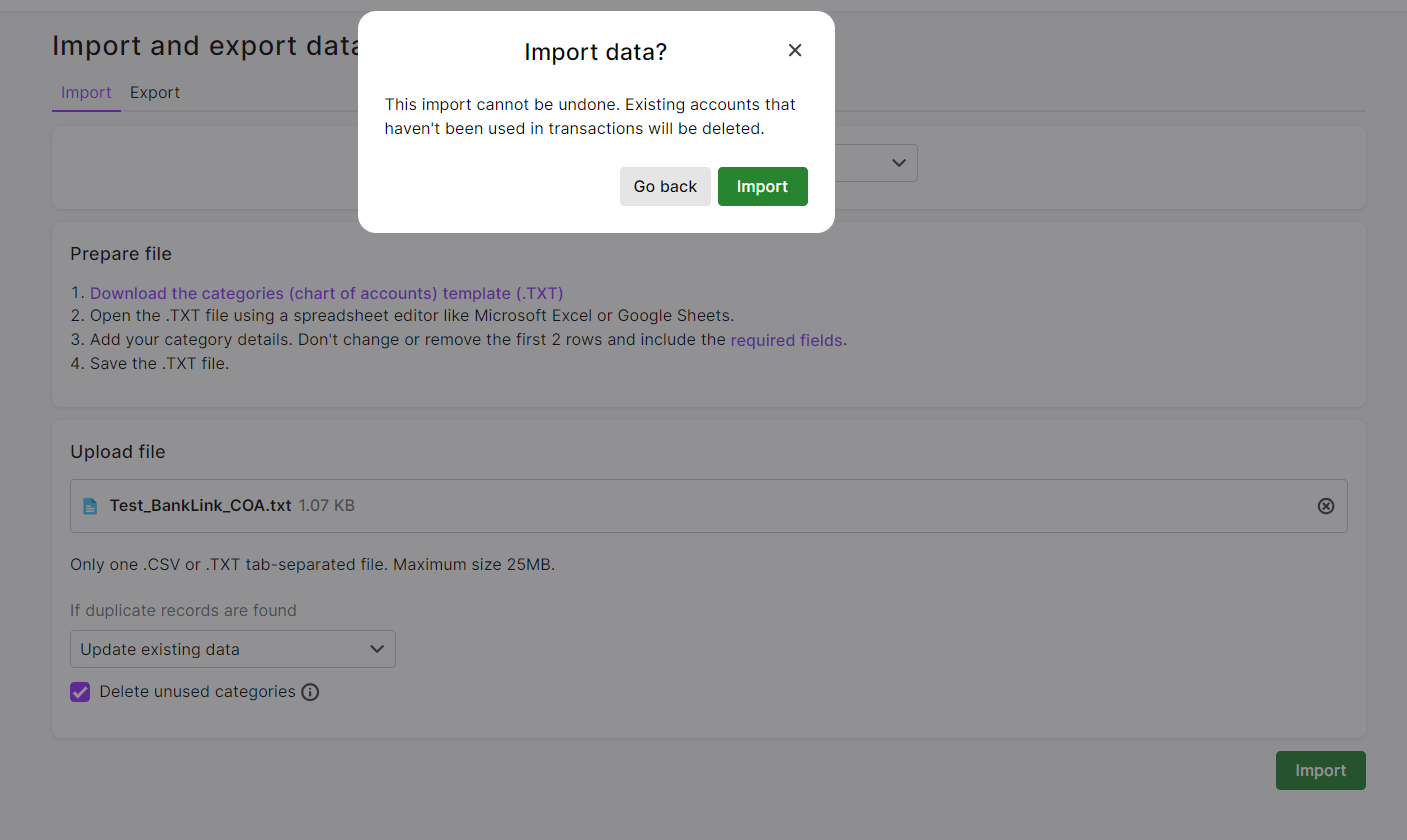
-
On the Import data confirmation page, click Import:
-
Your file will be imported and you will be presented success message advising you to check your emails for when the file import is complete. It normally arrives within 2 minutes.
-
You'll receive an e-mail with a message similar to the following - with the subject line of Your file with Accounts data was imported from
noreply@apps.myob.com. If you've followed the steps correctly, there should be no accounts skipped.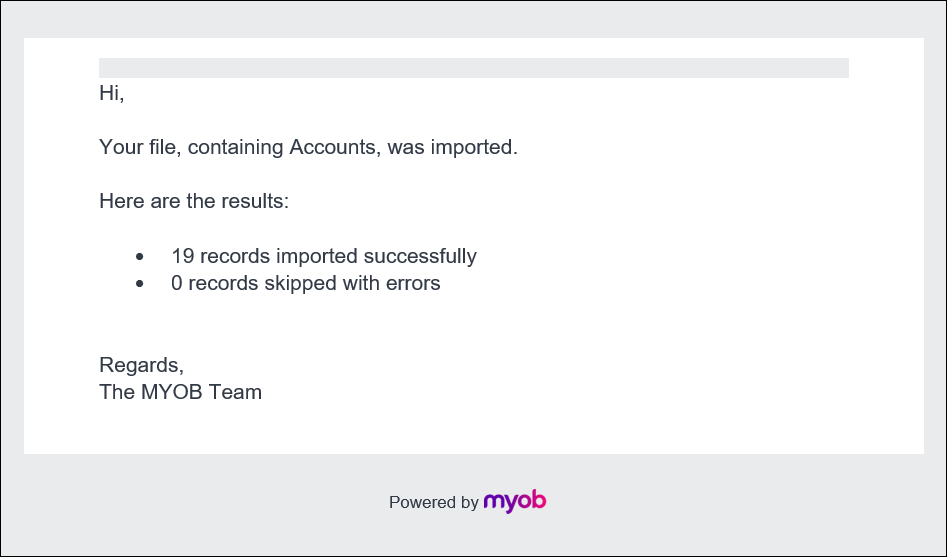
-
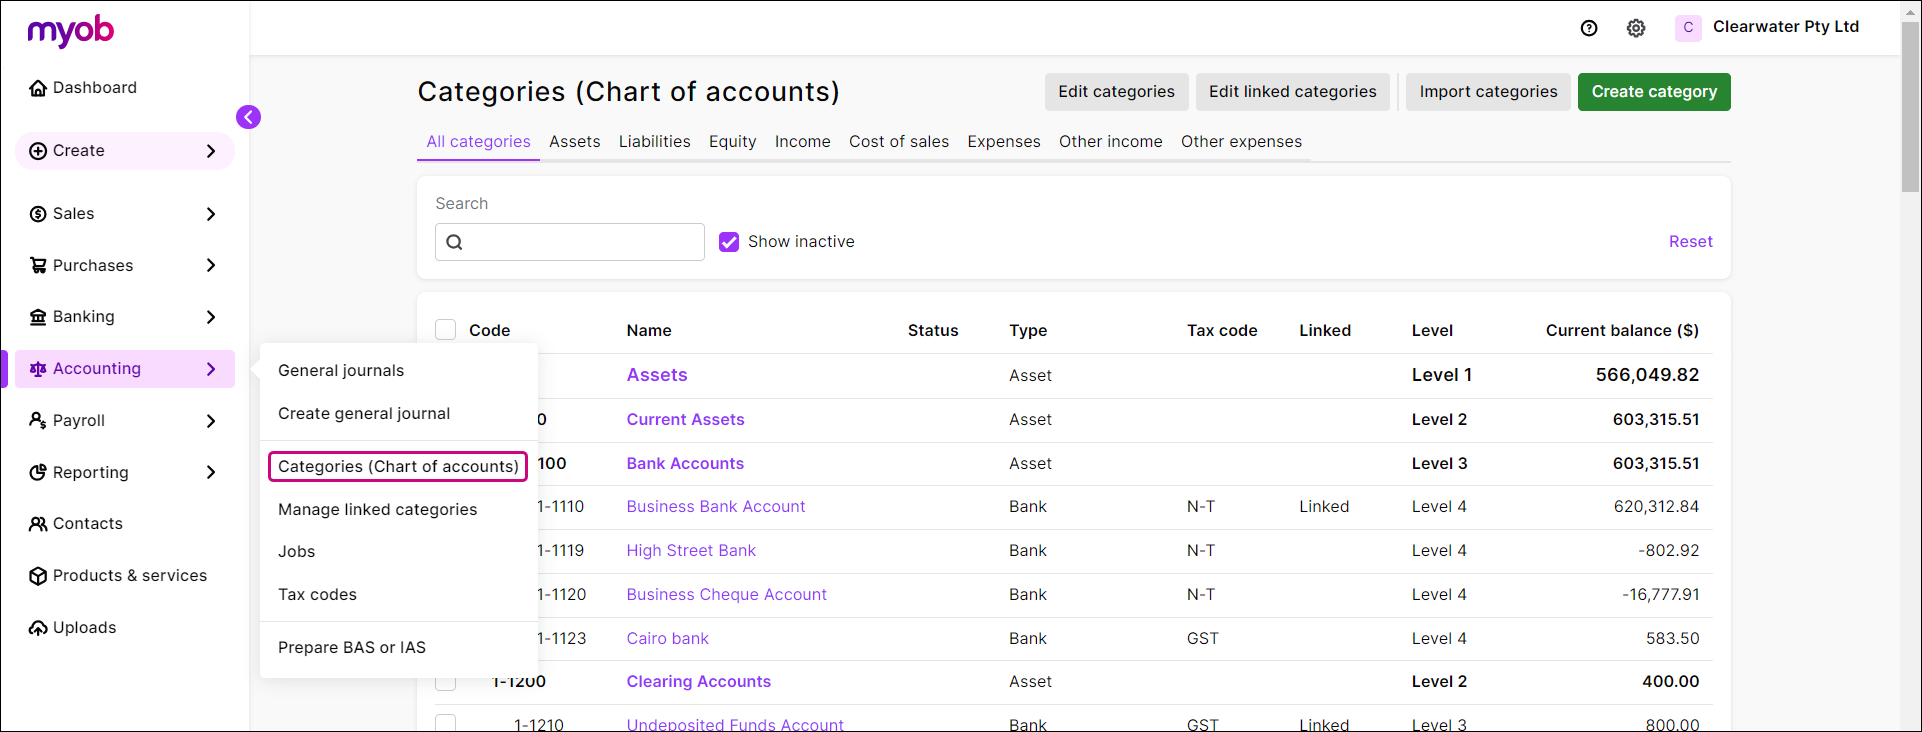
Check your chart of accounts by going to the Accounting menu > Categories (Chart of accounts) to visually confirm that your categories have been imported to your satisfaction.
If you want, you can edit the categories to change the default tax codes assigned to them.
For more detailed steps on importing catgeories (chart of accounts), as well as charts of accounts samples, see ‘Other chart of accounts resources’ at the end of this topic.
5. Re-assign default linked categories to imported categories or edit linked category names and numbers
Now that you’ve imported your chart of accounts successfully from MYOB BankLink into your new MYOB Business Connected Ledger, it’s time to modify the linked categories and arrange categories according to the hierarchy you desire.
Re-assign default linked categories to imported categories or edit linked category names and numbers
-
In MYOB Business Connected Ledger, go to the Accounting menu >Categories (Chart of accounts) to open the Categories (Chart of accounts) page.
-
Look for any categories that are marked Linked.
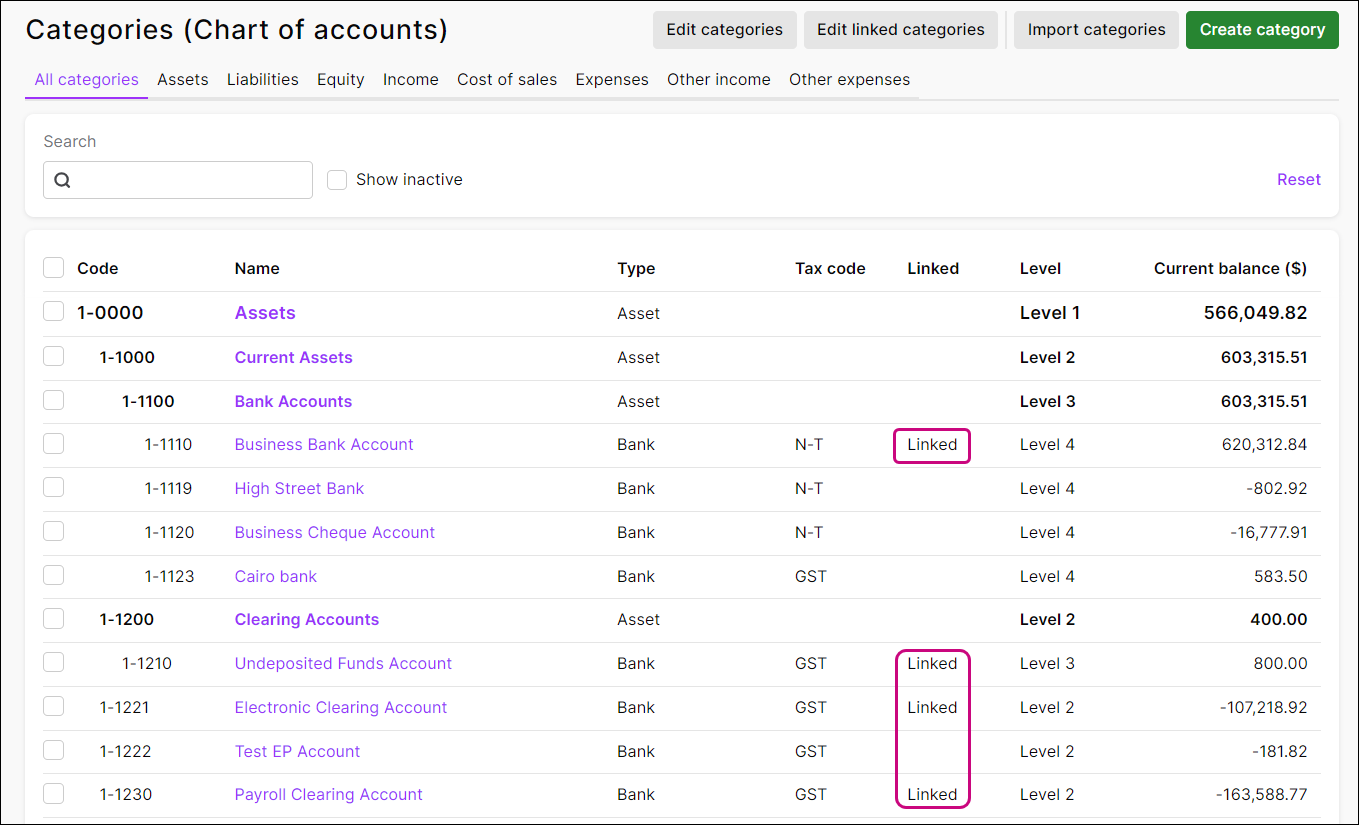
-
Click on one of the categories to open it. From here you will be able to edit the Code and Name to match the format that you want. Click Save.

-
Repeat these steps for all linked categories.
Not all of the categories are available for you to change for MYOB Business Connected Ledger subscriptions. This is because MYOB Business Connected Ledger doesn’t have invoicing and payroll. For linked categories you can’t change, we recommend that you simply re-number these categories to suit your chart of accounts format.
Your categories should now be ready.
6. Set your financial year and enter opening balances
Now that your categories are ready, you should chose your financial year and enter in any opening balances and journals required to show prior-period comparisons.
Set your financial year and enter opening balances
-
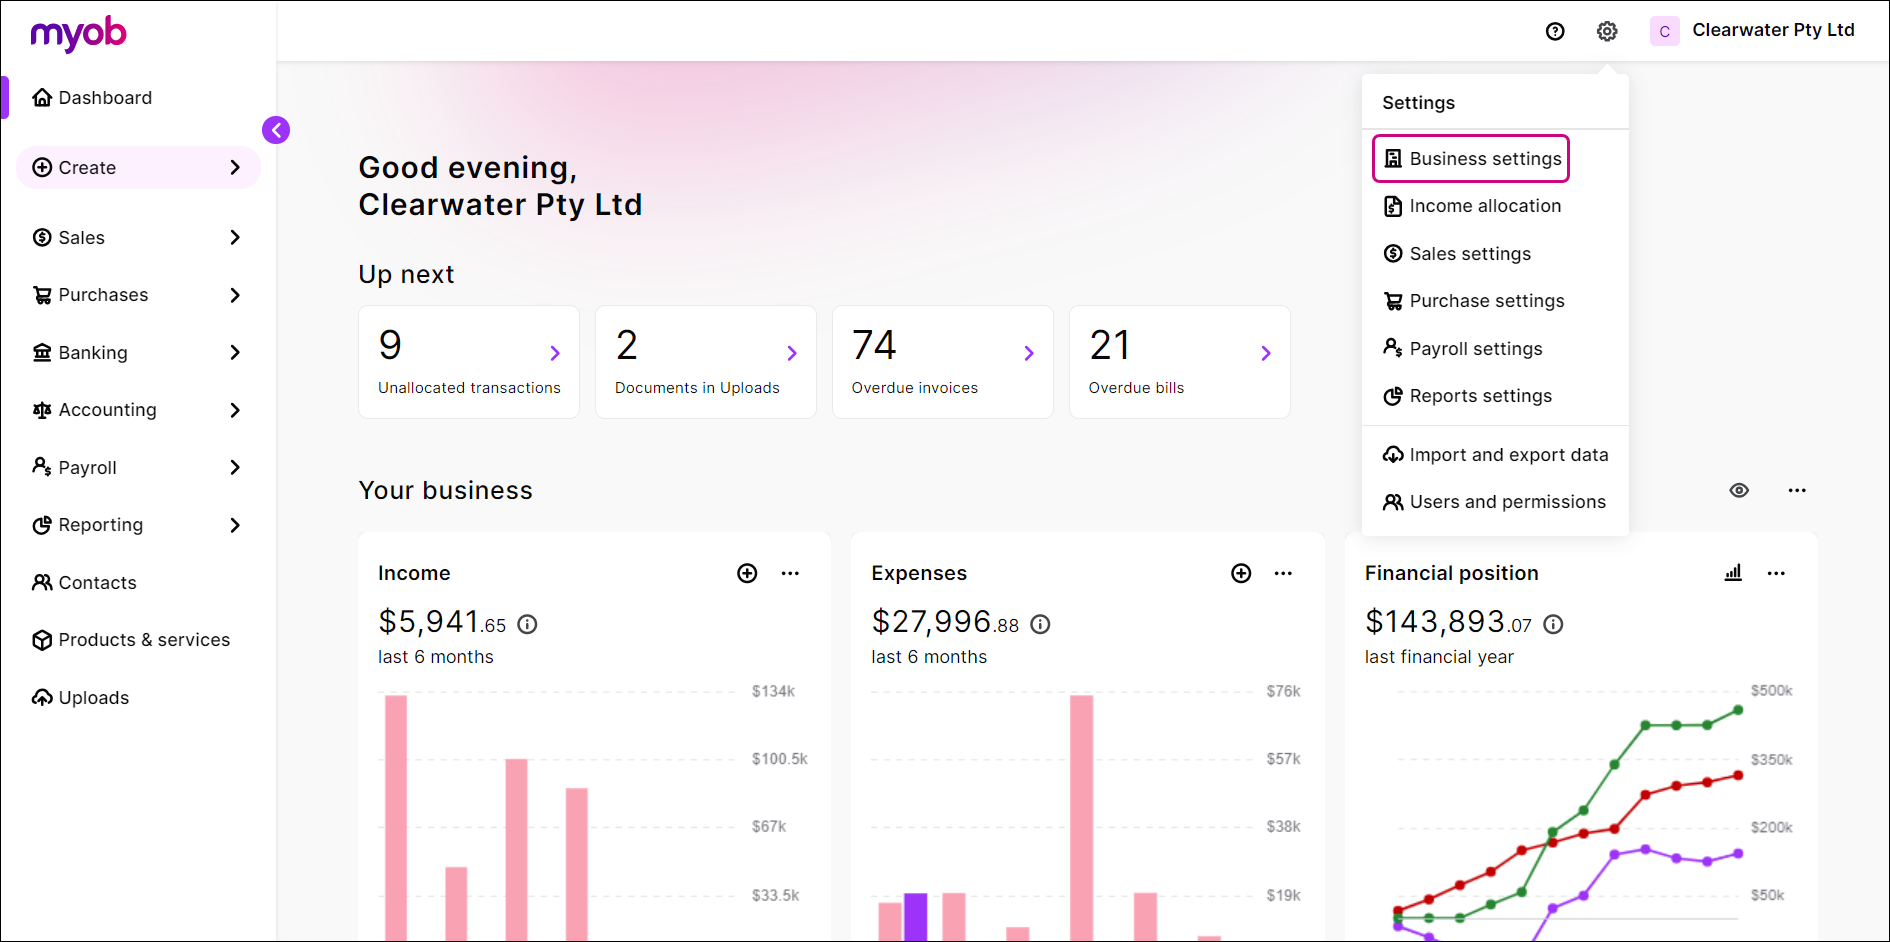
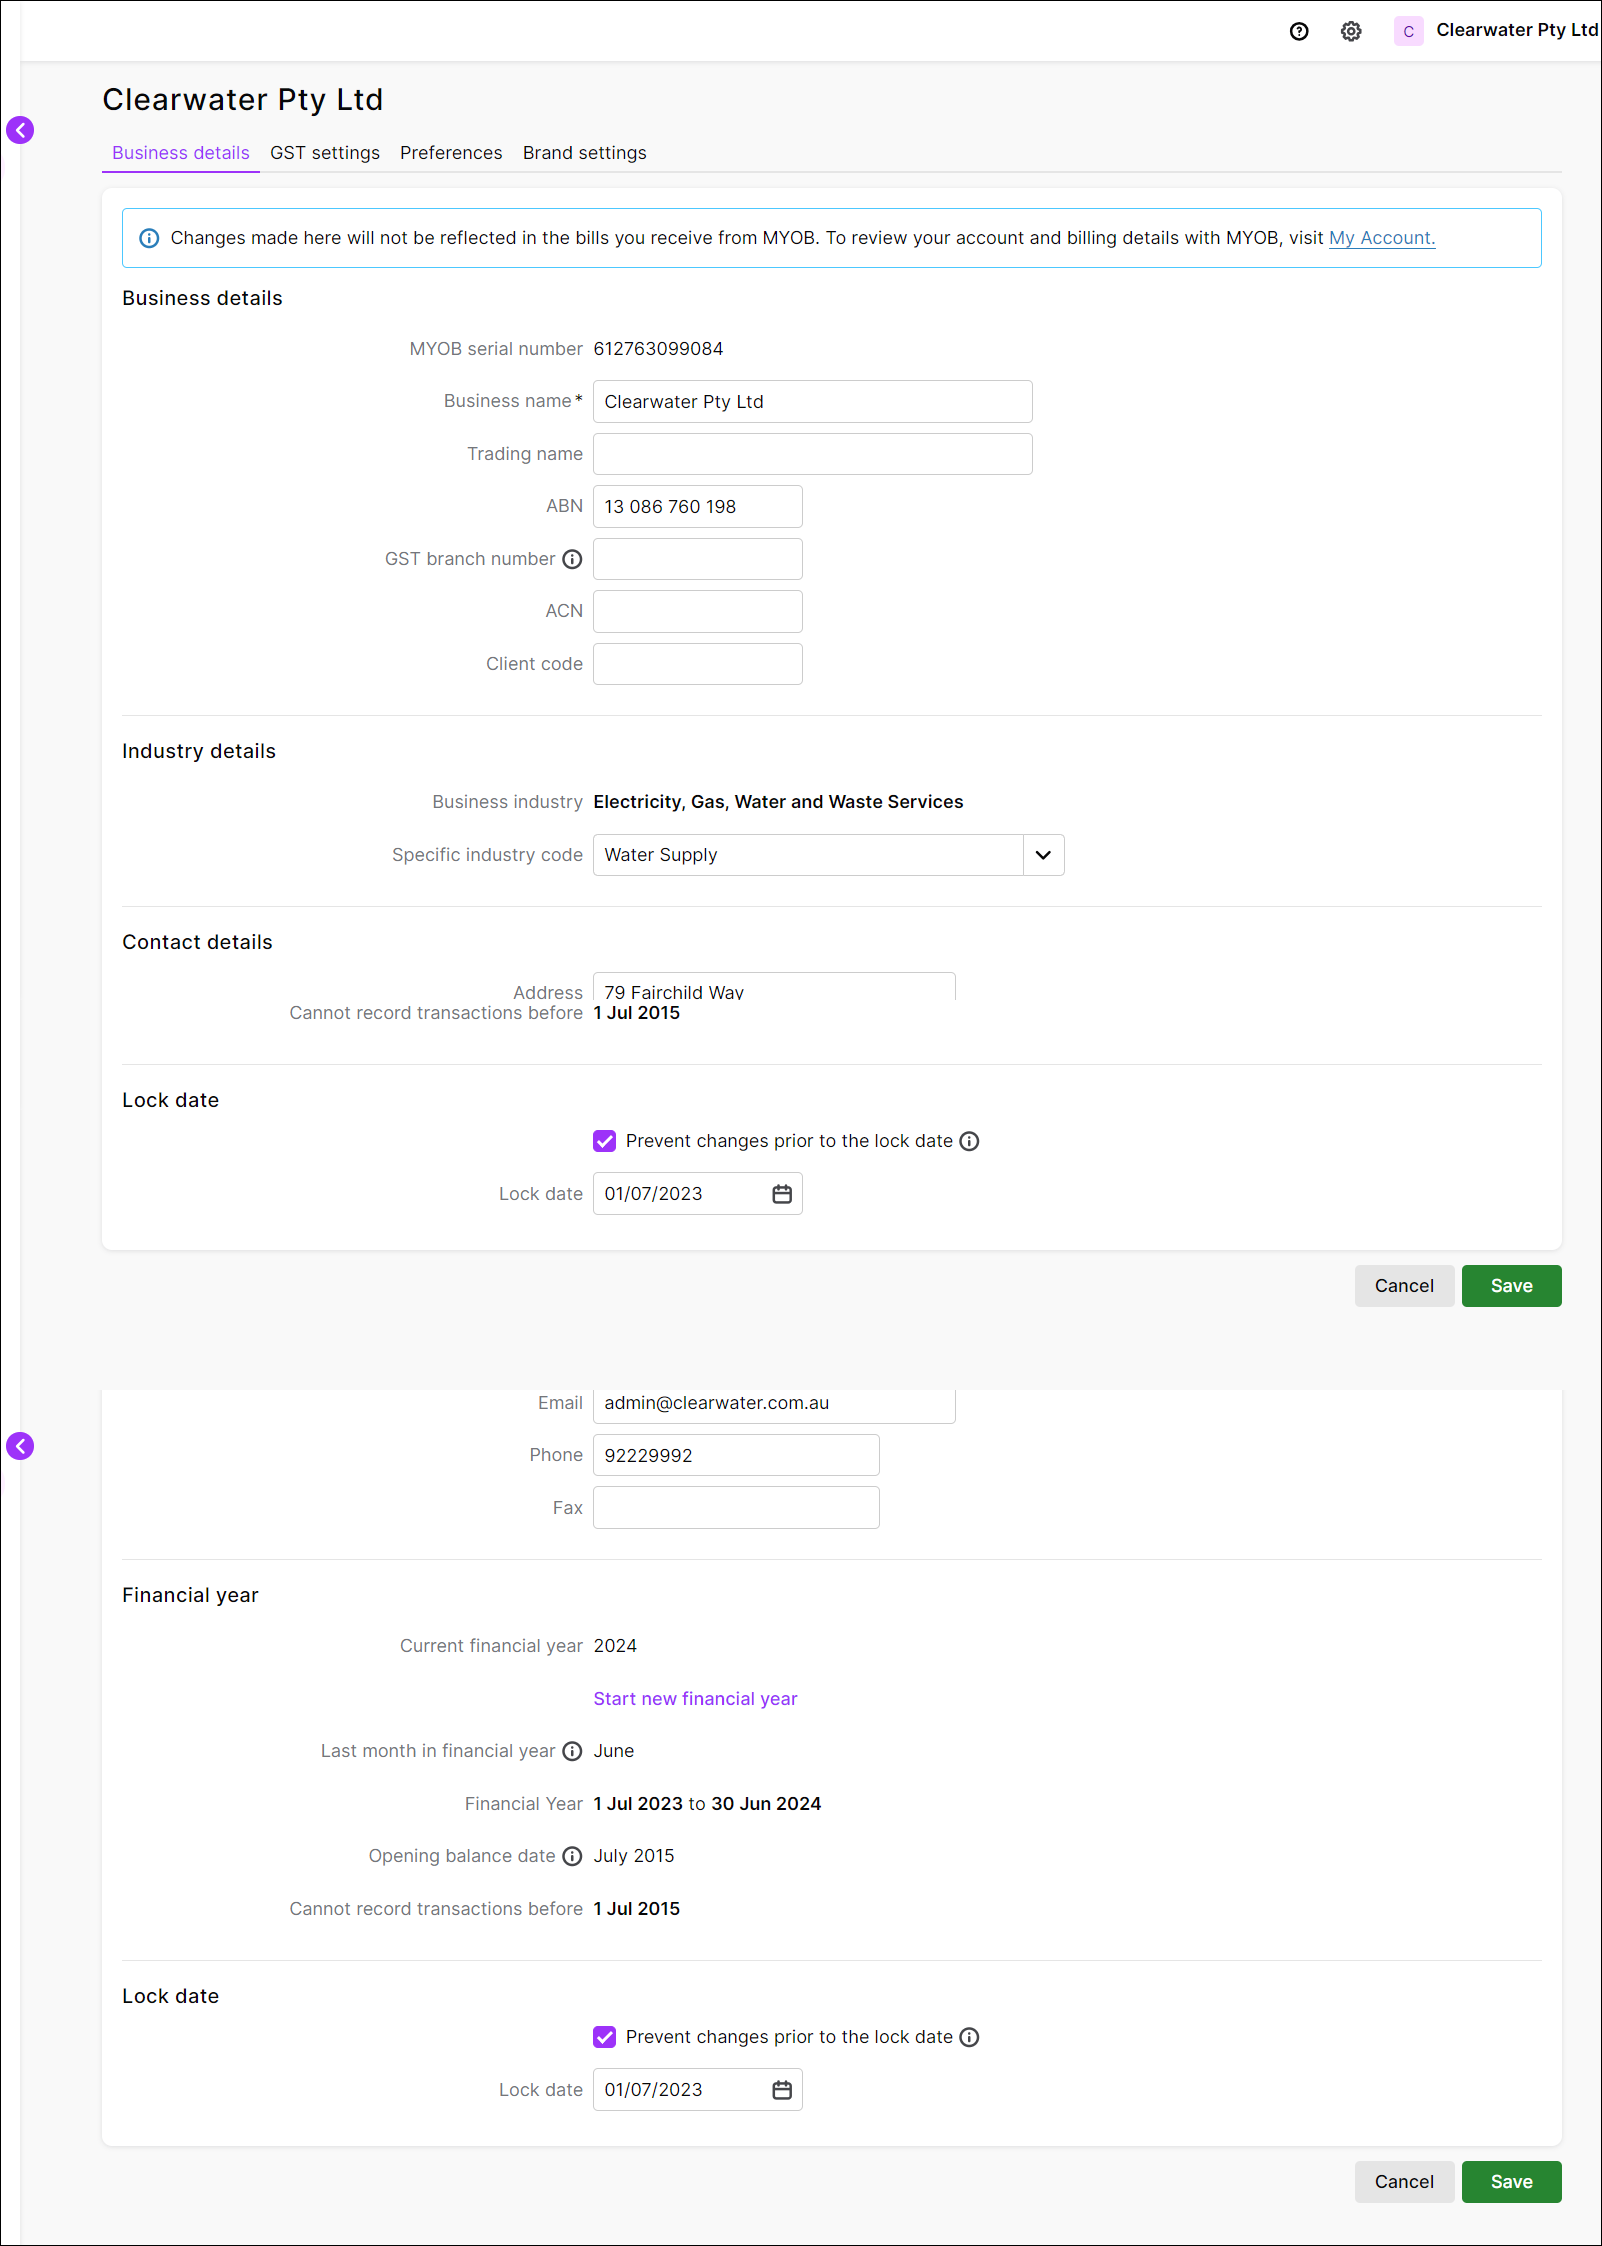
Click the settings menu (⚙️) and choose Business settings.
-
Change your financial year to suit your needs, we recommend using the prior year to this year to allow you to enter any journal entries that you may need for prior year comparatives. Click Save.
-
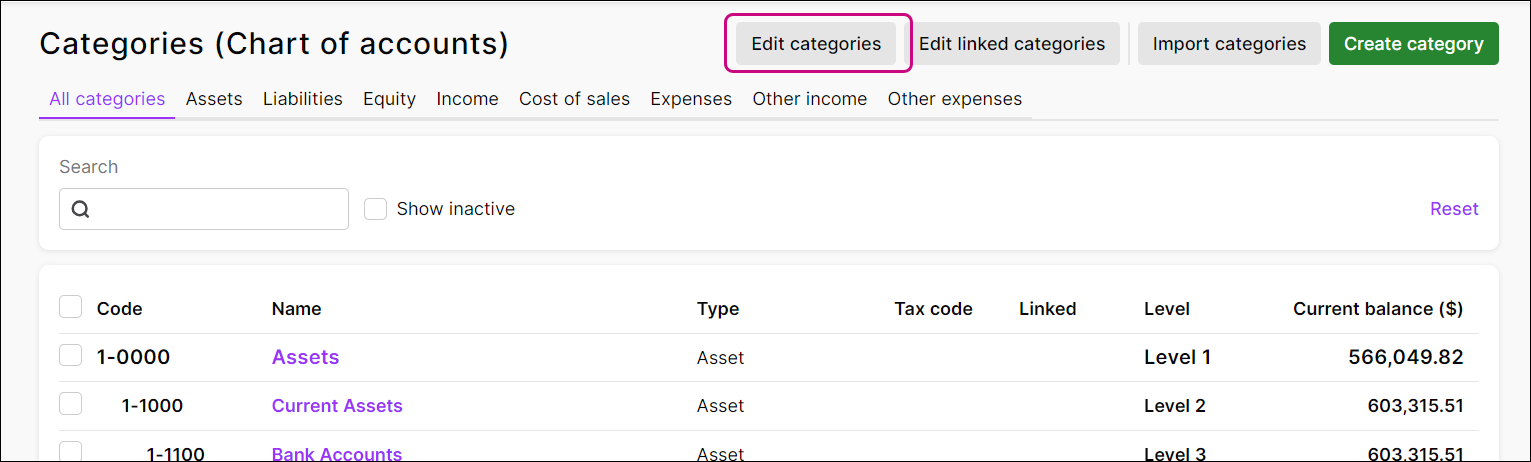
Go to the Accounting menu > Categories (Chart of accounts) and click on Edit categories.
-
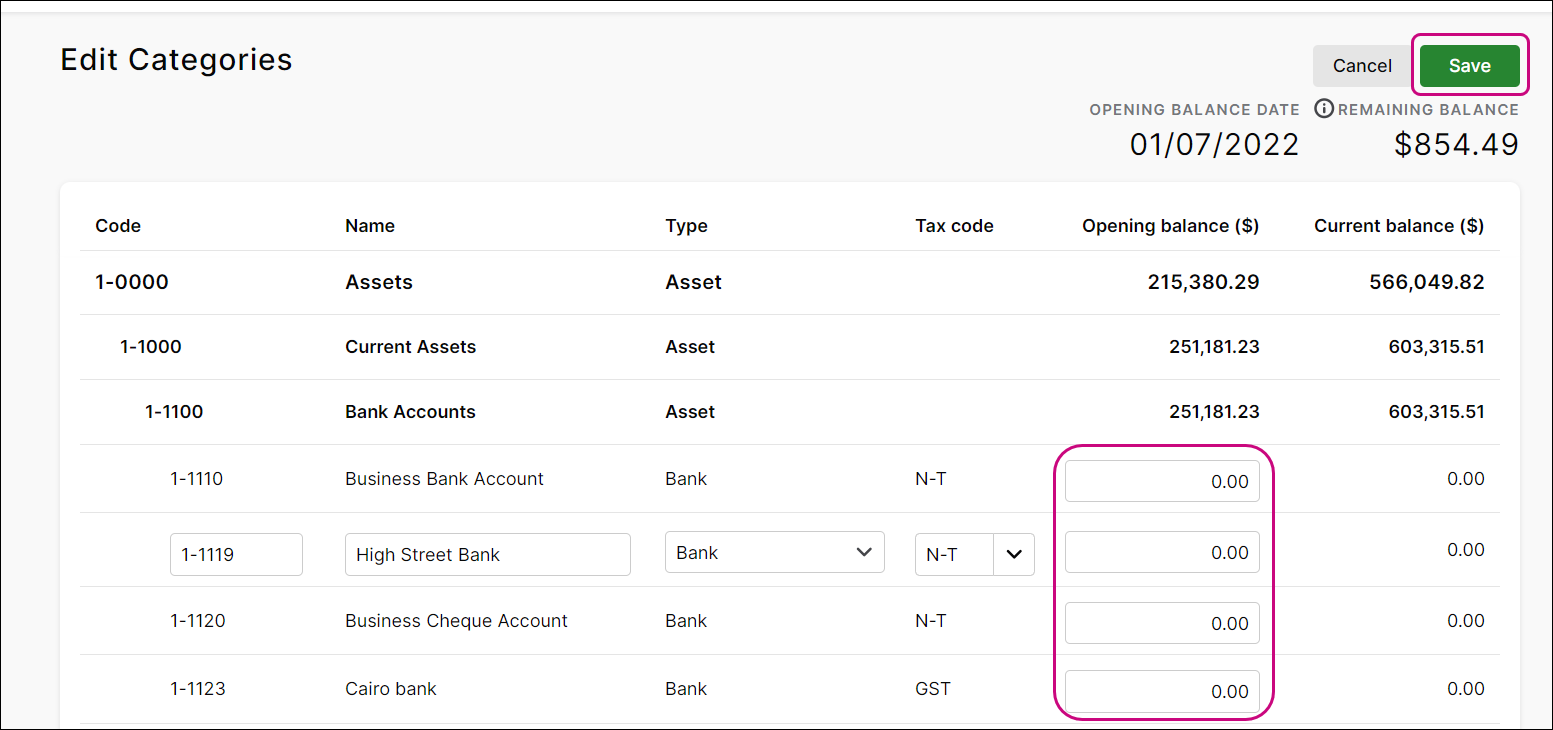
The list of categories will appear with the opening balance fields available for editing. Enter in any opening balances and click Save.
Enter journals to show prior period comparisons
Once you have saved your opening balances, you can enter journal entries for prior period comparatives. You will need to review your financial statements such as your trial balance from the ledger you were previously using to collate this data. To enter journal entries go to Accounting menu > Create general journal. Enter the relevant journals ensuring the appropriate dates and narration (description) and click Record.
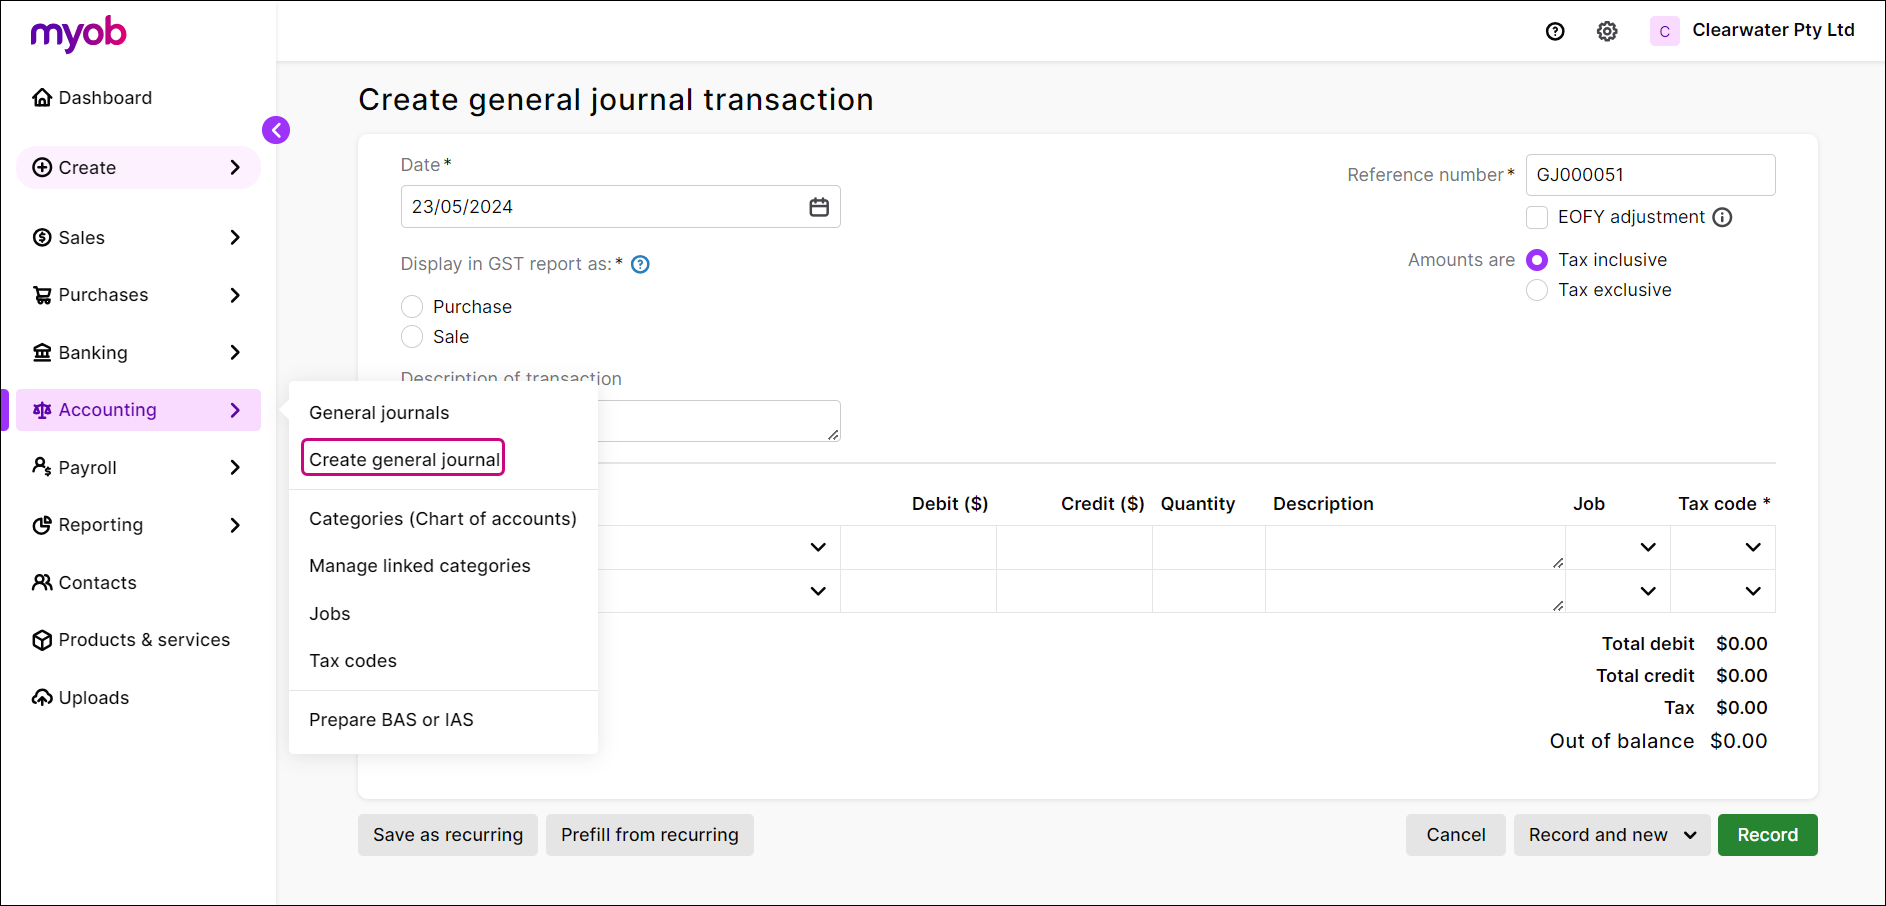
It is not currently possible to import journals into MYOB Business.
Start a new financial year
Once you’ve finished entering prior period comparisons, you should start a new financial year and roll forward to the current year.
In MYOB Business Connected Ledger, click the settings menu (⚙️) and choose Business settings. In the Financial year section, click Start new financial year.
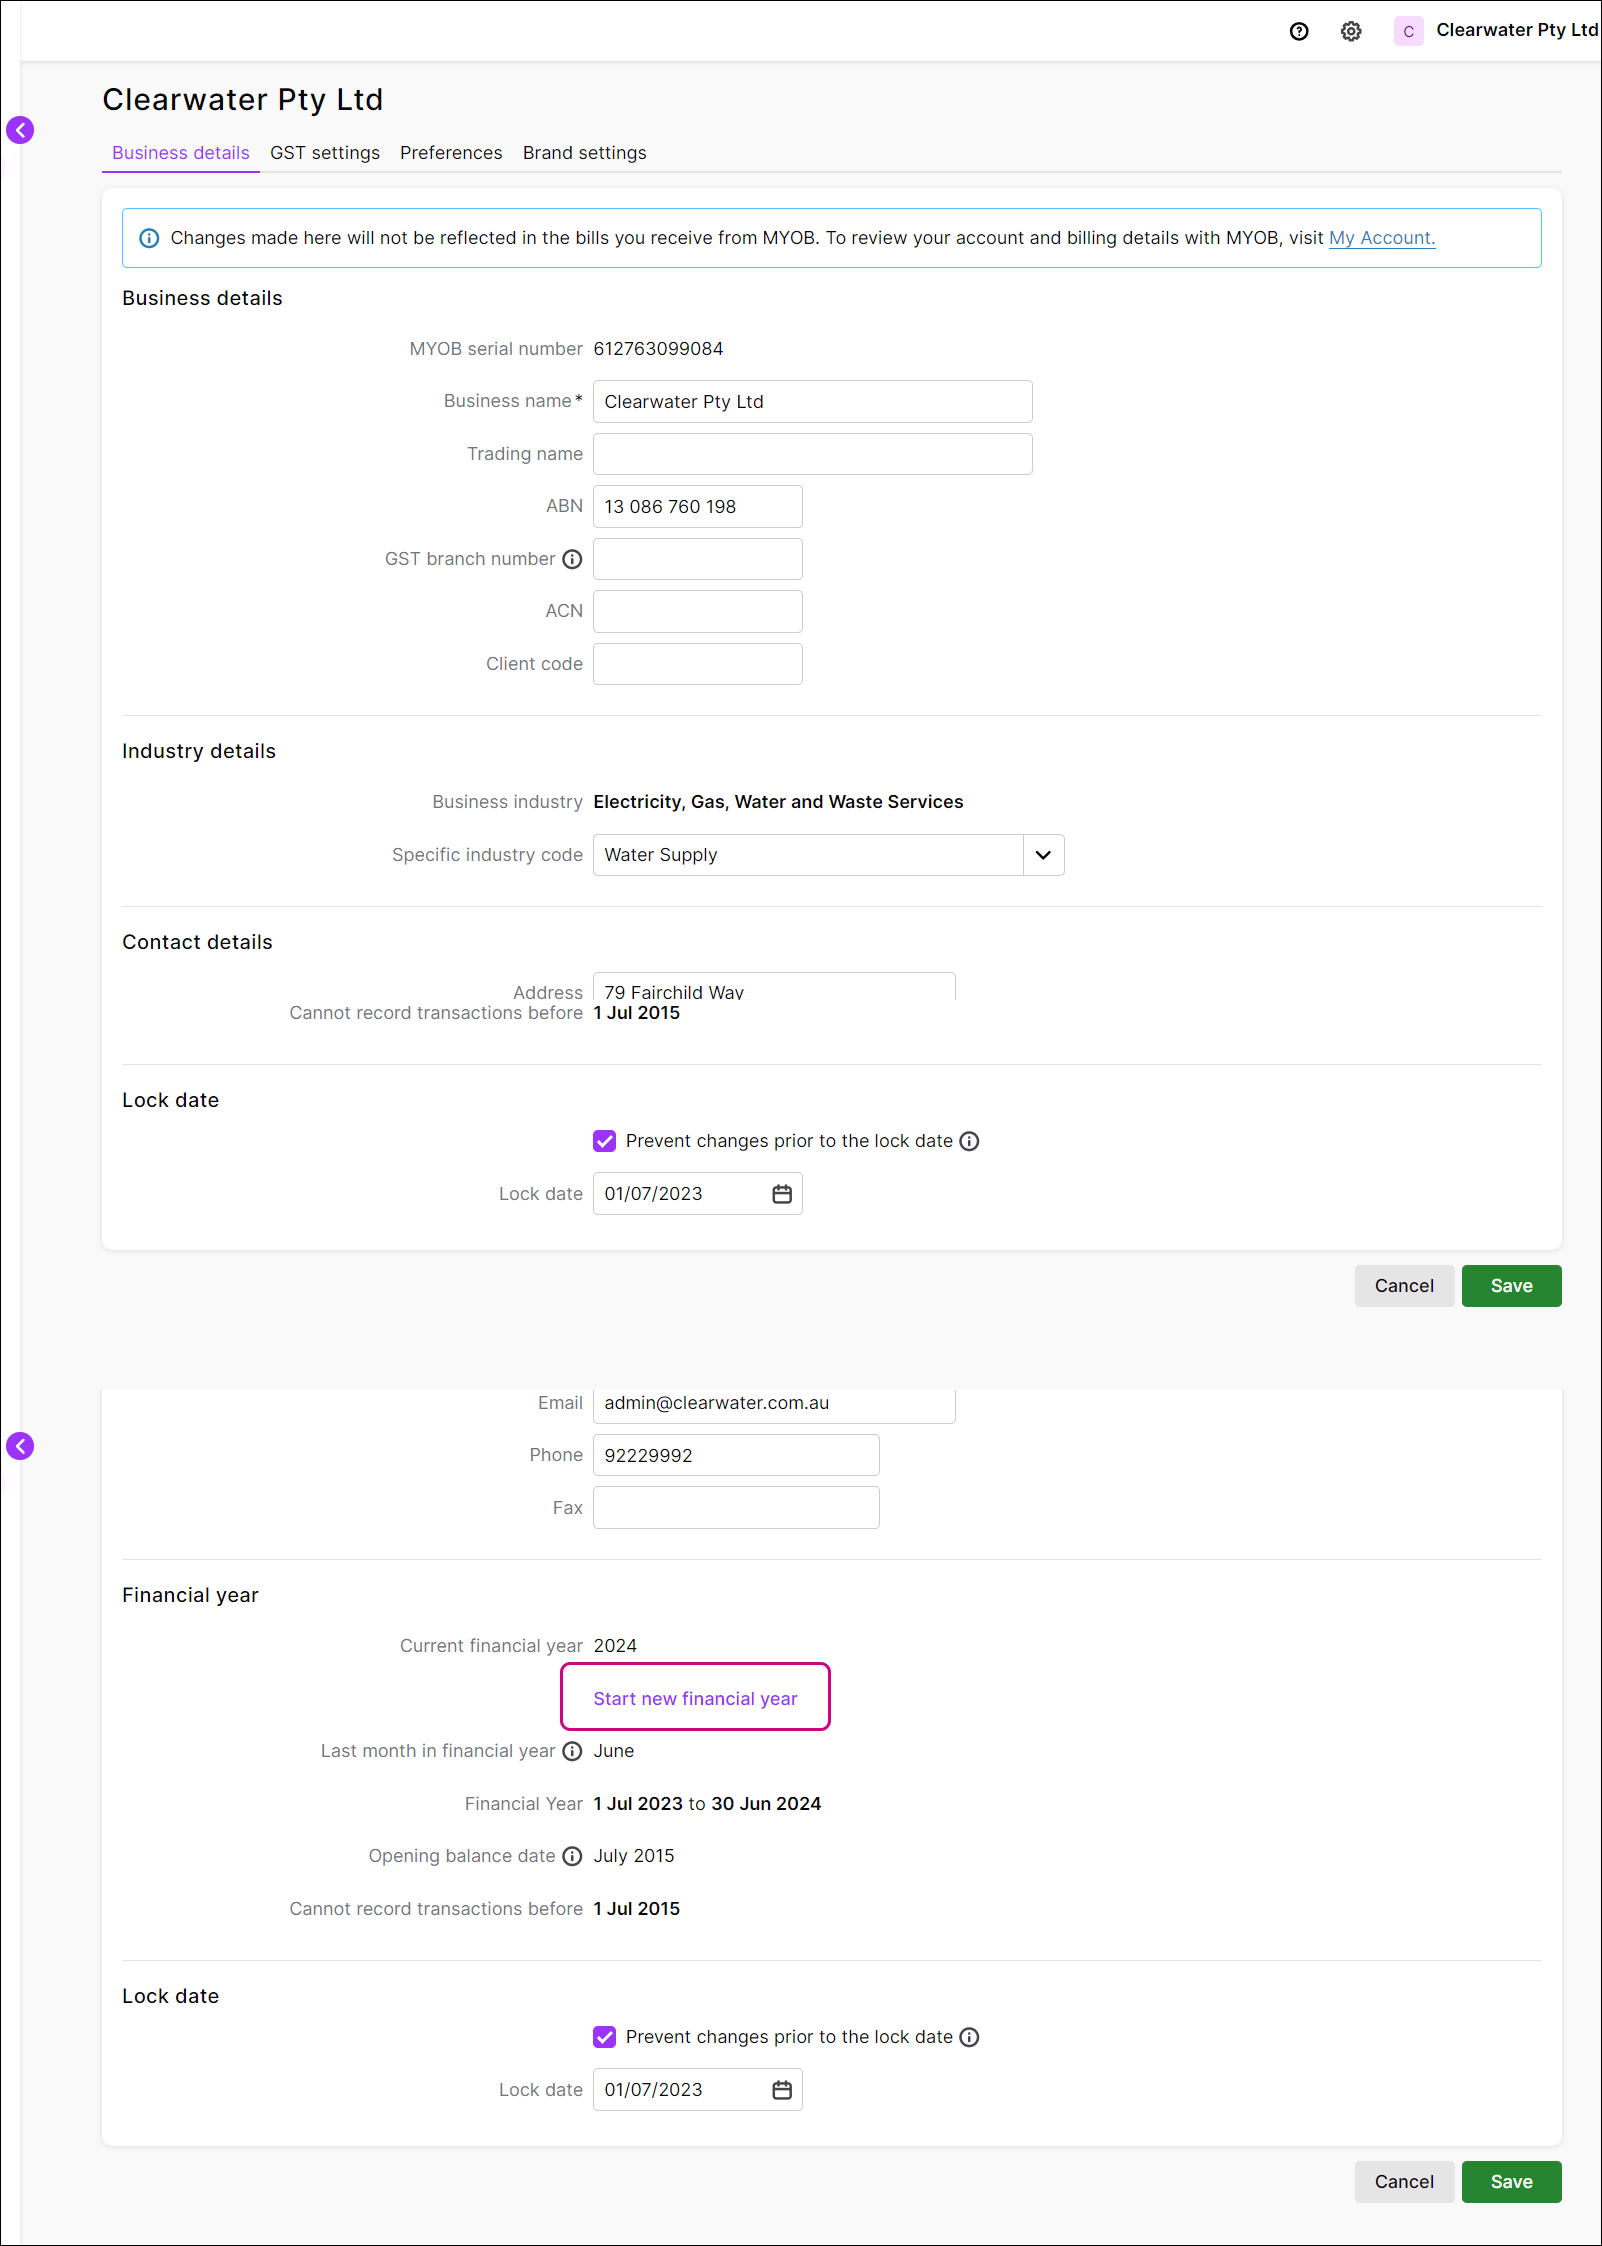
When you start a new financial year:
-
the current earnings will be moved to retained earnings
-
you'll still be able to enter transactions in the previous financial year, providing you first remove the lock date option if you’ve set one.
7. (Optional) Import current year uncoded bank transactions as a QIF from MYOB BankLink
This step is optional as:
-
You’re able to request MYOB to send prior period bank transactions to your new ledger (these come across as uncoded and you will need to create the necessary rules to auto-code or code these manually) – see step 9. Notify MYOB that you'll be redirecting your client's bank feeds from MYOB BankLink to MYOB Business Connected Ledger, below, which contains a template you can complete and send to MYOB with the details of bank accounts or credit card accounts you want to move and where you can nominate the start date of the feeds into your new ledger.
-
You may choose not to have bank transactions from prior periods given this will require additional work to code the transactions via bank feed rules or manual coding and it may be easier to just create a journal to account for the movements up to the time of moving to MYOB Business Connected Ledger.
Import bank transactions into the MYOB Business file
Once you’ve exported the bank statements from MYOB BankLink, you can import them into MYOB Business on the Bank transactions page.
-
Go to the Banking menu and choose Bank transactions. The Bank transactions page appears.
-
At the top right, click the ellipsis (...) and choose Import statement.
-
On the Bank statement import history page, click Import statement file.
-
Choose the Bank account you want the imported transactions to go into.
-
Click Import statement file. The Import statement file page appears.
-
Click Browse. The Open window appears.
-
Select the statement file you want to import and click Open.
-
Click Import. The Bank statement import history page reappears, showing the statement file you chose and a message appears at the top of the screen, telling you how many statement lines were imported successfully. Imported transactions will show on the Bank transactions page.
-
If you want to:
-
import more statements into this or other account, repeat from step 2.
-
work with the transactions you just imported, see Working with bank transactions.
-
8. Set up bank feeds rules
In MYOB Business, rules help you deal with transactions coming into MYOB from bank feeds or imported statements. They're a great time-saving feature that automate a lot of manual data entry.
9. Notify MYOB that you'll be redirecting your client's bank feeds from MYOB BankLink to MYOB Business Connected Ledger
Once you've set up bank feed rules, you should then notify MYOB which bank accounts you'll be moving to MYOB Business. This will result in an automatic cancellation of your MYOB BankLink bank feeds unless you specify otherwise. These steps are important as it will ensure you are not double billed for your BankLink bank feeds.
10. Invite other practice users to the file
If you’re the practice administrator or have been granted permissions by your practice administrator in my.myob, you'll be able to manage the online file access of users in your practice. If you need to invite other users to the ledger created for you or a ledger you’ve created yourself, you can do this in my.myob via My account > manage online file access – see the help article, Requesting access to a client file, for the details.
Other chart of accounts/categories resources
How to download and modify your categories (chart of accounts) templates
-
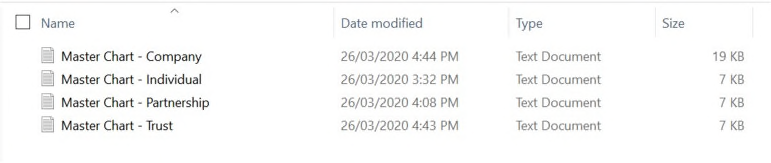
From the email you received from your Client Solutions Consultant, download the Master Chart Template.zip file to your preferred location.
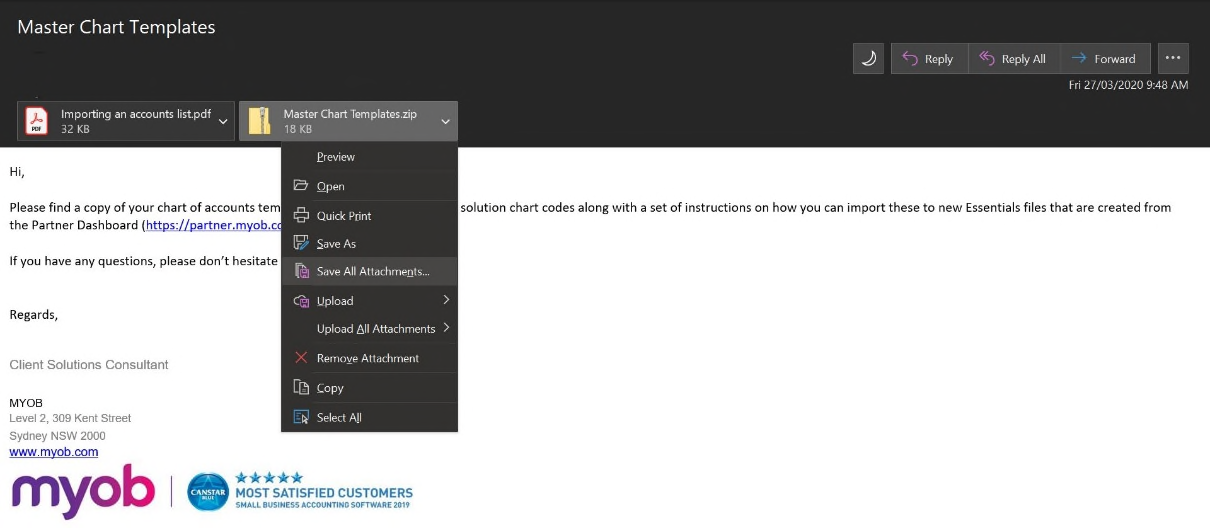
-
Go to the location you saved the Master Chart zip file and
select Extract All…
This creates a folder with a series of chart templates which you can now
use for future imports into MYOB Business files.
-
Open a blank workbook in Microsoft Excel.
-
Click and drag the downloaded sample template onto the workbook. The file will open in Excel and the contents of the template will be displayed.
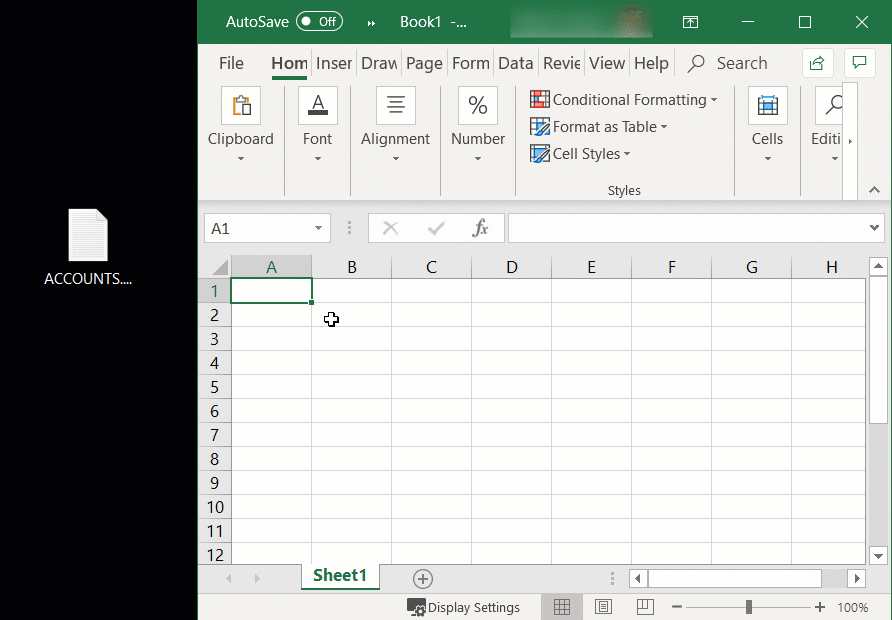
When looking at the file in Excel, note the following:
-
the first cell (A1) contains parentheses (brackets) - these need to remain, as they indicate that the import file is for MYOB.
-
the second row (beneath the row with the brackets) is labeled, so you can easily work out what type of information is required in each column.

-
-
-
Enter your data in each applicable column. Remember:
-
each column in the import file represents a field in MYOB
-
each row in the import file represents a different category
-
leave the brackets on the first row, and the headings on the second row.
For more details about each of the columns (fields) in the import file, see the FAQs in the help topic, Importing and exporting categories. -
When you're done, save the template as a text (.TXT) file. If you like, you can give the file a meaningful name, such as "Categories List Import" or similar.
-
Accounts in MYOB Business have been renamed as categories. However, import files still use column headings such as Account Name, Account Number, etc. Import field names will be updated in a future MYOB Business release.
Importing into MYOB Business
For the steps on importing categories (chart of accounts) into MYOB Business, see the help topic, Importing and exporting categories.
MYOB BankLink Chart of Accounts templates:
AU
NZ
AE Farm for MYOB Business File Set Up NZ.zip - to be added
NZ AE NonFarm Category Lists.zip
(these files also include a guide for working with MYOB Business categories, as well as a blank text file which you can use to remove accounts you don’t want to use, such as default codes)