
To print a report, select the required report from the relevant area of the application and proceed to open the Print window.
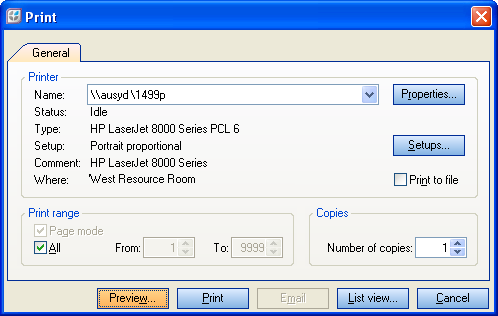
The fields on this window are:
-
Name: Displays the currently selected printer. Click the down arrow

-
Properties: This Properties button accesses settings for Finishing, Effects, Paper, Destination and Basics.
-
Setups: The Setups button opens the Select Page Setup window. You may change the page setup, or change the settings of the current setup. Refer to How to Edit a Page Setup 2024.
-
Where: Select the Print to file checkbox to enable the ellipsis at this field. Click the ellipsis and navigate to the location where you report will be saved; enter a name for your file and select the type from those available (eg. txt, doc, xls, pdf). After entering the details for your file select OK then select Print.
-
All: By default all pages of any report are included in the print. De-select this checkbox to enter the From and To page range.
-
Number of copies: Enter the required number of copies or click the up

-
Preview: Click Preview to view the report on screen. Refer to How to Preview a Report 2024.
On the Preview window you are able to create a PDF or save the report to Document Manager.
-
Print: Click Print to output the report directly to the printer.
-
Email: For a report that is being printed to file, click Email to launch an email (Microsoft Outlook or Express) with the report attached.
-
List view: List View is portrait layout with narrow margins.