MYOB AE install guide—2024.0 (Australia)
Release date—27 June 2024
Pre-requisites
Check that your computer meets the system requirements.
Disable any anti-virus/malware software and user account control on your server. Make sure to enable them again once you’ve finished installing MYOB AE.
Make sure that you know the login name and password for
your server,
SQL server
the workstations
You must login as a system administrator to the servers, the SQL server instance used by MYOB AE and all workstations. Don't use the default administrator login created by Windows.
Exit all MYOB software and all Windows programs on your server:
make sure all staff members have exited all MYOB applications on their workstations, including closing any icons in their system tray
tell your staff members that MYOB applications will not be available for use during the installation process.
Ensure your regional settings and format language are set to Australia.
Ensure that you have internet access.
To make sure that your database is upgraded correctly you MUST reboot the server machine that you intend to use to perform the MYOB AE installation before you start the actual installation.
Allow sufficient time for installation. It may take more than an hour to complete.
Check your disk space and back up your data:
The combined installer requires a minimum 4GB of free disk space on the local disk of your server.
As the combined installer takes some database backups, ensure that you also allow extra disk space for the backup of your database(s).
Backing up the MYOB AE or AO database, for example, AE database, Tax database, and/or Corporate Compliance database.
The combined installer locally backs up only your AE and Tax databases prior to the actual installation of MYOB AE. We recommend that you do your own database backups prior to installing this release.
We may replace any MYOB Master Reports at any time.
We recommend that if you’ve customized our masters to export a backup copy of the report layouts using the Report Export Utility which is available from Reports > Report > Export & Import before upgrading MYOB AE.
Preparing for end of year tax installation
It's important that, before you install AE Tax 2024.0, you prepare your data so that the best possible result is achieved during the year-end and rollover of your client’s information from 2023 to 2024.
If you use MYOB AE Tax, the combined installer will automatically:
run the year end routine during the install
install AE Reports for SQL Tax users, so there is no need to run a separate installer to obtain the new tax year reports
backup your MYOB SQL database(s) during the install.
The year-end routine runs automatically as part of the installation and uses the following default settings
Return date due—Reset using ATO Tax Level/Classification
Clear invoice amounts.

The year-end routine balances forward the lodgment details of all returns except those excluded from rollover.
Returns excluded from rollover remain in the previous year's AE Tax year.
The year-end routine:
carries the front cover details to the subsequent year's front cover.
sets overseas pension and salary income dates to the next financial year.
brings locked returns into the new AE Tax year and keeps them locked.
resets lodgment levels and due dates.
updates primary production averaging income years, dropping off the earliest and adding the immediate prior year.
updates special professional eligible income for averaging years, dropping off the earliest and adding the immediate prior year.
The returns that are not to be rolled forward to 2024, such as returns for clients for whom you no longer act, need to be flagged in AE Tax 2023. These returns will remain intact in 2023 and any other prior years.
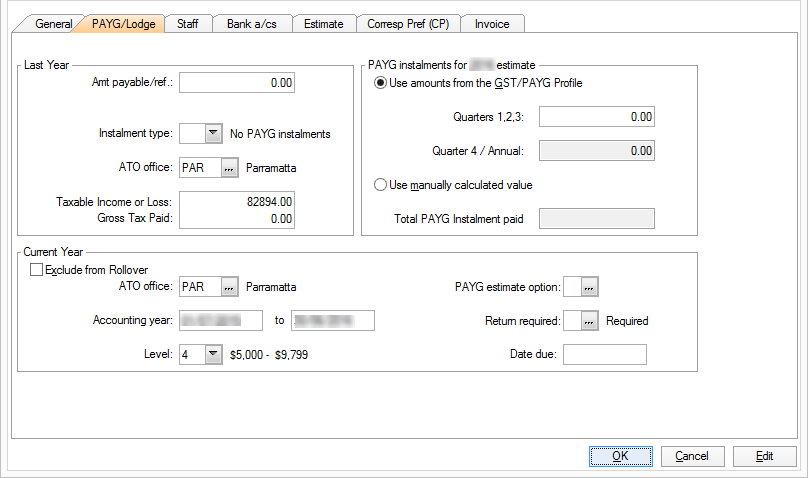
The Exclude from Rollover checkbox is found on Return Properties > PAYG/Lodge under the Current Year section. Setting the Exclude from Rollover checkbox on this tab excludes this return from rollover.
This step is important for accurate statistical reporting done by the practice, such as the Lodgment Monitoring program and 85% on-time lodgment requirements.
If you have any tax returns that have not been completed or lodged in 2024 or marked Final on the Front cover, you don't have to tick Exclude from Rollover.
To exclude a batch of returns from rollover use the Bulk Return edit routine.
The Bulk Return edit procedure is:
Select Maintenance > Bulk Return edit.
At the Return area to change field:
Click the ellipsis button.
Highlight the Exclude from rollover flag entry.
Click Select.
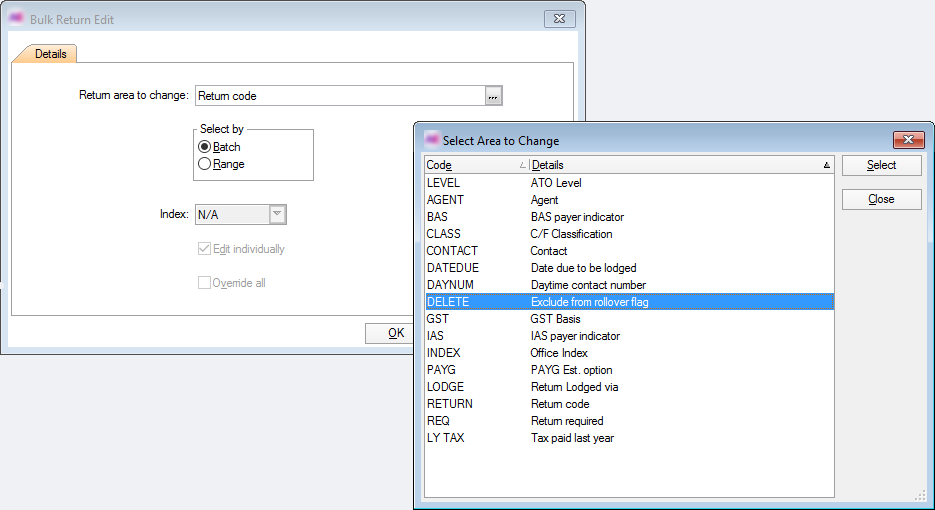
Select Batch.
De-select Edit individually.
Select Override all so as to apply the change to each selected return.

Click OK to close the warning message dialogue.
Click OK at the Bulk Return Edit main window. The Select Returns for Update index listing all returns on the system opens.
Highlight and select each return to be included in the batch.
If you sort the list of returns by Return Code, type the code and press Enter to move to that return. Alternatively, if you sort the list by TFN, key the TFN, with or without spaces, and press Enter. Then click Select.
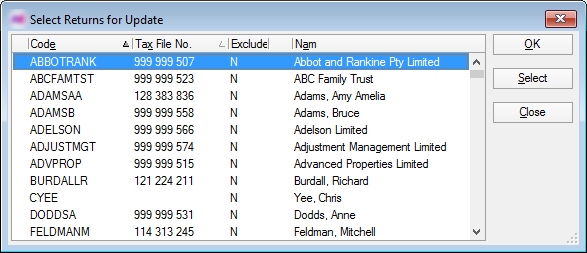
Each return that has a green tick is included in the batch.
Click OK. The Edit Rollover flag window opens.
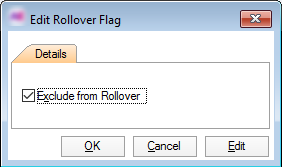
Select the Exclude from Rollover checkbox and click OK. The program will tick the checkbox in the Return Properties > Lodgment tab for each of the returns in the batch.
Adding a new client return in prior years
After rolling 2023 into 2024, any new client return added to 2023 will not be in 2024.
If you create a client return in 2023, you must also create one in 2024. Then, when you open the 2024 return, the RSD (rollover) opens and details from the 2023 year will roll into 2024.
Likewise, if you create a new return for, say, 2022, you'll also have to create it in 2023 and then open it to roll it into 2023, then repeat the process to roll it into 2024.
The Integrity check routine checks the validity of front cover and schedule information and ensures that each Index that links information in one part of the system to its counterparts is not corrupt.
To perform the integrity check:
Select System Services > Tax 2023 > Utilities > Integrity Check.
Enter the Master Password.
The Integrity Check window opens.The default master password in AE Tax is ASSERT.
Select the Index check and Validate alternate indices checkboxes.
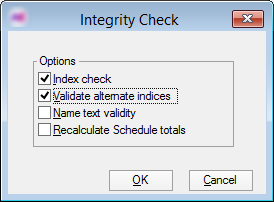
Click OK to open the Print window.
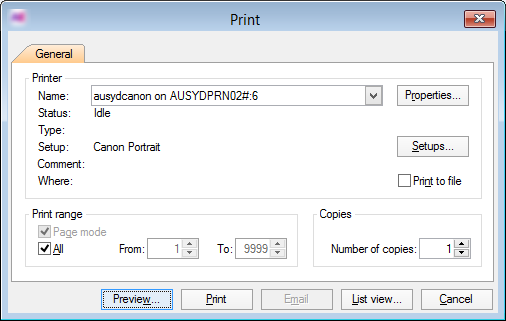
Select Preview. The Integrity Check – Indexes window opens.
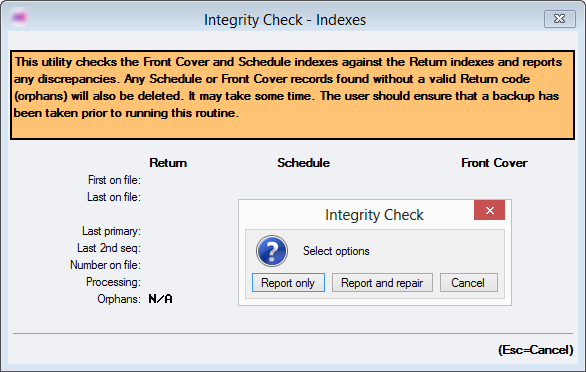
Select Report and repair.
The report will scroll to the screen. We recommend that you print or save this report as it may contain instructions regarding some returns and it will highlight any repairs that were made during the process.
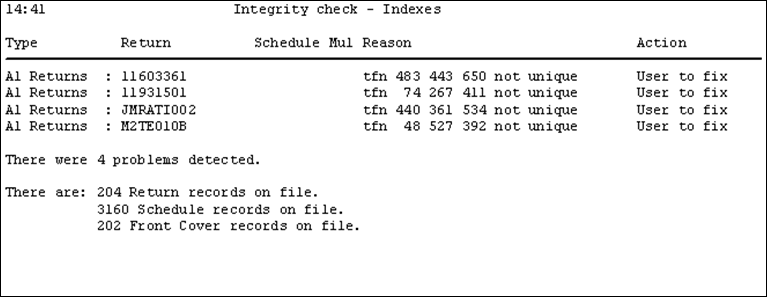
In the above report, the Reason ‘orphaned’ may occur where a schedule is not linked to a return.
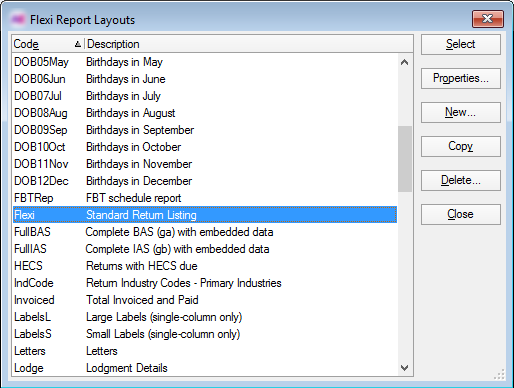
Click Reports > Flexi Report. The Flexi Report Layouts index opens.
If you have previously created your own flexi report layout for this report, select it. If not, select the AE Tax default report Flexi from the index.
Do not click OK until you have made your selections for sorting, layout, range, selection and filters.Click Properties. The Flexi Report window opens.
Click the Sorting tab.
At the Index field, select the sort sequence:Primary: to list all returns in a continuous report
Secondary: to sort the report by partner, manager, employee or agent as recorded on the Return Properties > Staff tab of each return.
Click the Selection tab
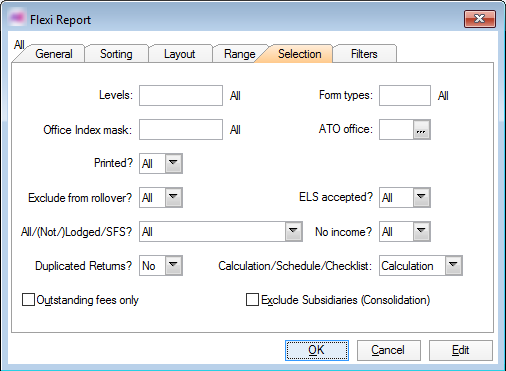
Select Yes at Exclude from rollover?
Click OK.
Click Preview. The sequence Record Selection window opens.
Select the Sort Sequence for the report. The primary sequence is by return code, the secondary sequence is by a staff code, and the tertiary sequence offers other miscellaneous sort sequences for the layout of the report.
Click OK to accept the range default of first to last.
Upgrading to AE 2024.0
Download the MYOB AE 2024.0 (5.4.51) - Install file from my.MYOB.
Log onto your server and double-click the downloaded file.
Read the Licence Agreement and then accept it by selecting the I have read and accept the licence agreement checkbox.
Click the Release Notes link in the bottom left-hand corner of the Welcome screen to access information about the current release.
Click Next.
Follow the instructions provided on the screen to complete the upgrade. These instructions will depend on your existing MYOB Accountants Enterprise Practice Solution products and what you’re licensed for.
Click Upgrade Now
If you’re using a proxy server you don’t need to change the ClientFrameWork.exe.config file in the server Deploy folder see Proxy Server Information.
An upgrade can either be done by Auto update when you open MYOB AE or you can run a Manual update.
Auto update
If you see this screen when you open MYOB AE, automatic workstation updates are enabled at your practice:

There are changes to workstation installations as part of this release, refer to workstation install changes for further information.
If you see this screen, automatic workstation updates are disabled for your practice, so you should run a Manual update on your workstation.

Click Yes to update your workstation automatically.
Click No and you will need to run a Manual update.
Manual update
The workstation updates for all MYOB AE products are combined into one file for this installer. The file is located at \MYOBAE\AESQL\WorkstationInstall\setup.exe.
After the server installation, a manual workstation update should be performed on all workstations that you want to have access to the latest MYOB AE products, in the following instances:
if you’re installing MYOB AE on a new workstation for the first time.
if the workstation link is not operational.
if the automatic update can’t proceed and you’re prompted to run a manual install.
Steps
Ensure that you have read the information in Preparing for Installation.
Log into the workstation as administrator.
Navigate to \MYOBAE\AESQL\WorkstationInstall\setup.exe on your server or computer where the server installation was performed.
Double-click setup.exe. The Licence Agreement window opens.
Read and accept the Licence Agreement by selecting the I have read and accept the licence agreement checkbox.
Click Next. The Ready to Install window opens.
Click Install Now. The Installation Progress window opens.
If you receive the message, If you receive an “Open file security” warning message when opening MYOB Accountants Enterprise Workstation, it is recommended that you restart your computer, click OK.
On completion, the Installation Complete window opens.
Click Finish. The workstation installation is complete.
If you have terminal servers, you'll need to run the manual update steps on each terminal server. Turn off virus protection software, anti-malware, screen savers and close all MYOB applications. If you're installing on terminal server, don't forget to put the terminal server into Installing applications on a Terminal Server.
If you have Document Manager
You’ll be prompted for the following information once the main installation of MYOB AE is complete:

If the server you are installing on is your document file store server see Installing on your document file store server.
If the server you are installing on is not your document file store server see Installing the document file store on a different server.
Deselect the Is this server the File Store Server? checkbox, and click Finish to complete the installation.
Run the Configuration tool on your chosen server from C:\MYOB\Knowledge Management\Document Manager\Server\Utility\DM_Config.exe or C:\MYOBAE\AESQL\Knowledge Management\Document Manager\Server\Utility\DM_Config.exe.
Read and accept the Licence Agreement.
Select the SQL Server instance that contains your MYOB Accountants Enterprise database.
Enter the location and details of the port number for your Document Manager document file store and indexing service.
Follow the onscreen instructions to complete the installation.
If you don’t already have it, you will be prompted to install Adobe iFilter version 9.0 x64. Click Next through the installer screens until it completes.
The PDF iFilter ensures that PDF documents will be indexed and therefore searchable in Document Manager.

Run a workstation install on each workstation that uses Document Manager. The file is located at C:\MYOBAE\AESQL\WorkstationInstall\setup.exe.
You’ll only need to do this the very first time. On successive upgrades, the workstation update will occur automatically when you access MYOB AE.
Select the Is this server the File Store Server? checkbox, then click Finish.
If you already have Document Manager on your server, you will see this screen. Select Reinstall and click Next.
The repair is complete.
If you don’t already have it, you will be prompted to install Adobe iFilter version 9.0 x64. Tick the checkbox and click Finish.

The Adobe PDF iFilter installer will open, click Next through the next few screens until the install is complete.

If you have Corporate Compliance
If you use Corporate Compliance integrated with Practice Manager, you can upgrade Corporate Compliance using this combined installer.
If you use Corporate Compliance as a standalone version and not integrated with Practice Manager, use the standalone installer available on my.MYOB.
Once the main installation of MYOB AE is complete, the post-installation configuration of Corporate Compliance starts automatically. You’ll be prompted for the location of the:
electronic lodgment files
backup files.
Follow the on-screen instructions to complete the installation.
If you have Client Accounting
If you have updated XML mappings for customised CSV imports, you may need to verify and migrate your XML mappings after the upgrade.
Once the upgrade is complete, a number of files are created in your MYOB installation:
File name | Description | Location |
|---|---|---|
MyobCsvMaps-System.xml | This system file contains the MYOB default settings for CSV import. Do not modify this file. | <MYOB directory>\CENTRAL\Deploy |
MyobCsvMaps-User.xml | This file is a new mapping XML file that contains user-defined XML mappings. Any values in this file will override the system defaults. You can modify this file if you wish to add any new mappings or value map sections. | Standalone installation: <MYOB directory>\CENTRAL\Deploy\Client Accounting Templates Combined installation: AE - C:\MYOBAE\AESQL\Client Accounting Templates |
MyobCsvMaps.xml | This file is a backup of the file previously located in the CENTRAL\Deploy folder before performing the upgrade. | <MYOB directory>\CENTRAL\Deploy\Client Accounting Templates |
If you made changes to MyobCsvMaps.xml before the upgrade, MYOB will back up this file to the folder <MYOB directory>\CENTRAL\Deploy\Client Accounting templates.
You can open this file and manually copy over any custom mappings to a new Map in the MyobCsvMaps-User.xml file, which is located in the folder indicated in the table above.
After you have copied your changes, you may delete MyobCsvMaps.xml if you wish. Any future updates should be made in MyobCsvMaps-User.xml.
If you have multiple servers
The following table outlines scenarios that may exist in your practice where you may have a SQL server and an application server containing different databases and program files:
SQL server | Application Server has | Upgrade process |
|---|---|---|
Everything on the SQL server | Run the install on the SQL server only. | |
SQL databases and MYOB services on SQL server | MYOB shared directory(eg: S6system)/Program files | Run the install on the SQL server only. |
SQL databases and MYOB services on SQL server |
| Run the install on the SQL server only. Run DMConfig.exe on App Server |
Document Manager only
If your Document Manager File Store is located on a separate server to either your SQL or application server, then run the configuration tool from C:\MYOB\Knowledge Management\Document Manager\Server\Utility\DM_Config.exe or C:\MYOBAE\AESQL\Knowledge Management\Document Manager\Server\Utility\DM_Config.exe on your file store.
You don’t need to run the installation on your Document Manager File Store.
Post-installation
Confirm that the release version is correct on both your server and your workstations after you've installed.
Open MYOB AE.
Select Help > About from the menu bar.
The install version should be 2024.0.
The version number should be 5.4.51.189.Click the Plugins button to access the version number of individual products.
Product | Version numbers |
|---|---|
AE Tax | 2024.0 (2024 tax return) 2023.4 (2023 tax return) |
Client Accounting | 5.4.51.189 |
Practice Manager | 5.4.51.189 |
Document Manager | 5.4.51.189 |
Corporate Compliance | 5.4.51.189 |
AE Tax homepages | 7.0.28,189 |
Statutory Reporter Formats Go to Maintenance > Maintenance Map > Client Accounting > Practice Report Settings > About in the Tasks bar on the left. | Definition version 52 |
On your server, 1. Go to C:\Program Files (x86)\MYOB\SBRSender\Server\Service\<SQL_Database_Name> 2. Right-click MYOB.Tax.Sbr.Common.dll, select Properties and click the Details t 3. Confirm the version number If you have more than one database, check the version is correct for each database | 7.0.28,189 |
Wherever possible it is a good idea to restart the server after the installation is complete. This will also restart any MYOB services for the PLS.
Using Tax 2024
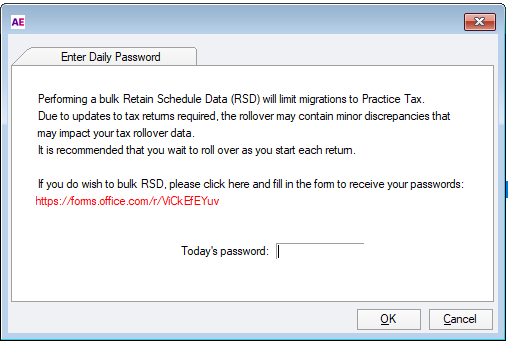
We’ve made some changes to the Bulk RSD routine. As we move towards the more streamlined online workflow in MYOB Practice tax, we recommend rolling over tax returns one at a time, so data is accurate and avoid potential errors.
What are the changes?
When you perform a bulk RSD rollover after installing 2024.0, you’ll see a message to enter Today’s password.
To get the password click the form link and complete the details. We’ll then send you an email with the password.
The passwords are valid only on the day mentioned in the email and will expire afterwards. You’ll not be able to perform the Bulk RSD without entering the password.
The RSD routine rolls over return and worksheet information from the previous tax year to the new tax year.
Choose the correct parameters and options in the RSD dialogues as the RSD procedure acts on the entire Tax Ledger for your practice.
Check the RSD options
MYOB AE Tax defaults the options that should be chosen so that your 2023 tax ledger contains as much historical information as possible. We strongly recommend that you accept these defaults.
If you’ve set your own defaults in a previous year, we'll use those defaults to rollover to 2024. If you weren't happy with the results of the rollover last year, review the defaults and read the information below for more details.
These options are used if you rollover the whole ledger, a batch of returns, or an individual return as you start working on it.
How to run the RSD routine
The following instructions are based on the default options for RSD. You can change the defaults, but read the explanations to understand the consequences of changing them.
In MYOB AE select Maintenance > Tax > Administration if you open your Tax 2024 ledger via System Release.
Select Utilities > Practice default options > Retain schedule data. The General tab opens providing options appropriate to all form types.
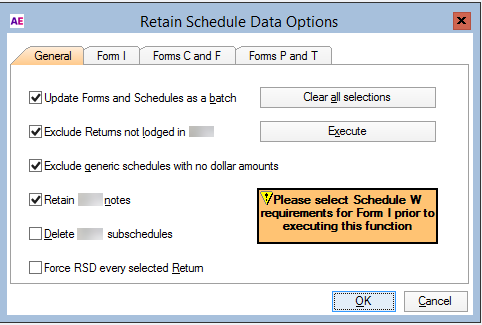
Select or deselect the Update forms and Schedules as batch checkbox, as required. If you deselect the Update forms and Schedules as batch checkbox, then only the return that has focus will be processed.
Leaving the Update forms and Schedules as batch checkbox selected does not have any effect on those practices that only roll forward returns when they first operate on themSelect or deselect the Exclude returns not lodged in 2023 checkbox, as required. This option applies only to Batch RSD and its importance cannot be understated.
If you deselect the Exclude returns not lodged in 2023 checkbox, every 2023 return will roll over to the 2024 ledger. This includes incomplete, unlodged returns.
Subsequently, work performed on returns in the 2023 ledger will not be present in the 2024 copy of the return. In order to have the final version of the 2024 return, together with the 2023 tax paid/refund amounts and PAYG Instalments paid information, you will have to perform the Force RSD routine for each such return when you open it to start work for 2023.We strongly recommend that you don't change this option.
Select or deselect the Exclude generic schedules with no dollar amounts checkbox, as required. By default the Exclude generic schedules with no dollar amounts checkbox is selected. To ensure the integrity of values in the main form that are lodged with the ATO, we strongly advise that you allow the RSD program to exclude blank generic schedules from the rollover routine.
Rolling blank Generic Schedules from year to year is dangerous!:
Information that you think is at the return label can be overwritten if you integrate from a schedule or worksheet that has a zero balance.
If you roll blank schedules from one year to the next without reviewing them in the new year, values imported from a general ledger directly into the labels on the face of the return could be wiped out if integration from a blank schedule occurs.
This option excludes from rollover blank generic schedules because they have the potential, if opened after a return label has been completed and/or lodged, of overwriting the value at the label in the return.
If you deselect the Exclude Generic schedules with no dollar amounts checkbox, every generic schedule will be rolled over into the new 2022 ledger. We strongly suggest that you do not deselect this option.
Select or deselect the Retain 2023 notes checkbox, as required.
Whilst this option is selected by default, it may be changed in the situation where you have a lot of unnecessary notes being rolled from year-to-year and find that there is never time to do Note Maintenance to remove the Notes that no longer apply to your client.
If you subsequently find you need a Note that was prepared in a previous year, you can open that year and cut and paste the Note into the current return.Select or deselect the Force RSD every return checkbox, as required.
This option should only ever be selected where a return has previously been through the RSD process and you have changed the prior year return because of an amendment to it, or you have been instructed to perform the routine again because of a change to MYOB AE Tax. You should never attempt to Force RSD on a lodged return.
When you select this option, every return that is included in the batch will be overwritten with the 2023 return details and if you have already commenced work on any of the returns in the batch, that work will be lost.
An example of when you would use this feature other than for a single return is where you are in a position of having to perform the RSD routine again for the entire ledger or for a range or batch of returns.Click the Form I tab. This tab provides checkboxes for:
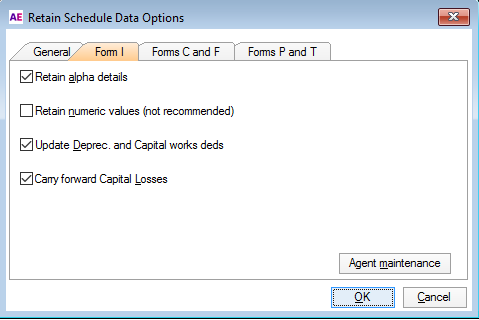
Retain alpha details: Selecting this checkbox rolls over all text entered in returns or schedules and worksheets, for example, Payment summary details, Financial institution details entered for Interest and Dividends, all Rental property details and any other text entered.
Retain numeric values: It is not recommended to select this checkbox as it will roll the same amounts that were entered in the 2023 return into the newly rolled over 2023 return. This could lead to errors if an amount from the previous year that was not applicable in the current year was overlooked when reviewing the return.
Update Deprec. and Capital works deds: Unless you want to enter all your depreciating asset details each year, leave this checkbox ticked. During the Year End and RSD routines, MYOB AE Tax moves Closing adjustable values to Opening adjustable values and automatically calculates depreciation for the current year.
Carry forward Capital Losses: This checkbox should be left ticked in order that Capital Losses are carried forward to the new tax year in their respective categories.
Click Agent Maintenance. The Agents window opens listing additional lodging agents in the practice.
Highlight the Agent from those listed.
Click Properties.
Open the Defaults tab.
Click the Forms C and F tab. Complete the options on this tab for:
Retain alpha details
Retain numeric details
Update Depreciation and Capital Works deductions
Carry forward Capital losses.
Click the General tab.
Click Execute to open the Record selection window.
Press Enter twice to accept the default range of first to last return, or
Type the codes for the first and last returns in the range to be processed, or
Select By item and create a batch of returns to be processed.
Click OK.
Selecting the Clear All Selections option will clear every tab on the RSD dialogue and will void the entire RSD process. Therefore, you would only do it if you wanted a clear screen to make new selections. This can also be easily be done by unticking a checkbox you do not want and ticking those you do.
In order to be able to run Tax Letters in 2024, you’ll need to update Tax letter views.
To do this:
Open your Tax 2024 ledger.
Select Tax Letters > Create/Update Views.
PM Plus users don’t need to perform these steps as the method to retrieve data is updated automatically.
To create the new event for Tax 2024 (newly installed current year -TA23) and roll over the steps from the previous year:
From the Return index for the current income year, highlight the Tax Tracking ledger and press Enter. The Event browser window opens.
Select File > New. The Events properties window opens.
In the Event field, type TA23.
Press Tab. The Copy from previous Event? dialog displays.
Click Yes, to roll forward the steps for AE Tax from the prior year.
Overtype the Date and Description to suit the new income year.
Click Apply.
Click Cancel.
You’ve completed the TA22 event and rolled forward the steps from AE Tax 2024. Tax Tracking is ready for the new year.
AE Tax reports
Customised AE Tax reports are not rolled from one tax year to the next. If you generated reports in 2023 and wish to use them again in 2024 you'll need to:
create the reports again in 2024 or
export the reports from 2023 and import them into 2024 with your required changes.
These instructions are based on standard table reports. If functionality like graphs, pie charts or logos do not work after importing, edit them in the new year's report. The copied report may also require editing for fields that have become redundant in a new tax year.
An overview of the process is:
Identify if the report is portrait or landscape.
Identify the ReportId for the folder where the report is destined to be imported, for example, Tax 2024.
Export the report from Tax 2024.
Edit the report, update the ReportId and change field names from 2023 to 2024.
Import the report.
Repeat this process for each customised report that you want to continue using in the new tax year.
Example
Each report has a ReportId. This identifies the folder where the report belongs. If the ReportId of the imported file is incorrect, the report won't display.
In Practice Manager, select Reports > Report Export & Import.
Select Tax2024 > Tax Reports only.
Select any report and click Export. The Export Report window opens.
Make a note of the directory and file name and click Save. The prompt Export complete displays.
Click OK.
Navigate to the directory, right-click on the file and select Open.
Select 'Select a program from a list of installed programs' and click OK.
Select Wordpad and click OK. The report opens in Wordpad.
Select Edit > Find. The Find window opens.
Type ReportId and click Find Next.
Example below:
<VPMReportData ReportId ="5147" Title="Lodgment Report by Manager" Description="Lodgment Report by Manager for I, P, T, C and F" BasedOnTemplateId="10" />
Note the ReportId (in this case, ‘5147’).Close Wordpad.
Follow these steps:
Backup your Practice Manager SQL database.
Select Reports > Tax 2024 > Tax reports only > Lodgment Report by Manager.
Click Edit.
Pay attention to whether the report is MYOB - Landscape or MYOB - Portrait.Click Cancel.
Select Reports > Report Export & Import.
Select Tax 2024 > Tax Reports only.
Select the report you want to copy and click Export. The Export Report window opens.
Make a note of the directory and file name and click Save. The prompt Export complete displays.
Click OK.
Navigate to the directory, right-click on the file and select Open With.
Select Wordpad and click OK. The report opens in Wordpad.
Select Edit > Find. The Find window opens.
Type ReportId and click Find Next.
Edit the ReportId to the value identified at Step 10 in Identifying the ReportId section above (5147).
Select Edit > Replace. The Replace window opens.
Type 2023 in the Find what field.
Type 2023 in the Replace with field and click Replace All.
At the prompt ‘Wordpad has finished searching the document', click OK.
Click Cancel to close the Replace window.
Select File > Save and then close Wordpad.
In Practice Manager, in the Report Export & Import tab select Tax reports only and click Import. The Import Report window opens.
Select All Files.
Select the edited report and click Open. The Base on Template window opens.
Select the template type identified at Step 10 in Identifying the ReportId section above (10) and click OK. The Import successful prompt displays.
Click OK.
Select Reports > Tax 2024 > Tax Reports only.
Select the Lodgment Report by Manager copied from Tax 2024 which displays a last modified date of today and click Run.
Confirm the report contains the correct details.
Repeat all these steps for each required report.
Group Ids
Year | Tax reports only | Tax & practice management reports |
|---|---|---|
2023 | 5177 | 6176 |
2022 | 5167 | 6166 |
2021 | 5157 | 6156 |
2020 | 5147 | 6146 |
2019 | 5137 | 6136 |
2018 | 5127 | 6126 |
2017 | 5117 | 6116 |
2016 | 5107 | 6106 |
2015 | 5097 | 6096 |
2014 | 5087 | 6086 |
2013 | 5077 | 6076 |
2012 | 5067 | 6066 |
Troubleshooting
Common tasks and troubleshooting (AE)
