Skip table of contents

Migrating Accounts (Series 6 & 8) with MYOB Accountants Enterprise using combined installer

This support note applies to:

  • AE Assets Live (AU)

  • AE Workpapers (AU)

  • AE Statutory Reporter (AU)

  • AE Practice Manager (AU)

  • AE System Release (AU)

  • AE Reporter (AU)

  • AE Document Manager (AU)

  • AE MAS (AU)

  • AE Investments (AU)

  • AE Assets (AU)

  • AE Tax (AU)

  • AE Corporate Compliance (AU)

This article will advise you on how to migrate Accounts with MYOB Accountants Enterprise (AE) using the combined installer.

Use this KB only if you use Accounts, otherwise use Migrating MYOB Accountants Enterprise using the combined installer

Before you begin

Please read through the instructions below before undertaking the migration process.

We strongly suggest that the migration of MYOB AE is performed by an individual with a strong knowledge of these software products and is competent with the Microsoft Windows operating system. If you experience issues with MYOB software after following the instructions below, additional assistance with your migration may fall outside of the terms of your Sales and Service Agreement.

We provide a Migration Service. If you have any doubts or concerns about completing this migration yourself, contact your MYOB Client Manager and arrange for one of our technical services analysts to perform the migration for you. This service may require a booking, so please plan well in advance.

Due to the complexities of migration, the full process cannot be covered in a single knowledge base article. It is intended that this article be used in conjunction with the relevant installation Guide, which is included on the MYOB Accountants Enterprise and Series 6 or 8 download image, and that those guides be read prior to commencing the migration process.

If you use MAS, see KB 37178: Migrating MYOB Accountants Enterprise using the combined installer before proceeding

Pre-migration checks

Before you begin the Migration process, you'll need to ensure:

  • Ensure you are logged in as an administrator user.

  • Ensure User Account Control (UAC) is switched off.

  • Ensure Data Execution Prevention (DEP) is set to the default setting.

  • Ensure any Anti-Virus, Anti-Spyware, Anti-Malware, Firewall or any other such security software is switched off.

  • Ensure Linked Connections are enabled on any Server and/or Windows machines.

  • The Date and time, language and regional settings are set to the correct region and time.

  • .Net Framework 3.5 to 4.8 are enabled/installed on both Server and Windows machines.

    • Server 2016-2022: via Server Manager.

    • Server 2012: via Server Manager for 3.5 & 4.5, while 4.6 is a manual install.

  • Please ensure the C: drive and the drive that will be hosting the MYOB data is less than 1.8TB in partition size.

  • Check what MYOB AE products you are licenced for on your current server and you're installing the same version of MYOB AE that is currently installed on your existing server. Browse to \\servername\registration folder - Open AERego.exe and note down the products licensed as this will be required during the installation.

  • All ATO PLS reports on your old server have been unscheduled.

  • There are no tax returns with a status of Transmitting or Transmitted. If you have Transmitted or Transmitting returns, contact MYOB support for assistance.

  • Note down the my.MYOB Practice login email id.

Before you install MYOB AE, consult the System Requirements page to ensure your setup is compatible with the MYOB software.

If you have any issues with the above, we recommend consulting your IT provider.

1. Backup your MYOB AE data

You will need to copy certain directories and files from your old server to the new server to ensure all data is retained.

Copy the relevant files and/or folders listed below for each database in use. For example, if there are multiple tax databases - you may have AETAX1 and AETAX2 - ensure both are copied.

If you're using...

Back up...

For more information, refer to...

System Release

SOL64 or TAX folder

KB 28712: Finding the System Release directory .

Tax (SQL)

SQL Tax database

KB 33978: Backing up a SQL database using Management Studio .

Accounts

Database directory

See topic below Locate Series Database directory

Practice Manager

AEDB or VPMSER SQL database

Document templates

Client documents

KB 33978: Backing up a SQL database using Management Studio

Document Manager

Document Manager
Intranet File Stores

KB 23595: Backing up MYOB Document Manager files. Please note All documents must be checked in prior to copying data. For details refer to KB 23570: How do I view a list of all checked out documents?.

Corporate Compliance

Corporate Compliance SQL database

KB 36967: Performing a manual backup of Corporate Compliance.

MYOB is retiring Corporate Compliance and Corporate Admin

Place these in an easy-to-access temporary directory on the new server for now.

Locate the Series Database directory

Copy the folder listed as Database location

Sites with AEPM: Can be found at START > All programs > MYOB Accountants Enterprise > Compliance Management > Help > About > Application details.

Locating your templates and documents

In MYOB AE navigate to the Maintenance menu > Maintenance Map > Documents section. Note down any relevant paths under the following areas:

Document settings

Note the path for:

Document Creation Settings

Tax Receipts Algorithm

VAT Receipts Algorithm

Word Billing Algorithm

Mailing Settings

Billing Startup Path

Templates Path

Document Startup Path

Document Style Defaults

Tax Invoice Path

Document Styles

All selected styles

If these paths are still in use and you're unsure what these paths are for, refer to the help menu. Make sure the files in these locations are copied across to the new server.

2. Install SQL Server

Install SQL server on the new server before installing using the combined installer.

To install SQL Server Express to the MYOBACCT instance, refer to KB 33977: Installing Microsoft SQL Server 2014 or 2019 Express with Management Tools to MYOBACCT Instance. Read this article if you are installing SQL Standard as a reference.

If you are licensed for Corporate Compliance (CC), set the traceflag -T4606 to the SQL instance. Instructions can be found in KB 35298 under "To set the traceflag -T4606 to the MYOBACCT instance for SQL 2012".

CC Users: Only follow the first section of KB 35298 to set the traceflag. Do not continue after Step 11.

3. Restore SQL Databases

After SQL Standard/Express application is installed, restore the relevant SQL databases from the backups created earlier. For details refer to KB 34002: Restoring an SQL database using SQL Server Management Studio.

The databases you need to restore are as follows:

  • MYOB AE: Restore VPMSER or AEDB1 databases

  • Tax: Restore SQLTAX or AETAX1 databases

  • Corporate Compliance: Restore the CorporateCompliance and SystemCatalog databases then, open the VPMSER or AEDB1 database and edit the SQL instance name in the dbo.Configuration table for the row titled CorporateComplianceConnectionString. Press the TAB key on the keyboard to tab through for the change to take affect.

4. Delete registered database identifier key
  1. Open SSMS (SQL Management Studio).

  2. In the AEDB database, go to the table pmo_SyncConfiguration.

  3. Right-click the table and select edit top 200.

  4. Delete the row with the registered_database_identifier key.

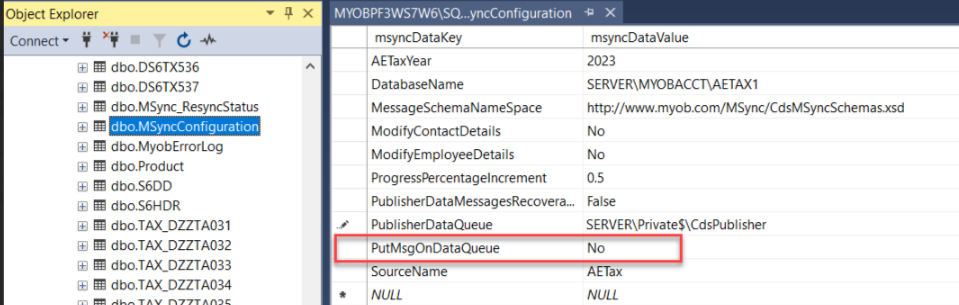
  5. PutMsgOnDataQueue to ‘No’

    1. Open SSMS (SQL Management Studio).

    2. In the AETAX database, go to the table dbo.MsyncConfiguration.

    3. Right-click the table and select edit top 200.

    4. Make the field PutMsgOnDataQueue = No

  6. DeleteMSYNC_Triggers 3 1.sql

    1. Open SSMS (SQL Management Studio).

    2. Run the attached 'DeleteMSYNC_Triggers.sql script against AETAX database.

5. Pre-configuration and MYOBAE Data copy

Standalone install pre-configuration

  • Create MYOBAE folder on C:\ drive

  • Copy the data folders from old PC into C:\MYOBAE folder

  • Create AESQL folder inside MYOBAE and continue from Step 6.

Network install pre-configuration

  • Create the S6SYSTEM (can keep the existing sharename instead of S6system).

  • Create MYOBAE\AESQL folders under S6System

You will need to create a S6SYSTEM directory to store MYOB AE program and data files. This can be located anywhere on the server machine, or on another machine. You will need to refer the installer to this location later.

  • S6SYSTEM must then be shared and mapped as a network drive on the server and all workstations.

  • You will also need to create MYOBAE folders under S6SYSTEM and an AESQL folder under MYOBAE. This is so you end up with S6SYSTEM\MYOBAE\AESQL folder paths.

If this is a network setup: you must then share the S6SYSTEM folder before proceeding to install MYOB AE. The share and all subfolders must have full control allowed for the Everyone group. Consult your IT provider if unsure on this process.

6. Copy Document Manager and Intranet File Stores

If using Document Manager, you will need to copy across your Document Manager File Store (DMFS) and Intranet Data folder. For information, refer to KB 23595: Backing up MYOB Document Manager files for information.

·All documents must be checked in prior to copying data. For details, refer to KB 23570: Viewing a list of all checked-out documents.

You can copy the Document Manager File Store (DMFS) to where you want it.

Intranet File Store

·        The Intranet File Store folders must be copied to the default location M:\MYOBAE\AESQL\Knowledge Management\Intranet\Data (Where M:\ is the mapped drive for S6SYSTEM share). You will have to first manually create folders for Knowledge Management\Intranet\Data under the AESQL folder.

If you copy over the Databaselookup.XML file that exists in both your DMFS and Intranet Data folder, you'll need to delete both XML files before you run the installer. If you have multiple MYOB AE databases, you may also have multiple file stores. Ensure these are brought across as well. For example, DMFS_AEDB1, DMFS_AEDB2.

7. Copy System Release folders
  • Copy the SOL64 folder to the new M:\MYOBAE\AESQL folder (Where M:\ is the mapped drive for the S6SYSTEM share) on the new server. Then rename the SOL64 folder to TAX.

  • If you're using Corporate Compliance, you'll also need to copy the ELS folder.

8. Install MYOB AE

Check what version of MYOB AE is installed on the old server and download that version from my.myob.com.au. When the download is complete, install that version of MYOB AE.

If you have copied the MYOBAE folder from the old machine to the new machine as part of the install, please ensure you rename the AESQL\Registration folder to Registration.Old. If you fail to do this, you will receive an error "License not valid for this computer" when using AE. To resolve, you will need to reinstall and redo the migration. 

For sites where the S6SYSTEM share is located on a file server and SQL is installed on a SQL server, MYOB AE needs to be installed on the SQL server. Make sure you map the S6SYSTEM share on the SQL server before running the installer.

During the MYOB AE install you'll be prompted:

  • The MYOB AE Installation Wizard opens. Select the Accept the License Agreement option and click Next. The wizard continues. The installer does a system check to ensure that your system meets the necessary requirements, and if OK, takes you to the Setup type selection.

  • Select Network or Standalone, as applicable and click Next. The wizard continues.

  • Select Existing data and click Next. The wizard continues.

  • Select Migration option from the wizard and click Next

  • For the Program file location of the MYOBAE folder. Select the path created earlier. For example, M:\MYOBAE (where M is the mapped drive for S6SYSTEM share)

  • Select your applicable products as noted before from pre-checks including Profiles to Practice Manager Integration and contact us to obtain the registration code.

If you are installing outside of Support hours, then click Temporary to complete the registration at another time. This will allow ONE user access for only 7 days until you register.

  • Enter a valid Registration Code for the displayed serial number & Number of users. The message "You have registered the following products successfully" appears.

  • Click Close. The registration process is complete.

  • The wizard continues and Select Yes for “Is your practice currently using SQL Server for AE Tax?”

  • You will be prompted to select your SQL instance (i.e. SERVER\MYOBACCT where SERVER is the server name) and click Next, the wizard continues.

  • Select Accountant Enterprise database i.e. VPMSER or AEDB1 and click Next to continue the process.

·        Review all information to ensure it is correct from Ready to install screen, then click Install Now.

The required software components are now installed. This takes between 30 minutes to 1 hour, but may take longer depending on the machine, and may require the computer to be restarted one or more times.

If you've licensed for Document Manager: at the end of the install, you will be prompted with the MYOB AE Document Manager File Store setup configuration menu. If your DMFS is on a remote server, deselect the run DM_Config.exe checkbox. You'll need to run the DM_Config.exe file on the DMFS machine from the location noted in the installer.

When pointing to the DMFS location, you must point it to a local path rather than a mapped drive.

  • At the end of the installation, a message about Open File warnings appears. Click OK.

  • Click the Finish button. The installation is complete.

System Release folder paths

  1. Open System Services.

  2. From within System Services, right-click on AETAX1 folder in the list and select Properties. The General tab of the Folder properties window appears.

  3. From within the General tab of the Folder properties window, press the TAB key to refresh.

  4. Click OK.

Add the following string in the Registry

Go to “HKEY_LOCAL_MACHINE\SOFTWARE\WOW6432Node\MYOB\MYOBACCT Server” - Add String 'BYPASS_ACCOUNTS' registry key with a Value 'Yes'

Refresh System Services Links

  • Check that you can generate an estimate for each tax year from 2005 to the current Tax year. If you can successfully generate a tax estimate, skip this step. If nothing appears, the system services links needs to be refreshed. See KB 28980: Refreshing the System Services links in AE Tax.

  • Update SA Password in Control Record for Tax Letters and update Create/Update views

  • Open up a 2007 or later Tax return and follow the menu path Utilities > Control Record > Defaults. Enter the SQL password then press the ENTER key on keyboard twice to save.

  • To take effect, the ENTER key must be used. This password is used for Tax Letters.

  • Open a 2007 or later Tax return and follow the menu path Tax Letters > Create/Update Views and then press OK.

  • If using a Proxy Server, configure the Proxy.Config file.

  • For information on configuring the Proxy.Config, see KB 36833: Configuring my Firewall or Proxy to work with MYOB AE/AO.

9. Install MYOB Accountants Enterprise 8/6 Series
  1. Copy the series DATA folder into S6System share, find ae_tax.ini file in the DATA folder and rename that file to ae_tax.ini.old

  2. Run the Series 6/8 Full Installer (6.51 or 8.35)

  3. Then see the installation guide and details downloaded as per Step 2 above, ensuring you install to the program directory created earlier. E.g., M:\MYOB

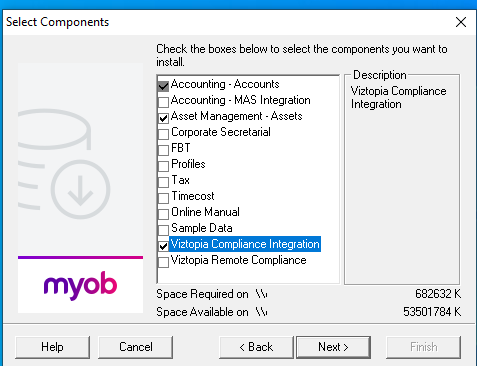
  4. On select Components window – Select Accounts, Assets, Viztopia Compliance Integration

  5. Click Next to proceed.

  6. Mostly this installer fails with 'Workstation didn't complete successfully' message. Continue with the error messages.

    1. To fix we have to change 'Installed Component' in Module.ini (which is located in M:\MYOB\Bin’ folder where M is the mapped drive) to 65592. Eg: INSTALL_COMP=65592.

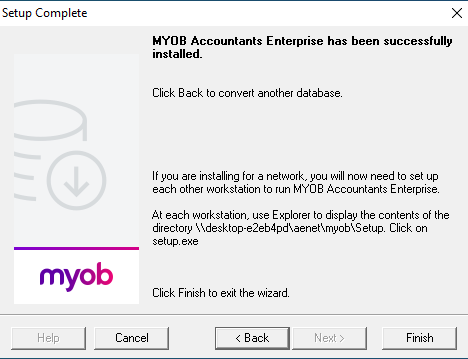
  7. Now Re-run MYOB AE series installer to complete the setup, for a successful installation.

  8. Clicking the Finish button the wizard should automatically resume with the Choose Database window listing the databases which were last upgraded.

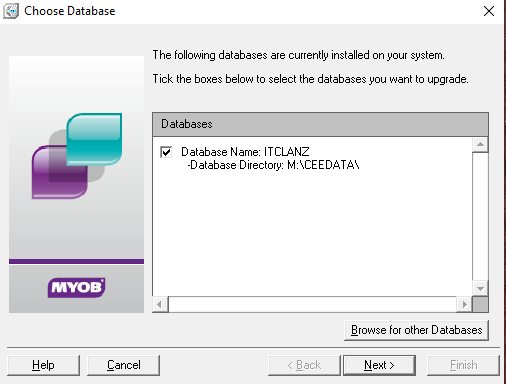
Series Database Setup

On the Choose Database window, tick the checkboxes against all the databases

to be upgraded.

If all your existing databases are not displayed, click Browse for other Databases and locate the folder that contains the database files.

  1. Click Next and the Database Setup Confirm window appears. Confirm that the details of the database to be upgraded are correct.

  2. Click Next and the Database Backup window appears. Select No, database(s) have already been backed up as you have performed

online and offline backups in the Pre–installation phase.

  1. Click Next and the Database Upgrade window appears with a progress bar indicating how the upgrade is progressing.

  2. Click Finish to close the database upgrade. The install starts configuring the AE Tax Components. A number of message windows track progress.

Note: This process may take time and appear to and appear to hang. Do not interrupt this process.

The Database Setup message confirms the process has completed successfully.

10.Update Module.ini file

Open your module.ini located in your installed folders BIN folder e.g. M:\MYOB\bin

  1. In the [DB_1] section at the end before the next section add the line VizIntegrated=1 as per example below:

    [OpplockChecking]
    SERVERNAME=True
    [DB_1]
    Name=Current
    Dir=\\SERVERNAME\myobdata\DATA\MYOB\
    Group=0
    TimeCost_DB_Type=ACCESS
    DbAccessType=UNKNOWN
    Expand_Usage_Level=80
    Expand_By=20
    BackupDirectory=\\SERVERNAME\myobdata\DATA\MYOB\backup\Group0\
    BackupDataFileName=backup.accdb
    RecvTax=\\SERVERNAME\myobdata\DATA\MYOB\recvtax\
    VizIntegrated=1
    [Database_Mappings]
    \\SERVER\myobdata\DATA\MYOB\Group0=DB_1

  2. Save and close

To Check the Config table in the CDS.DIR

  1. From the Windows desktop, follow the menu path: Start > Programs > MYOB Accountant Enterprise > DataSafe. The DataSafe Utilities window appears.

  2. Click Support Tools. The Solution6 Database Utilities window appears

  3. From the Other Utilities section, select the following from the drop down menus provided:

    Utility: Dbed - Edit Database
    Database: Database Directory (CDS.DIR)
    Client: No client (Practice file)
    Copy: Home
    Arguments: -t~

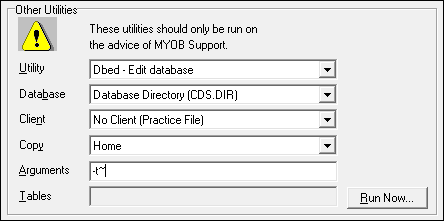
  4. Click Run Now. The MS DOS window appears.

  5. At the command line, type s config and press ENTER on the keyboard. The contents of the config table display.

  6. The config table in the CDS.DIR file of the current year Compliance Database should contain the line 0~VIZ~ and NOT contain the line 0~HVZ~.

Enter the following commands (in bold) into the command window:
d config with product(hvz) then press Enter - this removes 0~HVZ~
s config then press Enter - this will display that 0~HVZ~ does not exist
u config then press Enter and the cursor will drop to next line ready for data entry
0~VIZ~ and press Enter
. and press Enter - saves changes
s config then press Enter - this will display that 0~VIZ~ exists
q and press Enter - this will quit the DBED

11.Update Series Registration

Browse to M:\myob\bin\regiser.bat and Register the modules Accounts, Assets and Viztopia Compliance Integration, contact MYOB support for assistance to update the license using the internal tool.

12. Install Reporter if required
  1. Install Reporter 3.5

  2. Install Reporter workstation setup from M:\MYOB\Setup\reporter Integration\setup.exe

This install lays down a required DLL file. If you have customised your masters these will need to be copied over from the installed location off the old server so you retain changes.

13.If using AE Assets

Download the latest version of MYOB Assets from the my.MYOB website and install as per the installation guide

14. Update Corporate Compliance paths

If licensed for MYOB AE Corporate Compliance, you will need to choose a new CC Backup and ELS location.

To choose a new CC Backup location

  1. On the server, navigate to C:\Program Files (x86)\MYOB\Corporate Compliance\Utilities

  2. Open Backup.bat and go to Settings on the left, under Backup and Restore.

  3. Click the Change button in the bottom right and navigate to your new CC Backup location. Press OK and close Backup.bat.

To choose a new ELS location

  1. After you've chosen a new CC backup location, from within the Utilities folder, locate and open CCUtilities .exe.

  2. On the left under Settings, click on Electronic Lodgment Path.

  3. Click the Change button and navigate to your new CC ELS location. Press OK and close CCUtilities .exe. Your Corporate Compliance is now updated to the new server paths.

You’ll now need to log into AE and update your connection details

  1. Open MYOB AE and log in.

  2. Once you're logged into AE, follow the menu path Maintenance > Corporate Compliance > Settings.

  3. Ensure the server name and database are correct, then click Update connection details to ensure the settings are saved.

15. Copy MYOB AE templates and documents
  1. Copy across the templates, styles and documents copied from the old server as per step 1 into your new server.

  2. Open MYOB AE and follow the menu path: Maintenance > Maintenance Map > Documents section.

  3. Ensure all the paths at task one correctly match the locations on the new server. If required, change these paths in the software to match the files' location.

16. Disable and stop MYOB Practice Services on the old server/standalone

Make sure you've disabled the following services from the old server so the users don't access the data from the old server.

  • MYOB DM Portal Sync Service

  • MYOB OnTheGo API Service

  • MYOB Sync Client Service

    • MYOB Tax SBR Sender Server (VPMSER) (where VPMSER is the name of your database). If you have multiple databases, you'll see multiple instances of this service. Make sure you've disabled and stopped all the services.

Follow the steps below to disable and stop the services

  1. From the desktop of your Server or Standalone, press and hold the Windows key and R on your keyboard. 

  2. In the Open field, enter services.msc and click OK.

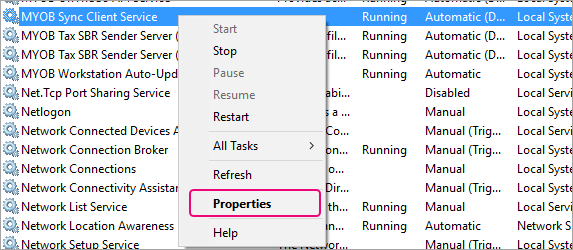
    1. From the list of Services, locate the service you want to disable and stop. For example, MYOB Sync Client Service.

  3. Right-click the service and select Properties.

  4. In the Service Properties window, select Disabled in Startup type. Click OK.

  5. To stop the service, right-click on the service and select Stop. The service will show Disabled and the Status column will be blank.

Final Setup Processes

Following the successful migration of MYOB AE to the new server, there are a couple of things that need to be completed post install:

  1. Download and apply any software updates as required from my.MYOB.

  2. Log into MYOB AE and navigate to Maintenance > Backup > Schedule Backups and set up the backup cycle.

  3. Perform a backup now via Maintenance > Backup > Backup Now to kick off scheduled tasks being active.

  4. Schedule a Backup for Corporate Compliance. Refer to KB 36065: Scheduling a backup in Corporate Compliance for information.

  5. Ensure integration is running correctly:

PMPlus - From MYOBAE follow the menu path Maintenance > Tax > Settings and ensure all settings are correct. Where incorrect, use the Edit Connection details button on the TASKS bar to correct the settings. Once completed, click Connect To Tax Database.

Run a workstation install as per the relevant section below:

Network setup:

If using existing workstations, uninstall any of the following that appear on the workstation:

  • MYOB Accountants Enterprise Assets

  • MYOB Accountants Enterprise Client

  • MYOB Accountants Enterprise Reporter Integration (Workstation)

  • MYOB AE Reporter Integration Workstation

  • MYOB Corporate Compliance

  • MYOB Document Manager Workstation

  • MYOB Intranet Workstation

  • MYOB PDF Manager

  • MYOB Registration Workstation

  • MYOB System Release Workstation

  1. Map the network drive from new Servername\Share.

  2. Run the combined Workstation setup located at M:\MYOBAE\AESQL\WorkstationInstall\setup.exe. Refer to KB 37154: Running a combined workstation installation or uninstallation for Accountants Enterprise for details.

  3. Run the “ Regkey Updates Pre Accounts Wkstn Install 1.reg ” 

  4. Run Series workstation install as per below:

Browse to M:\MYOB\SETUP and double click on the setup.exe file. This will start the workstation installation. At the end of the installation process ensure the workstation is restarted.

The workstation installation needs to be done on each workstation.

If the workstation is a pre-existing workstation you will need to amend the ceedata.ini manually post workstation setup or copy it from c:\windows off the new MYOB SQL server.

This can be located in different locations depending on your environment.

For windows 8, 8.1, 10, 11: C:\windows and C:\Users\user\AppData\Local\VirtualStore\Windows

For Terminal Server each user will have their own under %USERPROFILE%\Windows folder

If you're using...

To set up Practice my.myob settings:

  1. Log into MYOB AE as an Administrator user and follow the menu Maintenance Maintenance Map > Online Practice my.MYOB settings.

  2. Enter your Practice my.MYOB loginpassword and MYOB client code in the relevant fields.

Make sure the Practice my.MYOB login that you enter is the same Practice my.MYOB login used on your old server. This login must have web administrator access on the my.MYOB website.

PLS setup:

Before you can set up PLS, you'll need to complete the steps in Update Practice my.MYOB Settings above.

If you're using...

To set up PLS...


CloudAUTH

Ensure you run through the onboarding process again after the migration to register your new SoftwareID with Access Manager. For steps, refer to the help centre topic: Lodgement manager setup


Set DataSafe backup on server

For details of how to set DataSafe backups on the server see KB 26191: Scheduling DataSafe to back up one or more databases.

Symptoms you may experience after the MYOB AE migration:

If any error messages appear after the migration of MYOB AE, a list of possible explanations is provided below:

  • The configuration settings in the program and data directories may have been set incorrectly in the ceedata.ini file.

  • A non-certified environment may have been used for the new workstation.

  • A blank database path may have been selected during the database conversion process.

  • An incorrect path has been selected for the program installation for example instead of selecting M:\MYOB as the program directory you may have selected M:\MYOB\BIN.

  • The database conversion process may have not completed successfully.

  • The licence was copied over accidently resulting in invalid licence or your licence file is not valid for this computer.

  • The installed location e.g., MYOB\bin was copied over resulting in numerous errors about old server paths.

Post-Migration FAQs

KB 36044: Error: Lock violation when opening System Release products

KB 34036: Error: "S6DB32.dll is an old version" or "S6DB32.dll is missing"

KB 34288: Document links not opening after a server migration or when your DM File Store is moved

KB 29794: Error: "Your licence file is not valid for this computer" or "License file invalid". Please contact MYOB support"

KB 36833: Configuring my Firewall or Proxy to work with MYOB AE/AO

JavaScript errors detected

Please note, these errors can depend on your browser setup.

If this problem persists, please contact our support.