Skip table of contents

Stage Three—Create billing paragraphs

Practice Manager only

In this stage of the Billing Wizard you can customise the text—billing paragraph—that is displayed in the bill. Once a draft bill is created the bill paragraphs can be further defined using Bill Paragraphs 

 on the Billing Main page. See Defining billing paragraphs.

To create billing paragraphs
  1. Complete Stage Two—Add bill amounts in the Billing Wizard.

  2. Click Next. The Stage ThreeCreate Billing Paragrahs window opens.

  3. Select the required amount of detail from the Print Line Detail drop-downs. Your user settings, taken from the last time you raised a bill, are displayed by default.

    When a new selection is made a message will ask you to confirm your action. Once confirmed the billing paragraphs regenerates.

    The four Print Line Detail drop-downs enable you to determine the amount of detail displayed for the various transactions you are billing: Time, Disbursements, Miscellaneous and Estimate. See The Bill Amounts window for more information on the options for each transaction type.

  4. Select the paragraph from the table at the top of the window. The text is displayed in the edit section under the Paragraphs table.

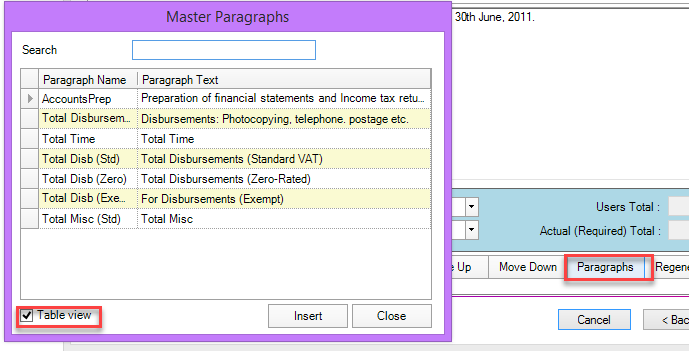
  5. Click the Paragraphs column. The Master Paragraphs window appears.

  6. Select the Table view checkbox to view all the master paragraphs.

  7. Enter or edit billing paragraph text in the edit section.

  8. Format the text using the formatting options on the toolbar. All the usual options are available to change the colour and font or apply bold text, italics or underlining.

  9. To add a new paragraph to the list, select the existing paragraph line that you want to precede the new line and click the Add button.

  10. Click Next to go to Stage FourSet billing address where you can enter the billing address and check other details.

    Go to Stage Four—Set billing address.

To create billing paragraphs by copying
  1. Complete Stage Two—Add bill amounts in the Billing Wizard.

  2. Click Next. The Stage ThreeCreate Billing Paragrahs window opens.

  3. Search for the bill paragraph to be copied. This can be done in a number of ways:

    • Click This Client. The Posted Bills window opens listing previous bills for the current client.

      All posted bills for the client you are currently billing are listed. Find and open the bill content you want to copy.

    • Click Other Client. The Find Client window opens.

      Find and open the client whose bill content you want to copy. All posted bills for the selected client will be listed.

    • (AE) Click This Assignment. This button is only available if the Billing Wizard is accessed from the Assignment Details page. The Posted Bills window opens.

      All posted bills for the assignment you are currently billing will be listed. It will show the bill date and number, and the write off and billed amount.

      Search for the assignment with the bill content you want to copy.

    • (AE) Click Other Assignment. This button is only available if the Billing Wizard is accessed from the Assignment Details page. The Find Assignment window opens.

      Search for the assignment with the bill content you want to copy.

      Once selected, the Posted Bills window lists all posted bills for the selected assignment. It will show the bill date and number, the write off and billed amount.

  4. Click a bill entry to display the paragraphs contained in it.

  5. Copy one or more paragraphs to the current draft bill by dragging and dropping. Include multiple paragraphs by pressing [Ctrl] while selecting the particular paragraphs.

    To copy the whole contents of the bill, select all paragraphs in the Print Line Text column. These will be added as new paragraphs which you can append to an existing paragraph by holding [Shift] while you drag them to the draft bill.

    You can replace the existing paragraph text with new paragraph text. Highlight the new paragraph text and drag the arrow over the existing text you want to replace.

    Only the text of paragraphs is added. The values from the Amount or Tax fields must be entered manually after you have copied the paragraphs.

  6. Reorder the billing paragraphs if required by clicking Move Up and Move Down. These are located at the bottom of the Create Bill Paragraphs window.

  7. Click Next to go to Stage Four—Set billing address.

    Go to Stage Four—Set billing address.

JavaScript errors detected

Please note, these errors can depend on your browser setup.

If this problem persists, please contact our support.