
You can use the Mail Merge Wizard to send bulk emails to clients.
-
You're able to send an email only, attach a standard document such as a newsletter or checklist or create a document based on a Word template; for example, a debtor statement.
-
You have a record of the email stored in Practice Manager which you can access at any time. These can be accessed from the Client page > Documents tab.
-
You can send emails to the primary email address or invoice email address (AE/AO) or a custom email address (AE). New Zealand AO Tax sites can send emails to a Tax email address.
Stage 1—Select your clients and launch the Mail Merge Wizard
To select your clients and launch the Mail merge wizard:
-
Choose your relevant option:
-
For a client merge, in the toolbar, click Contacts. The Find Clients page opens.
-
For a contacts merge, in the toolbar, click the Contacts drop-down and choose Open > Contacts. The Find Contacts page open.
You have a number of ways of creating this list:
-
|
Help topic |
Link to help topic |
Use |
|---|---|---|
|
Reports |
|
|
|
Append to Search |
|
|
|
Mail Merge lists (AE) |
|
Stage 2—Work through the mail merge wizard
Step 1—Select the mail merge method for emails
Don't close Outlook while sending emails. If you close Outlook during the mailing process, see Troubleshooting email issues.
-
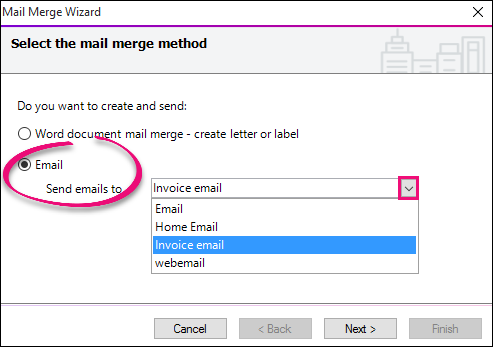
From the Mail Merge wizard window, select Email.
-
Click the drop-down to select the Send emails to email type.
-
Click Next. The email addresses of the selected clients and contacts are verified. If any clients or contacts don't have an email address or the email address is invalid, an error window appears listing the number of clients that don't have a valid email address.
-
Either:
-
Click Continue to go to the next stage. The listed clients or contacts will not be sent an email.
-
Click Cancel to exit the Mail Merge Wizard and enter a valid email address before restarting the mail merge procedure again.
-
Step 3—Confirm the email details
-
If needed, change the Email subject.
-
If you want to attach a file to the email, select one of the options:
-
If you click the Create and attach a Word document to this email checkbox, you select the Microsoft Word template to attach to the email in the next window.
-
If you select the Attach a file to the email checkbox, click the ellipsis to find and select a file and click Open to select the file attachment.

If you don't select a checkbox, an email will be generated based on the email template you selected.
-
-
In Email address to be sent from, if you want to change the email, click the drop-down and select a new email.
Emails in this list are retrieved from your Microsoft Outlook profile. We’ll remember the most recent email you selected. -
To configure the shared mailbox settings, click Configure a shared or delegate mailbox. The table in this window contains a list of manually-configured shared mailboxes.
To create a new shared mailbox:-
Enter a name in Shared mailbox/On behalf of (for example, accounts@myob.com).
-
In Send using, select an email from the drop-down to assign an email to the shared mailbox (for example, username@yourpractice.com).
-
To save the entry, press [Enter]. The entry appears in the Email account drop-down.
After creating the new shared mailbox entry, you will need to select the account in the Email account to be sent from section.
-
To delete a shared mailbox entry, highlight the row and press [Delete].
-
After creating the new shared mailbox entry, you will need to select the account in the Email account to be sent from section.
-
-
Click Next.
Step 5—Select the address to use (if applicable)
The Mail Merge Wizard—Select the address to be used opens only if you ticked the checkbox Create and attach a Word document to this email.
Here you select the address types to be used and their order.
The default is your primary address type; usually the postal address. You can be change this by selecting another available address that becomes the first address in the list. The system uses this address first. If this address doesn't exist for the client, the system default address will be used.
You cannot remove the system default address.
You can add several address types to the Address list. The first address found for each client will be used.
-
In the Available panel, select the address type required for the email.
-
Click the right arrow

-
Click Next.
Step 6—Select the contact precedence
Here you select the associated contact type to be used and the sequence. You can select to send the Word document or email to someone in the company.
For example, to send a letter or email to someone in the company that has an association type of has Mailing Contact or has Director, the system addresses the letter or email to each contact that has this role (multiple letters or emails will be sent).
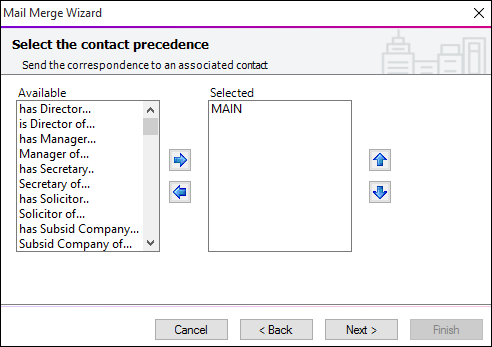
The default is the Main contact, who is the client or contact selected from the Find Clients or Find Contacts list.
If you are not using has Mailing Contact under Associations, leave the value as default and click Next to continue.
-
You can add several association types to the contact list. The first association type found for each client will be used.
-
If no contacts are found with any of the selected association types, the letter or email will be sent to the Main contact.
If you selected an association at this contact precedence stage, the following merge fields are to be taken from the associated contact and not the main selected client:
-
Select the contact precedence required as the addressee from the Available panel if not using the Main contact name.
-
Click the right arrow. The contact type to the Selected panel.
If a number of Available contact precedence types are selected they can be ordered in the list with the up and down arrows.
-
Click Next.
Step 7—Save the email to client's documents
Here you apply the system defaults.
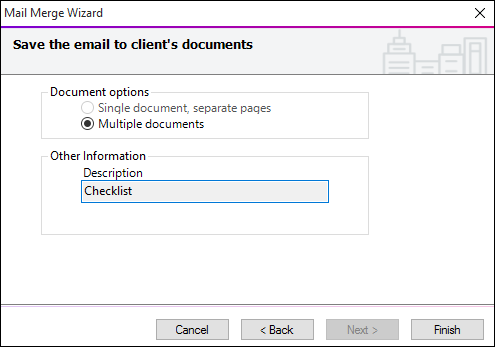
Document options are set to Multiple documents and can't be changed.
Under Other information, the Description comes from the Email Subject.
Run into any issues? See Troubleshooting emailing issues.