MYOB provides a Migration Service. If you have any doubts or concerns about completing this migration yourself, please contact your local MYOB office and arrange for one of our Consultants to perform the migration for you. This service may require a booking, so please plan well in advance.
It is important that someone who is competent with the Microsoft Windows operating system manages the migration.
If you experience issues with MYOB software after following the instructions below, additional assistance on your migration may fall outside of the terms of your Sales and Service Agreement.
Migrating just the SQL database
How to migrate only the SQL database
To migrate just the MYOB Practice Management SQL database, you need to:
Backup the VPMSER database on the old SQL server.
Restore the VPMSER database on the new SQL server and run the create user script.
Change the lookup.xml to point to the new SQL server for example C:\Program Files\MYOB\Central\Deploy.
Install integration on the new SQL server. Refer to the attached integration documents for your relevant integration platform:
1. Have a reliable backup of the Practice Manager database
It is important to ensure that you have a complete and reliable backup of the Practice Manager Database. You need to do this before you attempt to move or copy data to your new file server. You can perform the backup of the database through SQL in Management Studio, Enterprise Manger or MSDE backup and restore utility. Save the backup in .bak format.
Check the System Requirements and Certified Environment Roadmap on the MYOB Support website to ensure that the environment of the new server is certified. Refer to the System Requirements link for further information.
Ensure the operating system of the file server has the latest service pack that has been approved.
3. Check the Data Execution Prevention (DEP) setting on the server
Check the Data Execution Prevention (DEP) setting on the serveThe DEP setting needs to be set to turn on DEP for essential Windows programs and services only for installations on Windows servers. If you are required to change the setting, you will need to reboot the server for the setting to take effect.
4. Confirm Internet Explorer Enhanced Security Configuration is turned off
Follow the menu path: Start > Control Panel > Programs and Features. The Programs and features window appears.
Click the Add/Remove Windows Components button. The Windows Components Wizard appears.
Scroll through the Components list until you locate Internet Explorer Enhanced Security Configuration and untick it if it is ticked. Internet Explorer Enhanced Security Configuration is now deselected.
Click Next. Internet Explorer Enhanced Security Configuration is removed.
5. Copy the Practice Manager billing templates to the new server
To find the location of the billing templates on the old server, log into AE PM and follow the menu path Maintenance > Documents > Documents Styles. All the templates that have a tick in the enabled column are the ones being used by the practice. Take note of the path so the templates can be copied to the new server.
The templates can be copied to the share that has been created on the new server, however, after AE PM has been installed you will need to go back to Document Styles to make sure the paths are correct.
6. Copy the Practice Manager documents to the new server
To find the location of the documents on the old server, log into AE PM and follow the menu path Maintenance > Documents > Documents Creation Settings. The Algorithm column shows the location of where the documents are stored. Take a note of these locations so the documents can be copied across.
The new server must have a drive mapping exactly as it is on the old server, otherwise scripts will need to be written in order to be able to access the documents.
In the AEDB database, go to the table pmo_SyncConfiguration.
Right-click the table and select edit top 200.
Delete the row with the registered_database_identifier key.
10. Install Practice Manager and confrim you can log in
Please download the latest release of AE Practice Manager, available from the Product Downloads page, Australia or New Zealand and refer to the installation guide to complete the installation. Once installed, confirm you can log in successfully.
If any installation hotfixes were previously installed you need to re install them. Also refer to the Product Downloads page for the latest hotfixes.
11. Check the paths in the configuration table for Tax, MAS and Contacts
Open AE PM and go into the configuration table to check that the paths for Tax, MAS and contacts are pointing to the correct location.
13. Install Tax Smart Reports if using an SQL Tax database
The Tax Smart Reports install is available from the AE Tax installation image as per above. Please read the install guide before installing.
14. Check you can access all the documents and invoices
Open AE PM and open a client. Go to the Documents tab and ensure you can open documents.
Also go to the Bills tab and ensure you can open invoices.
15. Schedule SQL Backup
Schedule a backup of the Practice Manager SQL database within PM. To do this follow the menu path Maintenance > Backup > Schedule Backups.
16. Test Practice Manager
Integration is working: Open up Practice Manager, select a client, make sure you can change the name and that it flows through to Tax.
Launch Tax from the Tax Returns tab: Select a client, click on the tax returns tab, double click a tax return and make sure they open.
Run a report from Smart Reports
17. Uninstall and reinstall workstation setups
Ensure you remove the MYOB AE client via control panel->programs and features.
Then re-install the AEPM workstation setup by running \\SERVERNAME\centralclient\setup.exe in START->search programs and files.
Where SERVERNAME is your servers name
18. Disable and stop MYOB Practice Services on the old server/standalone
Make sure you've disabled and stopped the following MYOB Practice Services.
MYOB DM Portal Sync Service
MYOB OnTheGo API Service
MYOB Sync Client Service
MYOB Tax Manager Service
MYOB Tax SBR Sender Server (AODB1) (where AODB1 is the name of your database). If you have multiple databases, you'll see multiple instances of this service. Make sure you've disabled and stopped all the services.
Follow the steps below to disable and stop the services
From the desktop of your Server or Standalone, press and hold the Windows key and R on your keyboard.
In the Open field, enter services.msc and click OK.
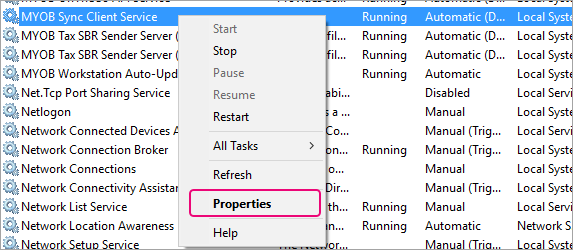
From the list of Services, locate the service you want to disable and stop. For example, MYOB Sync Client Service.
Right-click the service and select Properties.
In the Service Properties window, select Disabled in Startup type. Click OK.
To stop the service, right-click on the service and select Stop. The service will show Disabled and the Status column will be blank.
JavaScript errors detected
Please note, these errors can depend on your browser setup.
If this problem persists, please contact our support.